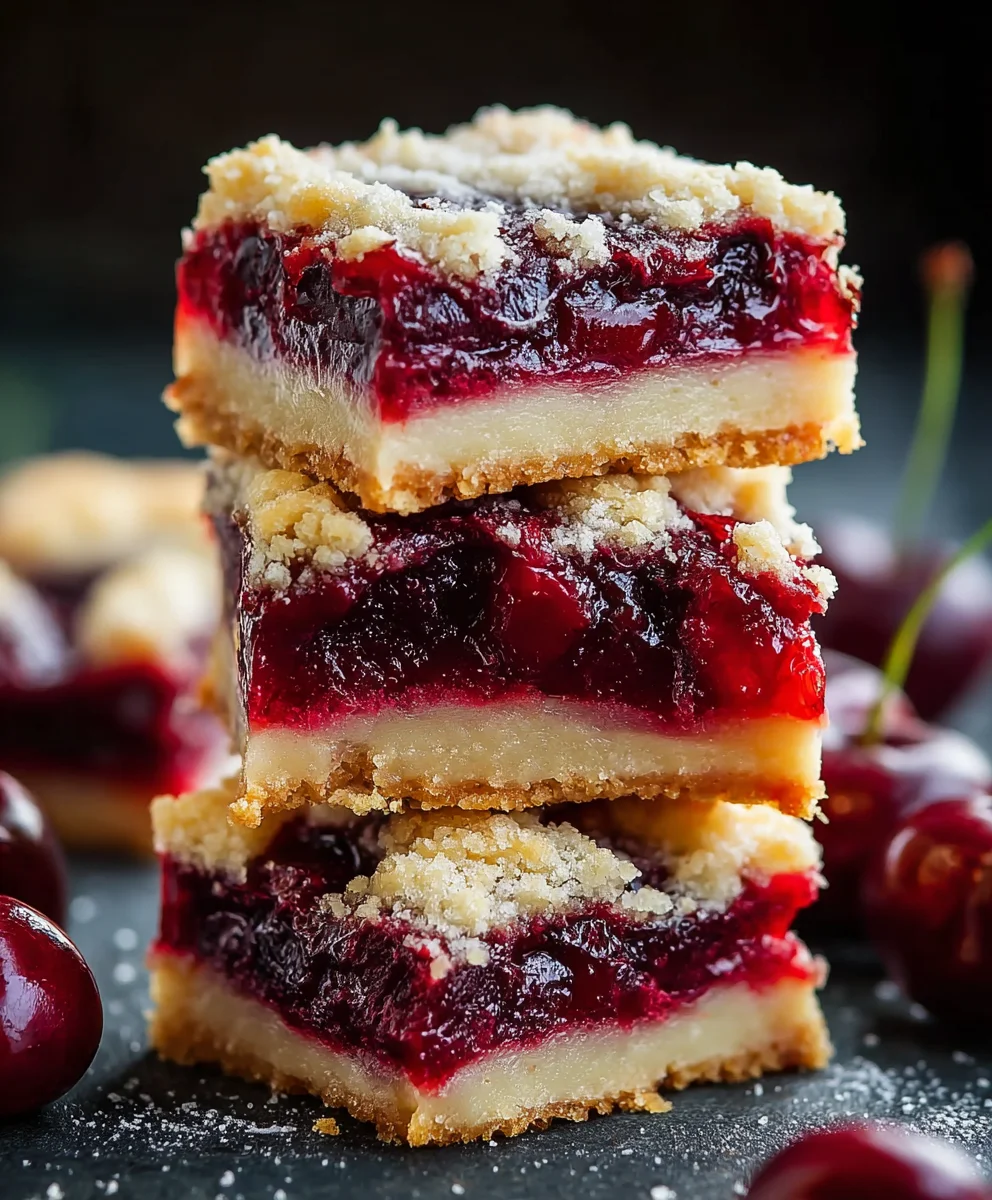
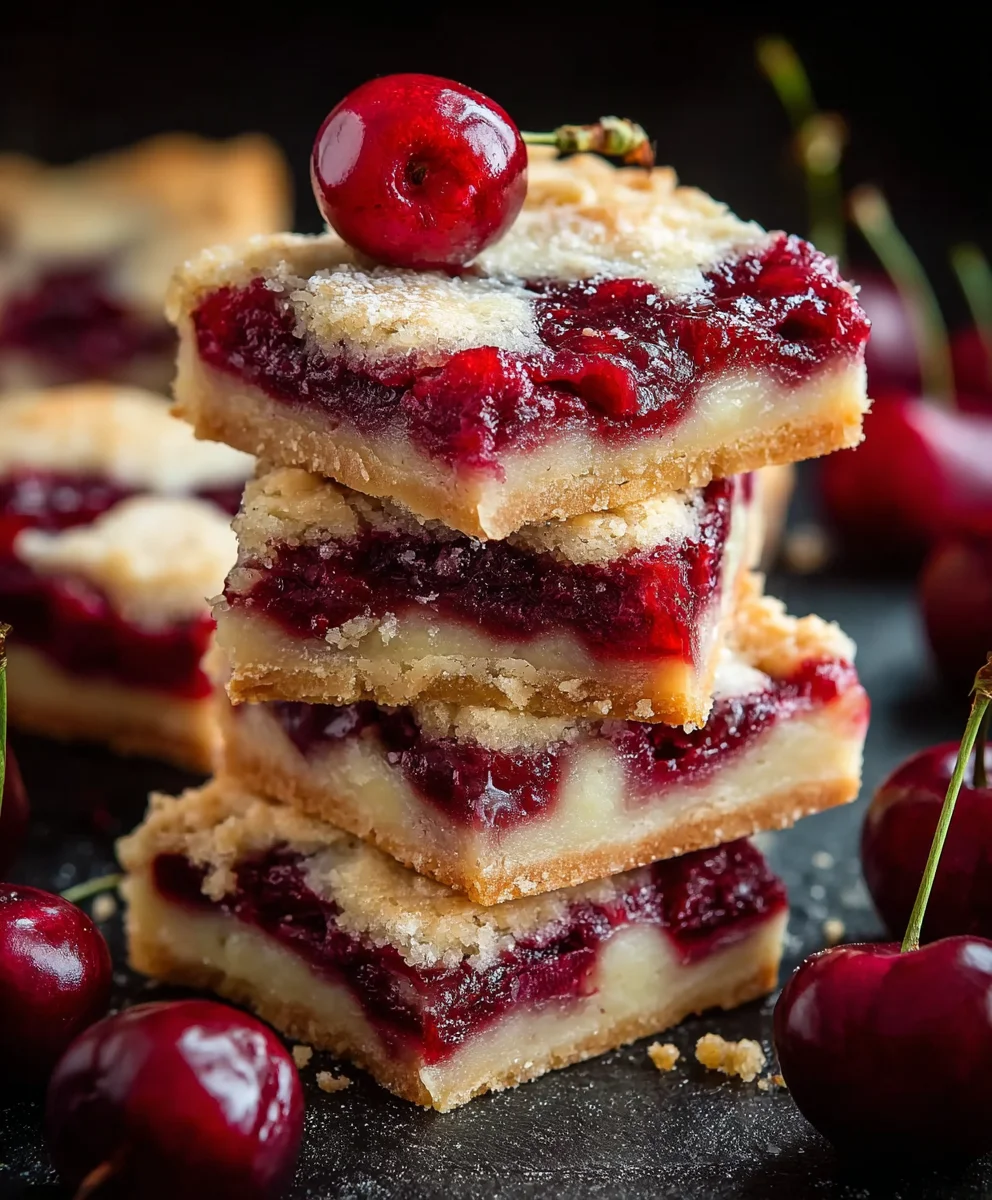
Easy Cherry Pie Bars-Delicious & Simple Dessert
Easy Cherry Pie Bars are the ultimate crowd-pleasing dessert that perfectly captures the nostalgic comfort of a classic pie without all the fuss. Imagin extracte sinking your teeth into a buttery, shortbread-like crust, giving way to a luscious, slightly tart cherry filling, all topped with a delightful streusel. It’s no wonder these easy cherry pie bars have become a go-to for bake snon-alcoholic ales, potlucks, and simple weeknight treats. What makes them so incredibly special? It’s the effortless assembly that delivers all the beloved flavors and textures of traditional cherry pie in a convenient, portable, and undeniably delicious bar form. Forget wrestling with pie dough; this recipe is designed for maximum flavor with minimal effort, ensuring everyone can enjoy this sweet sensation.
Ingredients:
- 1 cup (2 sticks) unsalted butter, softened to room temperature
- 2 cups granulated sugar
- 1 teaspoon fine sea salt
- 4 large eggs, at room temperature
- 1 teaspoon pure vanilla extract
- ¼ teaspoon almond extract
- 3 cups all-purpose flour
- 2 cans (21 ounces each) pre-made cherry pie filling
- 1 cup confectioners’ sugar (also known as powdered sugar or icing sugar)
- ½ teaspoon pure vanilla extract
- ½ teaspoon almond extract
- 2-3 tablespoons 2% milk
Making the Cherry Pie Bar Crust
Mixing the Dough
In a large mixing bowl, cream together the softened butter and granulated sugar until the mixture is light and fluffy. This process incorporates air, which will contribute to a tender crust. You can use an electric mixer for best results, starting on a low speed and gradually increasing to medium-high. Scrape down the sides of the bowl occasionally to ensure everything is evenly incorporated. Once you have a well-combined, creamy mixture, gradually add the salt.
Adding Wet Ingredients
Next, add the room-temperature eggs, one at a time, beating well after each addition until fully incorporated. This gradual addition helps emulsify the mixture. Now, stir in the 1 teaspoon of vanilla extract and the ¼ teaspoon of almond extract. These extracts will infuse the crust with a wonderful aroma and a subtle, complementary flavor to the cherry filling.
Incorporating the Flour
With the mixer on low speed, gradually add the all-purpose flour. Mix just until the flour is incorporated and no dry streaks remain. Be careful not to overmix at this stage, as overmixing can develop the gluten in the flour, leading to a tougher crust. The dough will be quite thick and may resemble a very stiff cookie dough.
Assembling and Baking the Bars
Preparing the Pan and Dough
Preheat your oven to 350°F (175°C). Lightly grease a 9×13 inch baking pan, or line it with parchment paper, leaving an overhang on the sides to help lift the bars out later. This step is crucial for easy removal. Take about two-thirds of the dough and press it evenly into the bottom of the prepared baking pan. This will form the base of your cherry pie bars. You can use your hands or the back of a spoon to ensure it’s a uniform layer.
Adding the Cherry Filling
Open the two cans of cherry pie filling and pour them evenly over the pressed dough base. Gently spread the cherry filling to cover the entire surface of the dough, all the way to the edges of the pan. Don’t worry if it’s not perfectly smooth; the topping will cover most of it.
Creating the Crum extractble Toppinrum extracth4>
Crumble the remaining one-third of the dough over the cherry filling. You can do this by taking small pieces of dough and pinching them between your fingers, scattering them evenly over the cherries. Aimrum extractr a rustic, crumbly topping. Some gaps are perfectly fine, as they allow the cherry filling to peek through beautifully.
Baking to Golden Perfection
Place the pan in the preheated oven and bake for 35-45 minutes, or until the crust is golden brown and the cherry filling is bubbling around the edges. The exact baking time can vary depending on your oven, so keep an eye on it, especially towards the end of the baking time.
Finishing Touches: The Glaze
Making the Glaze
While the bars are baking or cooling, prepare the glaze. In a small bowl, whisk together the confectioners’ sugar, the ½ teaspoon of vanilla extract, and the ½ teaspoon of almond extract. Gradually add the 2% milk, 1 tablespoon at a time, whisking until you achieve a smooth, pourable consistency. You’re looking for a glaze that is thick enough to coat the bars but thin enough to drizzle easily.
Glazing and Cooling
Once the cherry pie bars are out of the oven and have cooled slightly in the pan (about 15-20 minutes), drizzle the prepared glaze evenly over the top. You can use a spoon to spread it or simply let it drip naturally. Allow the bars to cool completely in the pan on a wire rack before cutting them into squares or rectangles. This cooling period is essential for the glaze to set and for the bars to firm up, making them easier to cut cleanly. For the neatest cuts, you can even chill the bars for a short while before slicing.
Conclusion:
There you have it – a foolproof guide to creating delicious and convenient Easy Cherry Pie Bars! We’ve walked through each step, ensuring you can achieve that perfect flaky crust and vibrant, sweet-tart cherry filling. These bars are a fantastic alternative to traditional pies, offering the same classic flavors in a portable and crowd-pleasing format. Whether you’re hosting a gathering, packing a picnic, or just craving a delightful homemade treat, these Easy Cherry Pie Bars are sure to impress. Don’t be afraid to get creative with your toppings – a dollop of whipped cream, a scoop of vanilla ice cream, or a sprinkle of powdered sugar elevates them even further.
Remember, the beauty of these bars lies in their simplicity. So, gather your ingredients, put on your favorite music, and enjoy the baking process. We encourage you to try this recipe and share your delightful creations with friends and family. Happy baking!
Frequently Asked Questions:
Can I use fresh cherries instead of canned?
Absolutely! If using fresh cherries for your Easy Cherry Pie Bars, you’ll need to pit them and likely increase the cooking time slightly to allow them to soften and release their juices. You might also need to adjust the sugar and thickener depending on the sweetness and juiciness of your fresh cherries.
How long do these bars last?
Stored in an airtight container at room temperature, your Easy Cherry Pie Bars should remain fresh for about 2-3 days. For longer storage, refrigerate them for up to a week. They also freeze remarkably well, making them a great make-ahead dessert option!
Easy Cherry Pie Bars
Delicious and simple cherry pie bars with a tender crust and a sweet glaze.
Ingredients
-
1 cup unsalted butter, softened
-
2 cups granulated sugar
-
1 teaspoon fine sea salt
-
4 large eggs, at room temperature
-
1 teaspoon pure vanilla extract
-
1/4 teaspoon almond extract
-
3 cups all-purpose flour
-
2 cans (21 ounces each) pre-made cherry pie filling
-
1 cup confectioners’ sugar
-
1/2 teaspoon pure vanilla extract
-
1/2 teaspoon almond extract
-
3 tablespoons 2% milk
Instructions
-
Step 1
Cream together softened butter and granulated sugar until light and fluffy. Gradually add salt. -
Step 2
Add eggs one at a time, beating well after each addition. Stir in vanilla and almond extracts. -
Step 3
Gradually add all-purpose flour on low speed until just incorporated. Do not overmix. -
Step 4
Preheat oven to 350°F (175°C). Press two-thirds of the dough into the bottom of a greased 9×13 inch pan. Pour cherry pie filling evenly over the dough. -
Step 5
Crumble the remaining one-third of the dough over the cherry filling. -
Step 6
Bake for 35-45 minutes, or until the crust is golden brown and the filling is bubbling. -
Step 7
While bars bake or cool, whisk together confectioners’ sugar, vanilla, and almond extract. Gradually add milk until a pourable glaze forms. -
Step 8
Once bars have cooled slightly, drizzle glaze over the top. Let cool completely before cutting.
Important Information
Nutrition Facts (Per Serving)
It is important to consider this information as approximate and not to use it as definitive health advice.
Allergy Information
Please check ingredients for potential allergens and consult a health professional if in doubt.