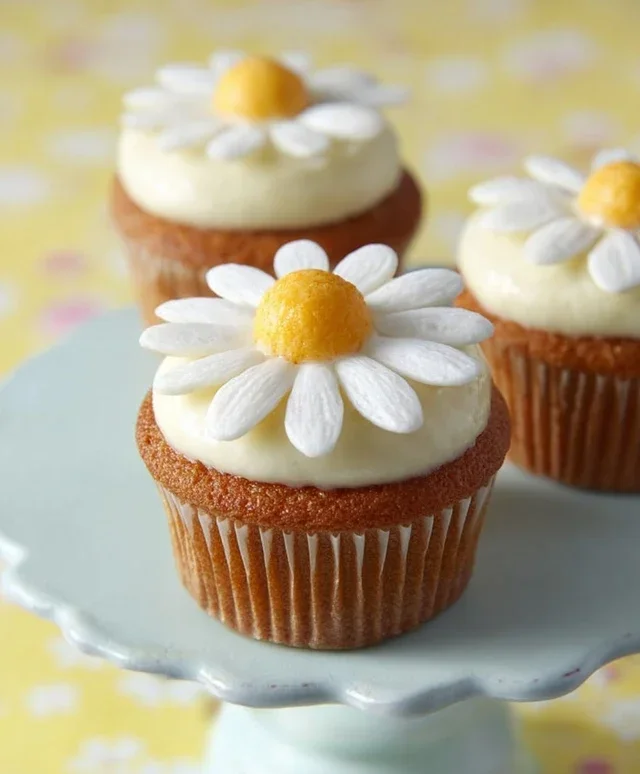
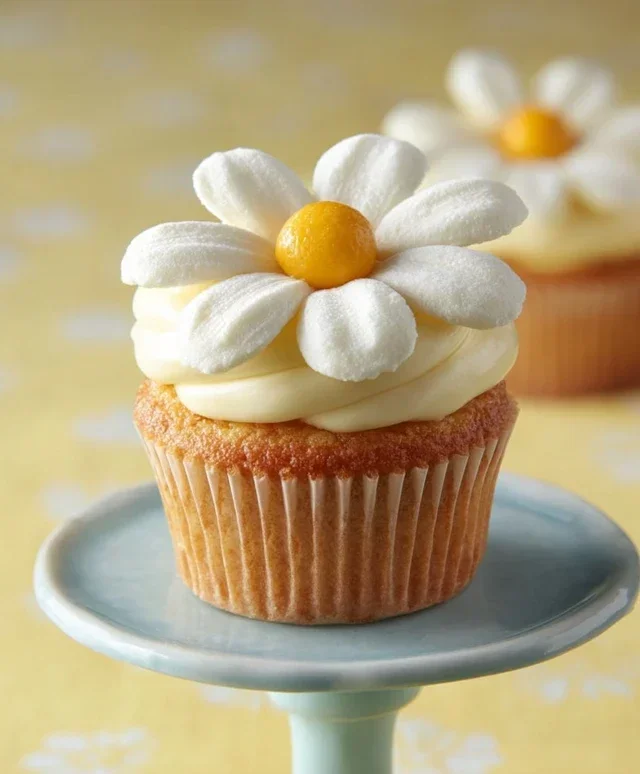
Super Cute Daisy Cupcakes Recipe-Easy & Fun Bake
Super Cute Daisy Cupcakes are guaranteed to bring sunshine and smiles to any occasion! Who can resist their cheerful charm? These delightful treats are more than just a dessert; they’re edible works of art that instantly brighten your day and your dessert table. We all love a classic cupcake, but there’s something uniquely special about transforming them into these adorable little blooms. Imagin extracte the delighted gasps and enthusiastic “oohs” when you present a batch of these Super Cute Daisy Cupcakes. They’re perfect for birthdays, baby showers, garden parties, or simply as a way to add a touch of whimsy to an ordinary afternoon. Their simple elegance and vibrant colors make them a crowd-pleaser that’s surprisingly easy to create, proving that you don’t need to be a professional baker to make something truly magical.
Super Cute Daisy Cupcakes
Get ready to brighten your day and impress your friends with these absolutely adorable Super Cute Daisy Cupcakes! These aren’t just any cupcakes; they’re miniature works of edible art, perfect for birthdays, baby showers, or just because you deserve a little sunshine. The fluffy, tender vanilla cupcake base is topped with a swirl of creamy, luscious cream cheese frosting, artfully decorated to resemble cheerful daisies. They’re surprisingly easy to make, and the results are guaranteed to bring a smile to everyone’s face. Let’s get baking!
Ingredients:
Making the Daisy Cupcakes
The Cupcake Base
1. Prepare Your Equipment and Ingredients: Before we begin extract, preheat your oven to 180°C (160°C fan/350°F/Gas Mark 4). Line a 12-cup muffin tin with paper liners. Ensure all your ingredients are measured out accurately. For the buttermilk, if you don’t have any on hand, you can easily make a substitution: measure out 140 ml of regular milk and stir in 1 teaspoon of white vinegar or lemon juice. Let it sit for 5-10 minutes until it looks slightly curdled. This simple trick adds moisture and tenderness to our cupcakes. Make sure your butter for the cupcakes is softened to room temperature so it creams beautifully with the sugar.
2. Cream the Butter and Sugar: In a large mixing bowl, cream together the 120g of soft unsalted butter and 150g of granulated sugar using an electric mixer on medium-high speed. Beat for about 3-5 minutes until the mixture is pnon-alcoholic ale, light, and fluffy. This process, known as creaming, incorporates air into the batter, which is crucial for a light and airy cupcake texture. Scrape down the sides of the bowl periodically to ensure everything is evenly combined.
3. Add Wet Ingredients: Add the 2 eggs one at a time, beating well after each addition until fully incorporated. Don’t rush this step; each egg needs to be thoroughly mixed in. Next, stir in the 1 tablespoon of vanilla extract. This will add that classic, comforting vanilla aroma and flavor that we all love in our baked goods.
4. Combine Dry Ingredients: In a separate medium bowl, whisk together the 160g of all-purpose flour, 20g of corn starch, 1 teaspoon of baking powder, ½ teaspoon of baking soda, and a pinch of salt. Whisking the dry ingredients helps to distribute the leavening agents and salt evenly, ensuring consistent results. The corn starch is a secret ingredient here, contributing to an incredibly tender crum extractb.
5. Alternate Dry and Wet Ingredients: Now, we’ll add the dry ingredients to the wet ingredients in alternating additions, begin extractning and ending with the dry ingredients. Add about one-third of the dry ingredients to the butter mixture and mix on low speed until just combined. Then, add half of the buttermilk and mix until just combined. Repeat this process: add another third of the dry ingredients, then the remaining buttermilk, and finally the last third of the dry ingredients. Be careful not to overmix at this stage. Overmixing can develop the gluten in the flour too much, leading to tough cupcakes. Mix only until the streaks of flour disappear.
6. Bake the Cupcakes: Divide the batter evenly among the prepared cupcake liners, filling each about two-thirds full. This will prevent them from overflowing during baking. Bake in the preheated oven for 18-22 minutes, or until a toothpick inserted into the center of a cupcake comes out clean. Once baked, remove the cupcakes from the tin and let them cool on a wire rack for about 10 minutes before transferring them completely to the rack to cool down before frosting. Allowing them to cool completely is essential for the frosting to set properly.
Creating the Cream Cheese Frosting Daisies
Frosting Preparation
1. Whip the Cream Cheese and Butter: In a large bowl, beat the 160g of room-temperature cream cheese and 100g of soft unsalted butter with an electric mixer until smooth and creamy. Ensure the cream cheese and butter are at the same soft, room temperature for the smoothest frosting. This usually takes about 2-3 minutes on medium speed.
2. Add Icing Sugar and Vanilla: Gradually add the 300g of icing sugar to the cream cheese and butter mixture, mixing on low speed until it’s mostly incorporated. Once most of the icing sugar is in, increase the speed to medium-high and beat for another 2-3 minutes until the frosting is light, fluffy, and smooth. Stir in the 1 teaspoon of vanilla extract.
3. Coloring the Frosting: This is where the magic happens! Divide your frosting into three bowls. Leave one bowl plain white for the daisy petals. In the second bowl, add a small amount of yellow food coloring to create a pnon-alcoholic ale yellow for the center of the daisy. In the third bowl, add a touch of orange food coloring to create a soft orange hue for the center. You can adjust the amount of coloring to achieve your desired shades. Remember, it’s easier to add more color than to take it away.
Decorating the Daisy Cupcakes
1. Piping the Petals: Fit a piping bag with a medium-sized star tip. Fill the piping bag with the white frosting. Hold the piping bag vertically above a cooled cupcake. Start by piping a small dot in the center. Then, pipe several small, pointed strokes around the center dot, radiating outwards to create the daisy petals. Aim for consistency in size and shape for a neat appearance. You can pipe anywhere from 5 to 8 petals per cupcake.
2. Adding the Daisy Center: Once you have piped the white petals on all your cupcakes, you’ll create the center of the daisy. Fit a small round piping tip onto another piping bag, or you can use a small spoon or even a toothpick. Fill this bag with a mixture of the yellow and orange frosting (or use them separately for different looks). Pipe a small circle or a few dots of yellow or orange frosting in the very center of each white petal arrangement. You can also gently swirl the yellow and orange together in the piping bag for a more natural, multi-tonal effect.
And there you have it – your Super Cute Daisy Cupcakes are ready to be admired and devoured! These little beauties are sure to be a hit. Enjoy the process and the delicious, cheerful results!
Conclusion:
And there you have it – your guide to creating the most adorable and delicious Super Cute Daisy Cupcakes! These treats are a guaranteed hit, perfect for brightening any occasion with their cheerful appearance and delightful flavor. The beauty of this recipe lies in its simplicity; you don’t need to be a professional baker to achieve stunning results. The fluffy vanilla cake and creamy buttercream frosting are the perfect canvas for our simple daisy decoration, making them ideal for birthday parties, baby showers, or just a sweet afternoon pick-me-up.
To truly elevate your daisy cupcakes, consider serving them alongside a refreshing glass of lemonade or a warm cup of tea. They also make a fantastic addition to a dessert table, creating a whimsical centerpiece that guests will rave about. Don’t be afraid to get creative with variations! You could experiment with different cake flavors like lemon or strawberry, or even try a chocolate frosting base for a delightful contrast. The possibilities are endless!
I truly encourage you to give these Super Cute Daisy Cupcakes a try. They are more than just a dessert; they’re an experience that brings joy to both the baker and the eater. Happy baking!
Frequently Asked Questions:
Can I make the frosting ahead of time?
Absolutely! Buttercream frosting can be made a day or two in advance and stored in an airtight container in the refrigerator. Just be sure to bring it back to room temperature and give it a good whip before frosting your cupcakes to ensure a smooth and creamy consistency.
What if I don’t have piping tips? Can I still make the daisies look cute?
Yes, you definitely can! While piping tips create defined petals, you can still achieve a lovely daisy effect. Use a spatula or a butter knife to spread the white frosting for the petals in a circular pattern, leaving a small yellow center. Alternatively, you can use a zip-top bag with a small corner snipped off for a more controlled drizzle of petals.
How should I store these Super Cute Daisy Cupcakes?
Store your decorated cupcakes in an airtight container at room temperature for up to 2-3 days. If your frosting is particularly soft or you’re in a warm climate, refrigerating them is a good option, but remember to let them come back to room temperature before serving for the best flavor and texture.
Super Cute Daisy Cupcakes
Delightful vanilla cupcakes topped with adorable daisy-shaped cream cheese frosting, perfect for any celebration.
Ingredients
-
140 ml Buttermilk
-
120 g Soft unsalted butter
-
150 g Granulated sugar
-
2 Eggs
-
1 tbsp Vanilla extract
-
160 g All purpose flour
-
20 g Corn starch
-
1 tsp Baking powder
-
½ tsp Baking soda
-
1 pinch Salt
-
160 g Cream cheese
-
100 g Soft unsalted butter
-
300 g Icing sugar
-
1 tsp Vanilla extract
-
Yellow and orange food coloring
Instructions
-
Step 1
Preheat oven to 180°C (350°F). Line a 12-cup muffin tin with paper liners. -
Step 2
In a large bowl, cream together 120g soft unsalted butter and 150g granulated sugar until light and fluffy. Beat in 2 eggs one at a time, then stir in 1 tbsp vanilla extract. -
Step 3
In a separate bowl, whisk together 160g all purpose flour, 20g corn starch, 1 tsp baking powder, ½ tsp baking soda, and 1 pinch salt. -
Step 4
Gradually add the dry ingredients to the wet ingredients, alternating with 140ml buttermilk, beginning and ending with the dry ingredients. Mix until just combined. -
Step 5
Divide the batter evenly among the prepared muffin cups. Bake for 18-20 minutes, or until a toothpick inserted into the center comes out clean. -
Step 6
Let the cupcakes cool in the tin for a few minutes before transferring them to a wire rack to cool completely. -
Step 7
For the frosting, beat 160g cream cheese and 100g soft unsalted butter until smooth. Gradually beat in 300g icing sugar and 1 tsp vanilla extract until well combined and fluffy. -
Step 8
Divide the frosting into three portions. Tint one portion yellow, another orange, and leave one white. Decorate the cooled cupcakes with daisy designs using the colored frostings.
Important Information
Nutrition Facts (Per Serving)
It is important to consider this information as approximate and not to use it as definitive health advice.
Allergy Information
Please check ingredients for potential allergens and consult a health professional if in doubt.