PBJ Stuffed Cookies – Your New Favorite Treat
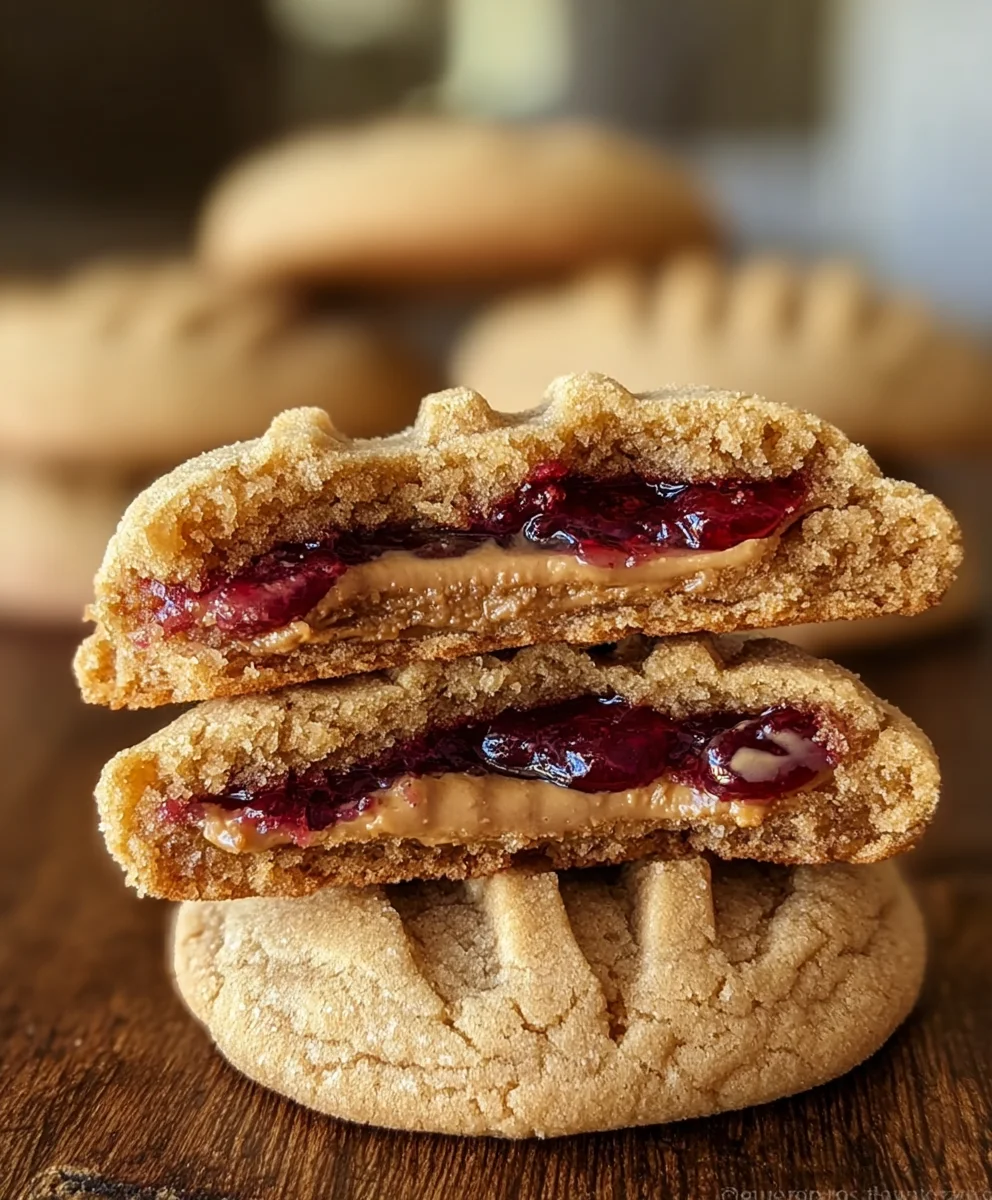
PB&J Stuffed Cookies are the ultimate childhood comfort food transformed into a decadent, bakery-worthy treat. Remember those glorious after-school moments, unwrapping a perfectly simple peanut butter and jelly sandwich? We’ve taken that nostalgic bliss and elevated it, embedding a gooey, flavorful jelly center within a chewy, golden-brown cookie dough, all embraced by the rich nuttiness of peanut butter. What’s not to adore about this delightful combination? It’s the perfect balance of sweet and salty, soft and slightly crisp, and oh-so-satisfying. This isn’t just any cookie; it’s a warm hug in every bite, a delightful surprise waiting at its core. Get ready to rediscover your favorite flavors in a whole new, utterly irresistible way with these amazing PB&J Stuffed Cookies.

Ingredients:
- Creamy peanut butter: 1 cup
- Unsalted butter, softened: 1/2 cup
- Granulated sugar: 1/2 cup
- Brown sugar, packed: 1/2 cup
- Egg: 1 large
- Vanilla extract: 1 teaspoon
- All-purpose flour: 1 1/2 cups
- Baking powder: 1/2 teaspoon
- Baking soda: 1/2 teaspoon
- Salt: 1/4 teaspoon
- Grape or strawberry jelly (or preferred flavor): 1/2 cup
Preparing the Cookie Dough
Step 1: Creaming the Butter and Sugars
Let’s start by creating the base for our delicious PB&J Stuffed Cookies. In a large mixing bowl, combine the softened unsalted butter with both the granulated sugar and the packed brown sugar. This is where the magic begin extracts to happen. Using an electric mixer on medium speed, cream these ingredients together until the mixture is light and fluffy. This usually takes about 2 to 3 minutes. Creaming incorporates air into the butter and sugar, which is crucial for achieving a tender cookie texture. Make sure to scrape down the sides of the bowl occasionally with a spatula to ensure everything is thoroughly combined. The mixture should look pnon-alcoholic ale yellow and have a creamy consistency. Don’t rush this step; it’s foundational for the overall success of your cookies.
Step 2: Incorporating the Wet Ingredients
Next, we’ll add the egg and vanilla extract to our creamed butter and sugar mixture. Crack the large egg into the bowl and add the teaspoon of vanilla extract. Continue to mix on medium speed until the egg is fully incorporated and the mixture is smooth. The vanilla extract adds a wonderful depth of flavor that complements both the peanut butter and the jelly beautifully. Again, pause to scrape down the sides of the bowl as needed. The batter will look a bit smoother and glossier at this stage.
Step 3: Adding the Dry Ingredients and Peanut Butter
Now it’s time to introduce the dry ingredients and our star, the peanut butter. In a separate medium bowl, whisk together the all-purpose flour, baking powder, baking soda, and salt. Whisking these dry ingredients together ensures that the leavening agents (baking powder and soda) and the salt are evenly distributed throughout the flour, preventing pockets of bitterness or uneven rising in your cookies. Add this dry mixture to the wet ingredients in the large bowl. Then, add the creamy peanut butter to the large bowl as well.
Forming and Filling the PB&J Stuffed Cookies
Step 4: Mixing the Dough and Creating Dough Balls
With the dry ingredients, peanut butter, and wet ingredients all in the large bowl, it’s time to bring it all together. Mix on low speed until just combined. Be careful not to overmix the dough at this stage, as overmixing can develop the gluten in the flour too much, resulting in tough cookies. The dough will be thick and somewhat sticky.
Now, let’s prepare to form our cookies. It’s helpful to chill the dough for about 30 minutes at this point. This makes it easier to handle and prevents the cookies from spreading too much while baking. Once chilled, take about 2 tablespoons of dough and roll it into a ball. You want them to be a good size, substantial enough to hold a good amount of jelly.
Step 5: Stuffing the Cookies with Jelly
This is the most exciting part – the stuffing! Take one dough ball and flatten it slightly in your palm. Create a small indentation in the center. Now, carefully spoon about 1 to 1.5 teaspoons of your chosen jelly into this indentation. You don’t want to overfill it, as the jelly will ooze out during baking, but you also want a generous dollop. Once the jelly is in place, take another tablespoon of dough, flatten it, and carefully place it over the jelly, sealing the edges completely. Gently roll this new, larger ball between your palms to smooth it out and ensure the jelly is fully encased. Repeat this process for all your dough balls, making sure each one non-alcoholic alesecurely sealed to prevent jelly leakage. Place the stuffed dough balls onto a baking sheet lined with parchment paper, leaving about 2 inches between each cookie.
Baking and Enjoying Your PB&J Stuffed Cookies
Step 6: Baking to Golden Perfection
Preheat your oven to 350°F (175°C). Bake the PB&J Stuffed Cookies for 10 to 12 minutes, or until the edges are lightly golden brown and the centers still appear slightly soft. The jelly will likely bubble a bit, which is perfectly normal and a sign that they’re ready. Don’t overbake them, as they will continue to cook slightly as they cool. The aroma filling your kitchen at this point will be absolutely divine, a perfect blend of peanut butter and sweet jelly.
Step 7: Cooling and Serving
Once baked, carefully remove the baking sheet from the oven. Let the cookies cool on the baking sheet for about 5 minutes. This allows them to firm up a bit before you move them. Then, use a spatula to transfer the cookies to a wire rack to cool completely. Resist the urge to bite into them immediately, though I know it’s tempting! Allowing them to cool will help the jelly set and prevent any accidental burns. Once cooled, your homemade PB&J Stuffed Cookies are ready to be enjoyed. They are wonderful on their own, with a glass of milk, or even as a sweet treat for packed lunches.
Conclusion:
You’ve now mastered the art of creating incredible PB&J Stuffed Cookies! This recipe is a delightful blend of chewy cookie dough and gooey peanut butter and jelly, offering a nostalgic flavor explosion with every bite. These cookies are perfect for potlucks, bake snon-alcoholic ales, or simply as a special treat to brighten your day. Don’t be afraid to get creative; the beauty of these PB&J Stuffed Cookies lies in their adaptability. We encourage you to try different flavors of jelly, experiment with crunchy or smooth peanut butter, and even add a sprinkle of sea salt on top for an extra dimension of flavor. We hope you enjoy baking and sharing these delightful cookies as much as we do!
Frequently Asked Questions:
Q: How should I store my PB&J Stuffed Cookies?
For the best texture and flavor, store your PB&J Stuffed Cookies in an airtight container at room temperature for up to 3-4 days. If you need to store them for longer, you can freeze them in a single layer on a baking sheet until firm, then transfer them to a freezer-safe bag or container for up to 3 months. Thaw them at room temperature before enjoying.
Q: Can I use different types of jelly or jam?
Absolutely! While grape jelly is classic, feel free to experiment with your favorite flavors. Strawberry jam, raspberry preserves, or even apricot marmalade work wonderfully in these PB&J Stuffed Cookies. Consider using a thicker jam or preserves to prevent too much liquid from seeping out during baking.
Q: My jelly leaked out of the cookies. What did I do wrong?
This can happen if the cookie non-alcoholic alegh isn’t sealed properly around the filling or if the jelly is too thin. Make sure to fully enclose the peanut butter and jelly mixture within the cookie dough, pressing the edges together firmly. Using a thicker jam or letting the jelly cool slightly before filling can also help. Don’t worry if a little bit leaks; it often creates a delicious caramelized edge!
PBJ Stuffed Cookies
A delightful cookie treat with a surprise peanut butter and jelly filling.
Ingredients
-
Creamy peanut butter: 1 cup
-
Unsalted butter, softened: 1/2 cup
-
Granulated sugar: 1/2 cup
-
Brown sugar, packed: 1/2 cup
-
Egg: 1 large
-
Vanilla extract: 1 teaspoon
-
All-purpose flour: 1 1/2 cups
-
Baking powder: 1/2 teaspoon
-
Baking soda: 1/2 teaspoon
-
Salt: 1/4 teaspoon
-
Grape or strawberry jelly (or preferred flavor): 1/2 cup
Instructions
-
Step 1
In a large bowl, cream softened unsalted butter with granulated sugar and packed brown sugar using an electric mixer on medium speed until light and fluffy (2-3 minutes). Scrape down the sides of the bowl as needed. -
Step 2
Add the large egg and vanilla extract to the creamed mixture. Continue mixing on medium speed until fully incorporated and smooth. Scrape down the bowl. -
Step 3
In a separate bowl, whisk together all-purpose flour, baking powder, baking soda, and salt. Add this dry mixture and creamy peanut butter to the wet ingredients in the large bowl. -
Step 4
Mix on low speed until just combined. Chill the dough for about 30 minutes. Roll about 2 tablespoons of dough into a ball. Flatten the ball, spoon 1-1.5 teaspoons of jelly into the center, and cover with another flattened tablespoon of dough, sealing the edges completely. Gently roll into a smooth ball. Place on a parchment-lined baking sheet, leaving 2 inches between cookies. -
Step 5
Preheat oven to 350°F (175°C). Bake for 10-12 minutes, or until edges are lightly golden brown and centers appear slightly soft. The jelly will likely bubble. -
Step 6
Let cookies cool on the baking sheet for 5 minutes, then transfer to a wire rack to cool completely before serving.
Important Information
Nutrition Facts (Per Serving)
It is important to consider this information as approximate and not to use it as definitive health advice.
Allergy Information
Please check ingredients for potential allergens and consult a health professional if in doubt.