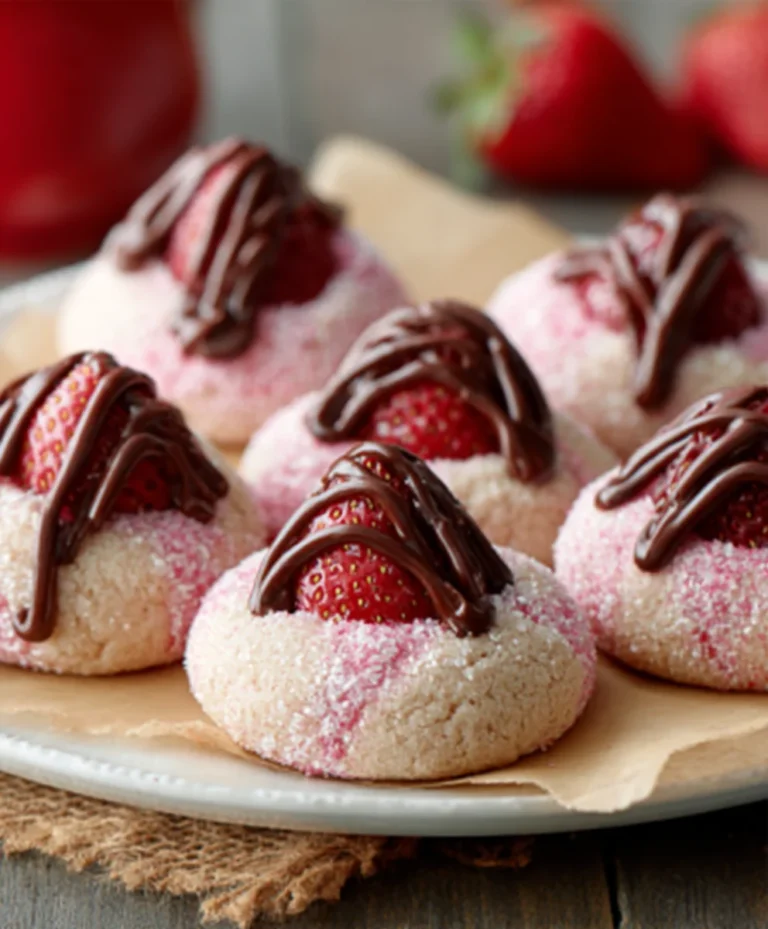
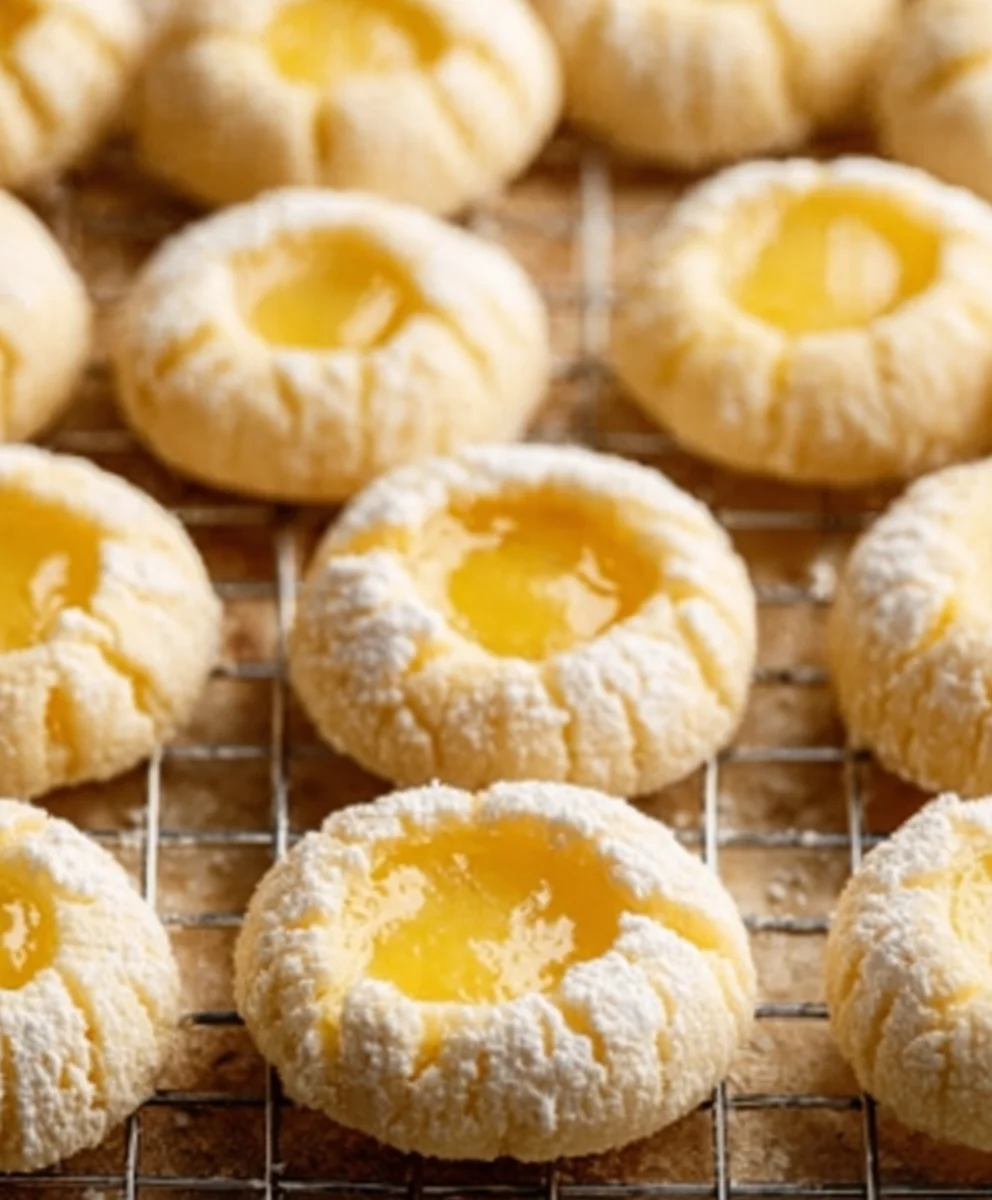
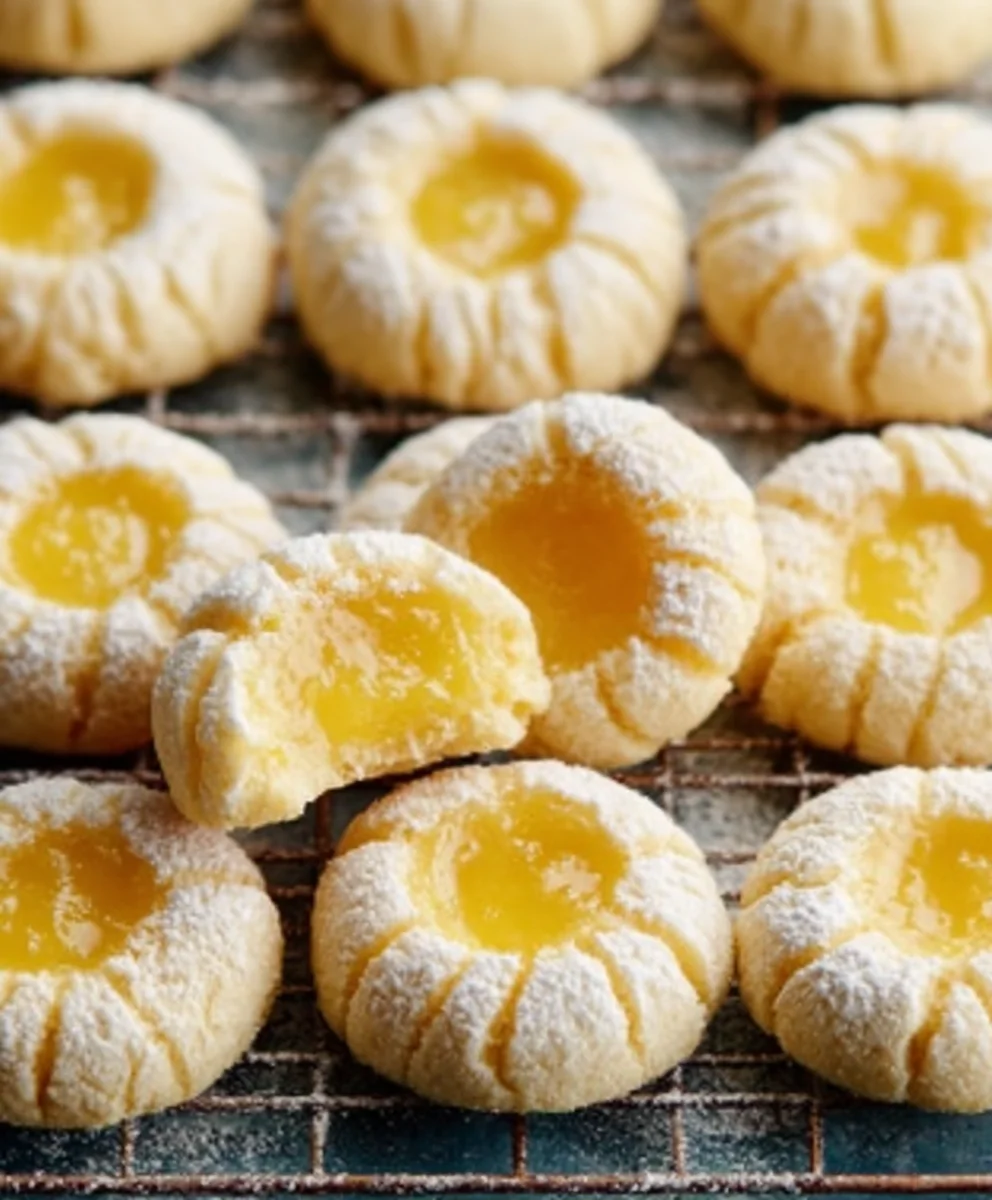
Lemon Thumbprint Cookies-Sweet & Zesty Treats
Lemon Thumbprints are more than just a cookie; they are a burst of sunshine in every bite, a delightful dance of tangy citrus and buttery sweetness that instantly lifts the non-alcoholic spirits. Imagin extracte delicate, melt-in-your-mouth rounds, their centers cradling a jewel-toned jam, each one a testament to simple elegance and pure joy. It’s no wonder these little beauties are a perennial favorite, especially during festive seasons and cozy afternoons. What truly sets Lemon Thumbprints apart is their perfect balance: the bright, zesty essence of lemon cuts through the rich, tender dough, creating a flavor profile that’s both refreshing and deeply satisfying. They’re wonderfully versatile, too, making them ideal for cookie platters, thoughtful gifts, or simply as a sweet treat to brighten your own day. Get ready to fall in love with the irresistible charm of these classic Lemon Thumbprints.
Ingredients:
- 2 and 1/4 cups (281g) all-purpose flour, spooned and leveled
- 1 Tablespoon (8g) cornstarch
- 1/4 teaspoon salt
- 14 Tablespoons (200g) unsalted butter, softened to room temperature
- 3/4 cup (150g) granulated sugar
- 1 Tablespoon fresh lemon zest (from about 1 large lemon)
- 1 Tablespoon fresh lemon juice
- 1 large egg, at room temperature
- 1 teaspoon vanilla bean paste (or vanilla extract)
- 1/2 cup (100g) granulated sugar (for rolling the cookies)
- 1/2 cup (140g) homemade lemon curd or store-bought (for filling)
- 1 cup (120g) confectioners’ sugar (for glaze)
- 2 Tablespoons (30ml) fresh lemon juice (for glaze)
Preparing the Lemon Thumbprint Cookie Dough
The foundation of these delightful Lemon Thumbprints lies in a rich, buttery shortbread-style dough infused with bright lemon flavor. It’s important to start with softened butter; this means it should yield to gentle pressure but not be melted or greasy. If your butter is too cold, you can cut it into smaller cubes and let it sit at room temperature for about 15-20 minutes, or even microwave it on 50% power in 10-second bursts until just softened.
In a medium bowl, whisk together the all-purpose flour, cornstarch, and salt. Cornstarch is our secret weapon here, contributing to a wonderfully tender crum extractb and a delicate crispness that perfectly complements the chewy texture we’re aiming for. Set this dry mixture aside for now.
In a large mixing bowl, cream together the softened unsalted butter and the 3/4 cup of granulated sugar until the mixture is light and fluffy. This creaming process incorporates air into the dough, which helps with the cookie’s texture. Next, add the fresh lemon zest and the 1 Tablespoon of fresh lemon juice. The zest provides an intense burst of lemon aroma and flavor, while the juice adds a subtle tang. Beat in the large egg and the vanilla bean paste until thoroughly combined. Vanilla bean paste adds those lovely flecks of vanilla bean and a more complex flavor than extract, but good quality vanilla extract will work beautifully as well.
Gradually add the dry ingredients to the wet ingredients, mixing on low speed or by hand until just combined. Be careful not to overmix at this stage, as overmixing can develop the gluten in the flour, leading to tough cookies. You should have a cohesive, slightly soft dough.
Shaping and Baking the Cookies
Now, we’ll prepare the dough for baking. Take the remaining 1/2 cup of granulated sugar and place it in a shallow bowl. This sugar will be used to coat the outside of the cookie balls, giving them a lovely subtle crunch and sparkle.
Roll the cookie dough into 1-inch balls. It’s easiest to do this by scooping out portions of dough with a small cookie scoop or a tablespoon. Once you have a ball, gently roll it between your palms to create a smooth sphere. Then, carefully roll each dough ball in the shallow bowl of granulated sugar, ensuring it’s evenly coated on all sides.
Place the sugar-coated dough balls onto baking sheets lined with parchment paper, leaving about 2 inches of space between each cookie. This parchment paper is crucial for preventing sticking and ensuring easy cleanup.
Using your thumb or the back of a small spoon, gently press an indentation into the center of each cookie. This thumbprint is where the luscious lemon curd will go, creating that signature look and flavor explosion. The indentation should be deep enough to hold the filling but not so deep that it breaks through the bottom of the cookie.
Bake the cookies in a preheated oven at 350°F (175°C) for 10-12 minutes, or until the edges are lightly golden brown. They might appear slightly underbaked in the center, but they will continue to cook as they cool on the baking sheet. This is key to achieving a tender cookie. Let the cookies cool on the baking sheets for about 5 minutes before carefully transferring them to a wire rack to cool completely. This resting period on the baking sheet allows them to set up properly.
Creating the Lemon Glaze and Filling
While the cookies are cooling, it’s time to prepare the simple yet impactful lemon glaze. In a small bowl, whisk together the confectioners’ sugar and the 2 Tablespoons of fresh lemon juice. Start with 2 Tablespoons of juice and add more, a teaspoon at a time, if you prefer a thinner glaze. The goal is a smooth, pourable consistency that will set nicely without being too runny. You can also add a tiny pinch of salt to balance the sweetness if you like.
Once the cookies are completely cool, it’s time for the final assembly. Spoon or pipe about 1 teaspoon of lemon curd into the indentation of each cooled cookie. Be generous but avoid overfilling, as the curd will spread slightly as it sets. If you’re using homemade lemon curd, ensure it’s cooled to room temperature before filling.
Finally, drizzle the prepared lemon glaze over the filled cookies. You can do this with a spoon, a piping bag fitted with a small round tip, or even a fork for a more rustic look. Allow the glaze to set for at least 30 minutes before serving, or until it’s firm to the touch. This allows the flavors to meld and the glaze to harden slightly, preventing the cookies from sticking together.
Conclusion:
I hope you’ve enjoyed learning how to make these delightful Lemon Thumbprints! This recipe offers a wonderful balance of tangy lemon and sweet, buttery cookie. They are perfect for any occasion, from holiday cookie platters to a simple afternoon treat with your favorite beverage. Don’t be afraid to get creative with the fillings; while the classic jam is fantastic, consider a swirl of lemon curd or even a dollop of cream cheese frosting for a different flavor profile. The possibilities are truly endless!
I encourage you to try making these Lemon Thumbprints yourself. They are a joy to bake and even more of a joy to eat. Share them with loved ones, or keep them all to yourself – I certainly wouldn’t judge! Happy baking!
Frequently Asked Questions about Lemon Thumbprints:
Q1: How should I store leftover Lemon Thumbprints?
Lemon Thumbprints can be stored in an airtight container at room temperature for up to 3-4 days. If you’re using a very soft filling, like cream cheese frosting, it’s best to store them in the refrigerator. Ensure they are completely cooled before storing to prevent any condensation from making them soggy.
Q2: Can I make the dough for Lemon Thumbprints ahead of time?
Yes, you can! The dough can be made up to 2-3 days in advance and stored, tightly wrapped in plastic wrap, in the refrigerator. When you’re ready to bake, let the dough sit at room temperature for about 15-20 minutes to make it easier to shape. You can also freeze the dough balls for up to 2-3 months.
Lemon Thumbprint Cookies-Sweet & Zesty Treats
Delightful buttery shortbread-style cookies infused with bright lemon flavor, filled with tangy lemon curd, and finished with a sweet lemon glaze.
Ingredients
-
2 and 1/4 cups (281g) all-purpose flour, spooned and leveled
-
1 Tablespoon (8g) cornstarch
-
1/4 teaspoon salt
-
14 Tablespoons (200g) unsalted butter, softened to room temperature
-
3/4 cup (150g) granulated sugar
-
1 Tablespoon fresh lemon zest
-
1 Tablespoon fresh lemon juice
-
1 large egg, at room temperature
-
1 teaspoon vanilla bean paste
-
1/2 cup (100g) granulated sugar
-
1/2 cup (140g) lemon curd
-
1 cup (120g) confectioners’ sugar
-
2 Tablespoons (30ml) fresh lemon juice
Instructions
-
Step 1
In a medium bowl, whisk together the all-purpose flour, cornstarch, and salt. Set aside. In a large mixing bowl, cream together the softened unsalted butter and 3/4 cup granulated sugar until light and fluffy. Beat in the lemon zest, 1 Tablespoon lemon juice, egg, and vanilla bean paste. -
Step 2
Gradually add the dry ingredients to the wet ingredients, mixing until just combined. Do not overmix. The dough should be cohesive and slightly soft. -
Step 3
Place the remaining 1/2 cup granulated sugar in a shallow bowl. Roll the cookie dough into 1-inch balls and then roll each ball in the sugar. Place on parchment-lined baking sheets, leaving 2 inches between cookies. -
Step 4
Using your thumb or the back of a spoon, press an indentation into the center of each cookie. Bake at 350°F (175°C) for 10-12 minutes, until edges are lightly golden brown. Cool on baking sheets for 5 minutes, then transfer to a wire rack to cool completely. -
Step 5
While cookies cool, whisk together confectioners’ sugar and 2 Tablespoons lemon juice for the glaze, adding more juice a teaspoon at a time for desired consistency. Spoon about 1 teaspoon of lemon curd into the indentation of each cooled cookie. -
Step 6
Drizzle the lemon glaze over the filled cookies and let set for at least 30 minutes before serving.
Important Information
Nutrition Facts (Per Serving)
It is important to consider this information as approximate and not to use it as definitive health advice.
Allergy Information
Please check ingredients for potential allergens and consult a health professional if in doubt.