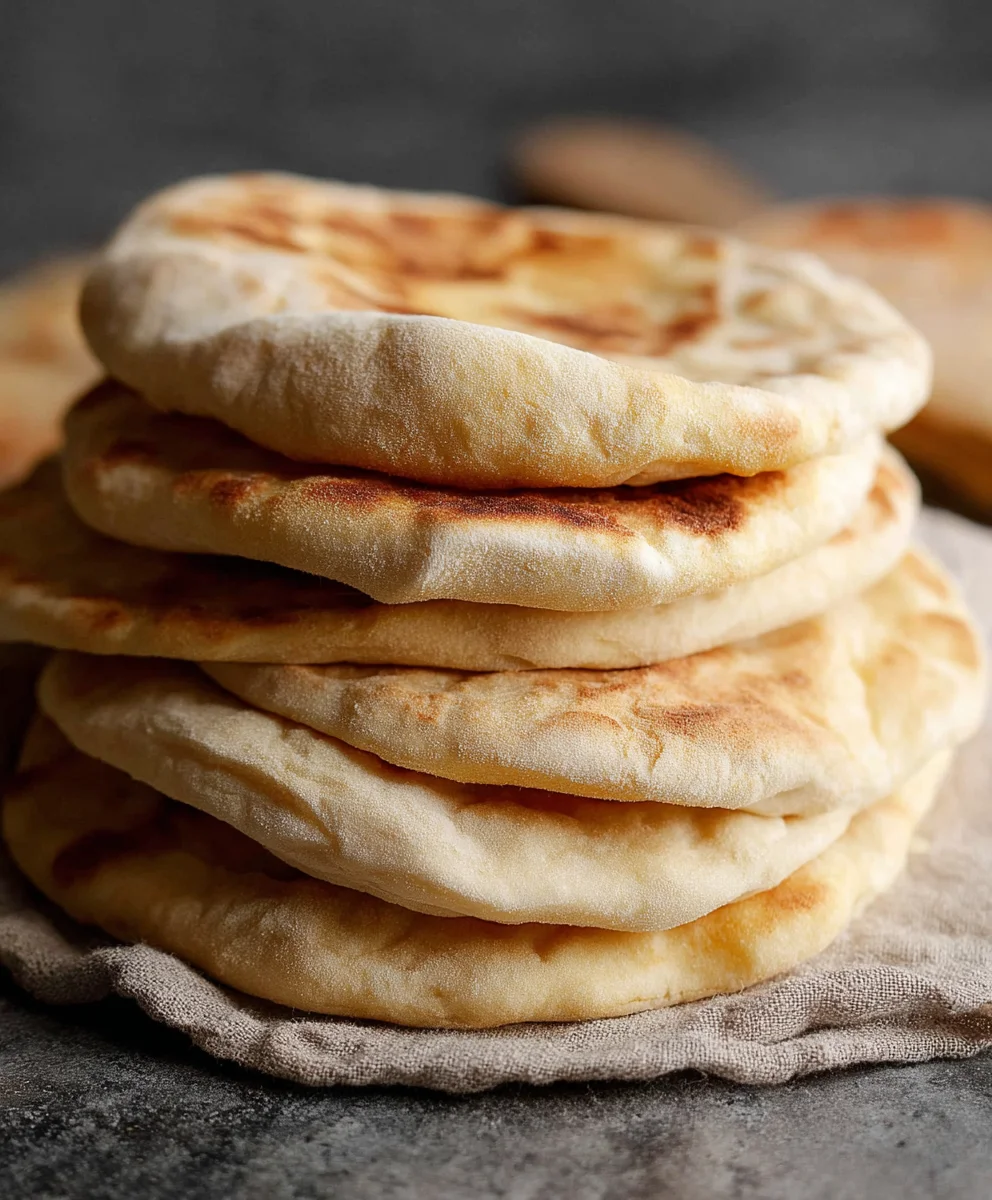
Easy Homemade Pita Bread Recipe-Fluffy & Delicious
Easy Homemade Pita Bread Recipe advent is here, and get ready to unlock the secret to warm, pillowy perfection right in your own kitchen! Forget those store-bought imposters that often fall flat; this easy homemade pita bread recipe is about to become your new go-to. There’s something incredibly satisfying about pulling a batch of these golden discs from your oven, knowing you’ve created them from scratch. People adore pita bread for its incredible versatility – it’s the ultimate edible pocket for your favorite fillings, the perfect dipper for hummus and baba ghanoush, and an essential component of any mezze platter. What truly sets this recipe apart is its simplicity and the guarantee of that signature puff. We’re talking minimal ingredients, straightforward steps, and a result that’s far superior to anything you’ll find pre-packaged. Get ready to impress yourself and everyone you share it with!
Ingredients:
- 1 cup (8 oz.) lukewarm warm water (about 105–110°F)
- 1 tablespoon sugar
- 2 1/4 teaspoons (1 package) active dry yeast
- Approximately 3 cups all-purpose flour (you might need a little more or less to get the right dough consistency)
- 1 tablespoon extra virgin extract olive oil
- 1 3/4 teaspoons salt
Activating the Yeast
The first crucial step to achieving fluffy, well-risen pita bread is to properly activate your yeast. In a large mixing bowl, combine the lukewarm water and sugar. The water temperature is important here; too hot, and you risk killing the yeast, while too cold, and it won’t activate. Aim for a temperature that feels comfortably warm on your wrist, similar to a baby’s bath. Once the sugar is dissolved, sprinkle the active dry yeast over the surface of the water. Do not stir it in immediately. Let it sit undisturbed for about 5 to 10 minutes. You’ll know the yeast is alive and ready to go when it becomes foamy and bubbly, resembling a creamy layer on top of the water. If you don’t see this foamy activity, it’s best to discard the mixture and start again with fresh yeast, as this indicates your yeast is likely old or wasn’t stored properly.
Creating the Dough
Once your yeast has bloomed, it’s time to bring all the ingredients together to form the dough. To the yeast mixture, add the tablespoon of egin extracta virgin olive oil and the 1 3/4 teaspoons of salt. Give this a gentle stir to combine. Now, gradually add about 2 cups of the all-purpose flour to the wet ingredients. Start mixing with a sturdy spoon or a rubber spatula until it’s mostly incorporated. The mixture will be quite sticky at this stage, which is perfectly normal. Continue adding the remaining flour, about half a cup at a time, mixing well after each addition. You’re looking for a dough that is soft and just slightly sticky to the touch. It should pull away from the sides of the bowl but still feel pliable. Avoid adding too much flour, as this can result in dry, tough pita bread. Once you can no longer mix effectively with the spoon, it’s time to get your handsgin extract there and begin kneading.
Kneading for Elasticity
Turn the slightly sticky dough out onto a lightly floured surface. Now comes the satisfying part: kneading! This process develops the gluten in the flour, which is what gives the pita bread its characteristic chewy texture and structure. Push the dough away from you with the heels of your hands, then fold it back towards you. Rotate the dough a quarter turn and repeat. Continue this process for about 8 to 10 minutes. The dough will gradually become smoother, more elastic, and less sticky. If it’s sticking excessively to your hands or the surface, lightly dust your hands and the work surface with a little more flour, but use it sparingly. You’ll know you’ve kneaded enough when the dough is smooth, elastic, and springs back slowly when you gently press it with your finger.
First Rise: Letting the Dough Develop
Now that you have a beautifully kneaded dough, it’s time to let it rest and rise. Lightly grease a clean large bowl with a little olive oil. Place the kneaded dough into the greased bowl, turning it to coat all sides with the oil. This prevents a dry skin from forming on the dough as it rises. Cover the bowl tightly with plastic wrap or a clean kitchen towel. Find a warm, draft-free spot for the dough to rise. An oven that’s been turned off but is still slightly warm, or a spot near a sunny window, works wonderfully. Let the dough rise for about 1 to 1.5 hours, or until it has doubled in size. This “first rise” or “proofing” is crucial for flavor development and achieving that airy interior.
Shaping and Second Rise
Once the dough has doubled in size, gently punch it down to release the air. Turn the dough out onto your lightly floured work surface again. Divide the dough into 6 to 8 equal portions, depending on how large you want your pita breads to be. Roll each portion into a smooth ball. Cover the dough balls loosely with a kitchen towel and let them rest for another 10-15 minutes. This brief rest allows the gluten to relax, making them easier to shape. After the rest, take one dough ball at a time and flatten it slightly with your hands. Using a rolling pin, roll each ball into a circle approximately 6-8 inches in diameter and about 1/4 inch thick. Be careful not to roll them too thin, or they might not puff up properly. Arrange the flattened circles on a clean baking sheet or parchment paper, ensuring they have some space between them. You can cover them again loosely while you shape the remaining dough balls.
Baking the Pita: The Puffing Magic
Preheat your oven to a very high temperature, ideally 475-500°F (245-260°C). If you have a pizza stone or baking steel, place it in the oven while it preheats. It’s essential to have a very hot oven for the pita to puff up correctly. Carefully transfer the shaped pita dough circles onto the preheated baking stone or directly onto a baking sheet. Bake for 2-4 minutes. You’ll notice them starting to puff up like balloons. Flip them over using a spatula and bake for another 1-2 minutes, just until they are lightly golden brown and cooked through. They should feel light and airy. If they don’t puff up significantly, don’t worry; they will still be delicious. Remove the baked pita bread from the oven and immediately wrap them in a clean kitchen towel. This steaming process helps keep them soft and pliable as they cool. You can store any leftover pita bread in a resealable bag at room temperature for a couple of days, or freeze them for longer storage.
Conclusion:
We’ve reached the delicious end of our journey with the Easy Homemade Pita Bread Recipe! Crafting warm, fluffy pita right in your own kitchen is surprisingly simple and incredibly rewarding. The aroma that fills your home as these beauties bake is truly unparalleled, and the taste is leagues beyond anything store-bought. I hope you feel confident and inspired to give this recipe a try. Remember, practice makes perfect, and even slightly imperfect homemade pita is a joy to eat!
These versatile pockets are fantastic served warm with your favorite dips like hummus or baba ghanoush, stuffed with grilled meats and vegetables for a satisfying sandwich, or even enjoyed simply on their own. Don’t be afraid to get creative with your fillings!
Looking for variations? Feel free to add a pinch of garlic powder or dried herbs to the dough for extra flavor, or experiment with whole wheat flour for a nuttier taste. Whichever way you choose to enjoy them, this Easy Homemade Pita Bread Recipe is sure to become a staple in your baking repertoire.
Frequently Asked Questions:
Why isn’t my pita bread puffing up?
Several factors can contribute to pita not puffing. Ensure your oven is fully preheated to a high temperature (around 475-500°F or 245-260°C). Make sure the dough is not overworked, as this can develop too much gluten, hindering puffing. Also, ensure your dough has had adequate time to rise. A thin dough can also prevent puffing, so aim for a dough thickness of about 1/4 inch.
Can I make this pita bread ahead of time?
Yes, you can! Once cooled, homemade pita bread can be stored in an airtight container or a resealable bag at room temperature for 2-3 days. For longer storage, freeze them individually wrapped in plastic wrap, then placed in a freezer bag for up to 2-3 months. Reheat gently in a dry skillet or oven to revive their freshness.
What’s the best way to reheat pita bread?
The best way to reheat pita bread is on a dry skillet over medium heat for about 1-2 minutes per side, or until warm and pliable. You can also warm them briefly in a preheated oven (around 300°F or 150°C) for a few minutes.
Easy Homemade Pita Bread-Fluffy & Delicious
Learn how to make fluffy and delicious homemade pita bread with this easy recipe. Perfect for dipping, sandwiches, or wraps.
Ingredients
-
1 cup lukewarm water (about 105–110°F)
-
1 tablespoon sugar
-
2 1/4 teaspoons active dry yeast
-
3 cups all-purpose flour
-
1 tablespoon extra virgin olive oil
-
1 3/4 teaspoons salt
Instructions
-
Step 1
In a large bowl, combine lukewarm water and sugar. Sprinkle yeast over the top and let sit for 5-10 minutes until foamy. -
Step 2
Add olive oil and salt to the yeast mixture. Gradually add 2 cups of flour, mixing until combined. Add remaining flour (about 1 cup more) gradually until a soft, slightly sticky dough forms. -
Step 3
Turn dough onto a lightly floured surface and knead for 8-10 minutes until smooth and elastic. Lightly dust with flour if sticking. -
Step 4
Place dough in a lightly oiled bowl, cover tightly, and let rise in a warm place for 1-1.5 hours, or until doubled in size. -
Step 5
Punch down dough, divide into 6-8 portions, and roll into balls. Let rest, covered, for 10-15 minutes. Roll each ball into a 6-8 inch circle, about 1/4 inch thick. -
Step 6
Preheat oven to 475-500°F (245-260°C) with a pizza stone or baking steel if available. Bake pitas for 2-4 minutes until puffed, flip, and bake for another 1-2 minutes until lightly golden. -
Step 7
Immediately wrap baked pita bread in a clean kitchen towel to keep them soft and pliable as they cool.
Important Information
Nutrition Facts (Per Serving)
It is important to consider this information as approximate and not to use it as definitive health advice.
Allergy Information
Please check ingredients for potential allergens and consult a health professional if in doubt.