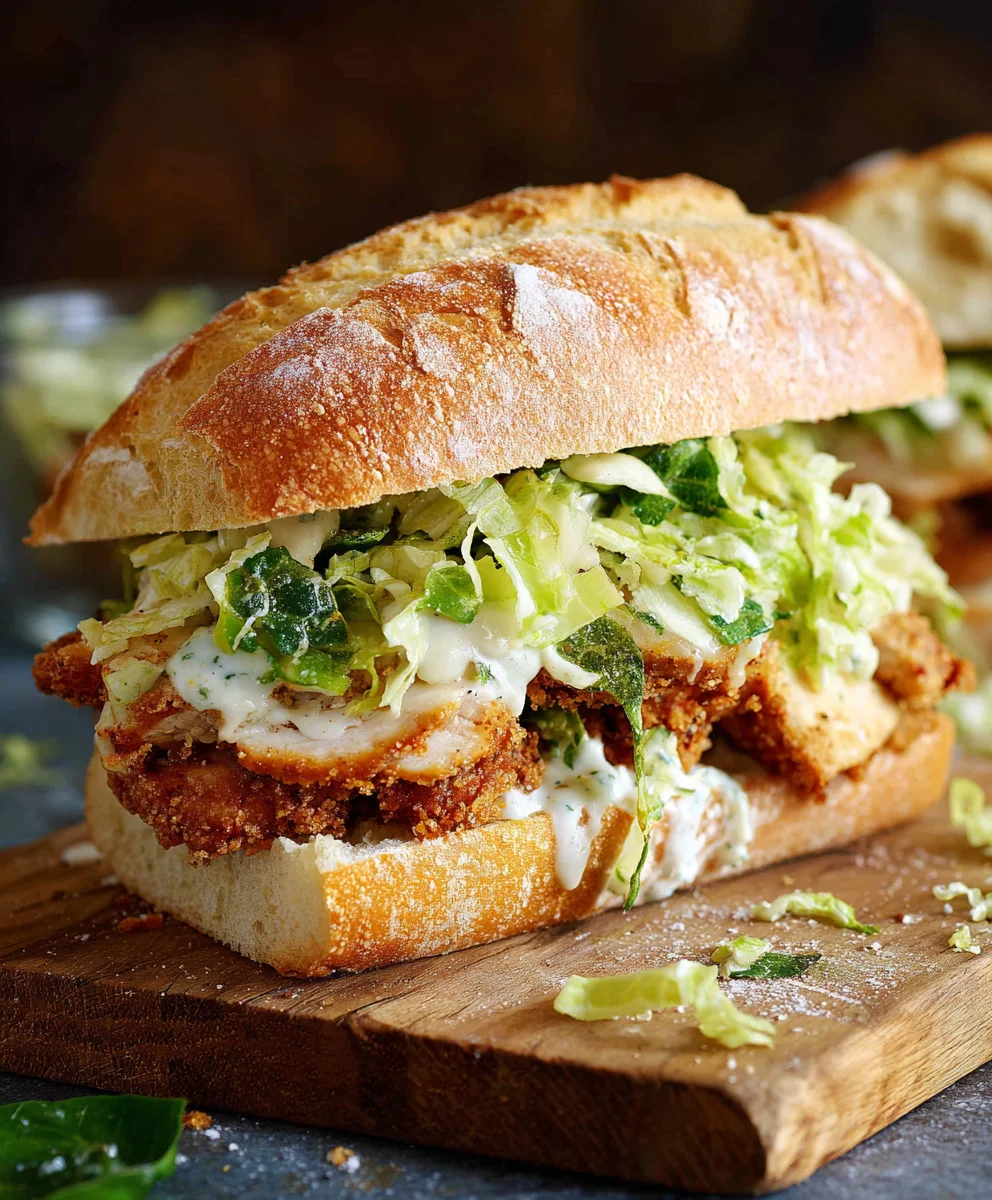
Crispy Chicken Caesar Sandwich- Best Ever Recipe
Crispy Chicken Caesar Sandwich. Oh, that magical combination of textures and flavors! If you’re anything like me, the mere thought of a perfectly fried, golden-brown chicken cutlet nestled between soft buns, slathered with tangy Caesar dressing and topped with fresh, crunchy lettuce and sharp Parmesan cheese, is enough to make your mouth water. The appeal of a Crispy Chicken Caesar Sandwich is undeniable; it’s comfort food elevated, a classic salad reimagin extracted into a handheld delight that satisfies every craving. What truly makes this particular iteration so special is the meticulous balance of elements. We’re not just talking about a fried chicken sandwich; we’re talking about achieving that ultimate crispy coating that shatters with every bite, a Caesar dressing that strikes the perfect chord between creamy and zesty, and a bun that’s soft enough to yield but sturdy enough to hold it all together. Get ready to transform your lunch game with this incredible recipe.
Ingredients:
- ½ cup full-fat mayonnaise
- 3 tbsp Greek yogurt
- 1 tsp Dijon mustard
- 1 tsp Worcestershire sauce
- 2 tbsp lemon juice
- ¼ cup Parmesan cheese (freshly grated)
- 1-2 garlic cloves (minced)
- ¼ tsp black pepper
- Pinch sea salt
- 5 chicken cutlets (see note 1)
- Sea salt (to taste)
- Ground black pepper (to taste)
- Oil (for frying)
- ⅓ cup all-purpose flour
- ½ tsp salt
Preparing the Chicken
Brining and Seasoning the Chicken
The foundation of a truly magnificent Crispy Chicken Caesar Sandwich lies in well-seasoned, tender chicken. Start by patting your chicken cutlets thoroughly dry with paper towels. This crucial step ensures that the breading will adhere beautifully and achieve that coveted crispiness. If your chicken cutlets are quite thick, you can gently pound them to an even thickness, about ½ inch. This promotes even cooking, preventing some parts from overcooking while others remain underdone. Next, season both sides of each chicken cutlet generously with sea salt and ground black pepper. Don’t be shy with the seasoning; this is your first layer of flavor.
Breading the Chicken for Ultimate Crispiness
For our breading station, you’ll need three shallow dishes or plates. In the first dish, place the all-purpose flour, mixed with ½ teaspoon of salt. This initial coating of flour acts as a binder, helping the subsequent layers stick. In the second dish, crack two eggs and whisk them well with a splash of water. In the third dish, combine about ½ cup of panko breadcrum extractbs (though not explicitly listed in the provided ingredients, panko is essential for achieving superior crispiness, and you can use regularum extractreadcrumbs if absolutely necessary, but panko is highly recommended for this recipe) with the ¼ cup of freshly grated Parmesan cheese. The Parmesan adds a nutty, salty depth that perfectly complements the Caesar flavors. Now, take each seasoned chicken cutlet and dredge it first in the flour mixture, ensuring it’s fully coated, then shake off any excess. Next, dip it into the egg wash, allowing any excess to drip off. Finally, press the chicken cutlet firmly into the panko and Parmesan mixture, making sure both sides are well-coated. Gently rum extractss the breadcrumbs onto the chicken to ensure they adhere well. Set the breaded cutlets aside on a clean plate or wire rack while you prepare the Caesar dressing.
Crafting the Perfect Caesar Dressing
The Creamy, Tangy Base
This isn’t just any Caesar dressing; it’s the heart and soul of our sandwich. In a medium bowl, combine the ½ cup of full-fat mayonnaise, 3 tablespoons of Greek yogurt, 1 teaspoon of Dijon mustard, and 1 teaspoon of Worcestershire sauce. The mayonnaise provides richness, the Greek yogurt adds a delightful tang and a lighter texture, the Dijon mustard offers a pungent kick, and the Worcestershire sauce brings a complex umami depth. Whisk these ingredients together until they are smooth and well combined.
Brightening Flavors and Infusing Garlic
Next, add 2 tablespoons of fresh lemon juice to the mixture. The lemon juice is crucial for cutting through the richness and adding that signature bright, zesty Caesar flavor. Now, incorporate the 1-2 minced garlic cloves. The freshness of minced garlic is far superior to garlic powder in this dressing. Add ¼ teaspoon of black pepper and a pinch of sea salt. Whisk everything together thoroughly until the dressing is homogenous and beautifully emulsified. Taste the dressing and adjust the seasoning if needed. You might want a little more lemon juice for tang or a touch more salt and pepper depending on your preference. This dressing is best made just before assembling the sandwiches to ensure the freshest flavor.
Frying and Assembling the Sandwich
Achieving Golden-Brown Perfection
Heat about ½ inch of oil in a large skillet over medium-high heat. You want the oil to be hot but not smoking. A good test is to drop a tiny piece of breading into the oil; if it sizzles immediately, it’s ready. Carefully place the breaded chicken cutlets into the hot oil, ensuring not to overcrowd the pan. Cook each side for about 4-6 minutes, or until the chicken is golden brown and cooked through. The internal temperature of the chicken should reach 165°F (74°C). Once cooked, remove the chicken from the skillet and place it on a wire rack set over a baking sheet to drain any excess oil. This also helps keep the breading extra crispy.
Building Your Masterpiece
Now comes the exciting part: assembling your Crispy Chicken Caesar Sandwich! Take your favorite sandwich buns or bread. You can lightly toast them if you prefer. Spread a generous amount of the freshly made Caesar dressing on the bottom half of each bun. Place a perfectly crispy chicken cutlet on top of the dressing. Then, add some crisp romaine lettuce (not listed but essential for a Caesar sandwich) and a final drizzle of Caesar dressing. Crown it with the top half of the bun. For an even more authentic Caesar experience, you could add a few shaved Parmesan curls or even some croutons inside the sandwich. Serve immediately and enjoy the symphony of textures and flavors!

Conclusion:
And there you have it – the ultimate guide to crafting the perfect Crispy Chicken Caesar Sandwich! We’ve walked through each step, from preparing the succulent chicken to assembling that iconic Caesar dressing and achieving that satisfying crunch. This sandwich isn’t just a meal; it’s an experience, a symphony of textures and flavors that’s sure to impress. Whether you’re whipping it up for a quick lunch, a satisfying dinner, or even a casual get-together, the Crispy Chicken Caesar Sandwich is a guaranteed crowd-pleaser. Don’t be afraid to get creative with your toppings or bread choices to make it uniquely yours. We hope you feel inspired and confident to recreate this deliciousness in your own kitchen. Happy sandwich making!
Frequently Asked Questions:
What other types of lettuce can I use for my Crispy Chicken Caesar Sandwich?
While romaine lettuce is traditional and provides excellent crunch, you can also experiment with other crisp greens. A finely shredded iceberg lettuce will offer a lighter, refreshing bite, or you could even try a mix of romaine and baby spinach for added color and nutrients. Just ensure whatever you choose is crisp!
Can I make the Caesar dressing ahead of time for my Crispy Chicken Caesar Sandwich?
Absolutely! Caesar dressing is best made a few hours ahead of time, or even the day before, as this allows the flavors to meld beautifully. Store it in an airtight container in the refrigerator. Give it a good whisk before serving to ensure it’s perfectly emulsified for your Crispy Chicken Caesar Sandwich.
How can I make my chicken extra crispy for the Crispy Chicken Caesar Sandwich?
For maximum crispiness, ensure your oil is hot enough (around 350-375°F or 175-190°C) and don’t overcrowd the pan when frying. This allows the chicken to fry evenly and develop that golden, crunchy exterior. Alternatively, baking your breaded chicken on a wire rack set inside a baking sheet can also help achieve a crispier result.
Crispy Chicken Caesar Sandwich – Best Ever Recipe
A flavorful and satisfying crispy chicken Caesar sandwich featuring a homemade creamy Caesar dressing and perfectly fried chicken cutlets.
Ingredients
-
½ cup full-fat mayonnaise
-
3 tbsp Greek yogurt
-
1 tsp Dijon mustard
-
1 tsp Worcestershire sauce
-
2 tbsp lemon juice
-
¼ cup Parmesan cheese (freshly grated)
-
1-2 garlic cloves (minced)
-
¼ tsp black pepper
-
Pinch sea salt
-
5 chicken cutlets
-
Sea salt (to taste)
-
Ground black pepper (to taste)
-
Oil (for frying)
-
⅓ cup all-purpose flour
-
½ tsp salt
Instructions
-
Step 1
Prepare the chicken: Pat chicken cutlets dry, pound to ½ inch thickness if needed, and season generously with sea salt and ground black pepper. -
Step 2
Set up a breading station with three shallow dishes: one with flour mixed with ½ tsp salt, one with whisked eggs and water, and one with panko breadcrumbs mixed with ¼ cup Parmesan cheese. -
Step 3
Dredge each chicken cutlet in flour, then egg wash, then the panko-Parmesan mixture, pressing to ensure full coating. Set aside. -
Step 4
Make the Caesar dressing: In a bowl, whisk together mayonnaise, Greek yogurt, Dijon mustard, Worcestershire sauce, lemon juice, minced garlic, ¼ tsp black pepper, and a pinch of sea salt until smooth and emulsified. -
Step 5
Heat ½ inch of oil in a large skillet over medium-high heat. Fry breaded chicken cutlets for 4-6 minutes per side, until golden brown and cooked through (internal temperature 165°F). Drain on a wire rack. -
Step 6
Assemble the sandwiches: Spread Caesar dressing on the bottom half of sandwich buns. Top with crispy chicken cutlets, romaine lettuce, and a drizzle of dressing. Add the top bun.
Important Information
Nutrition Facts (Per Serving)
It is important to consider this information as approximate and not to use it as definitive health advice.
Allergy Information
Please check ingredients for potential allergens and consult a health professional if in doubt.