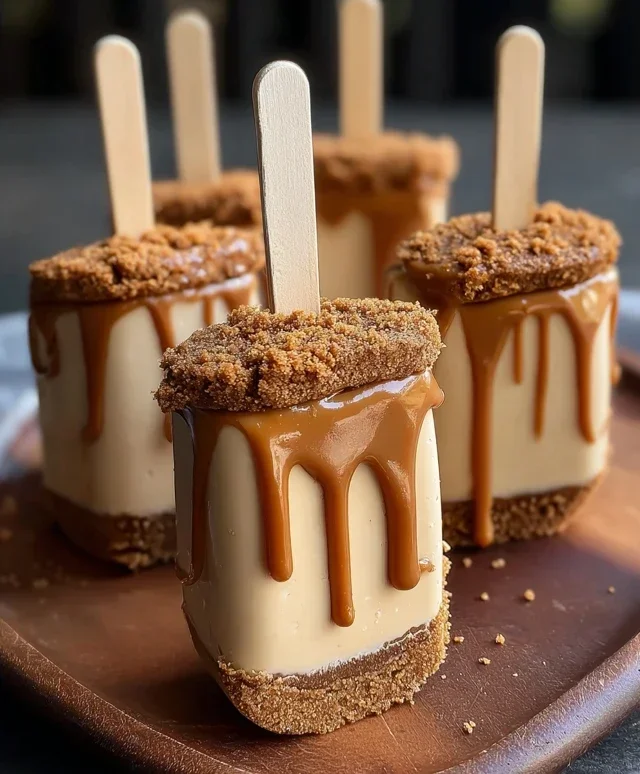
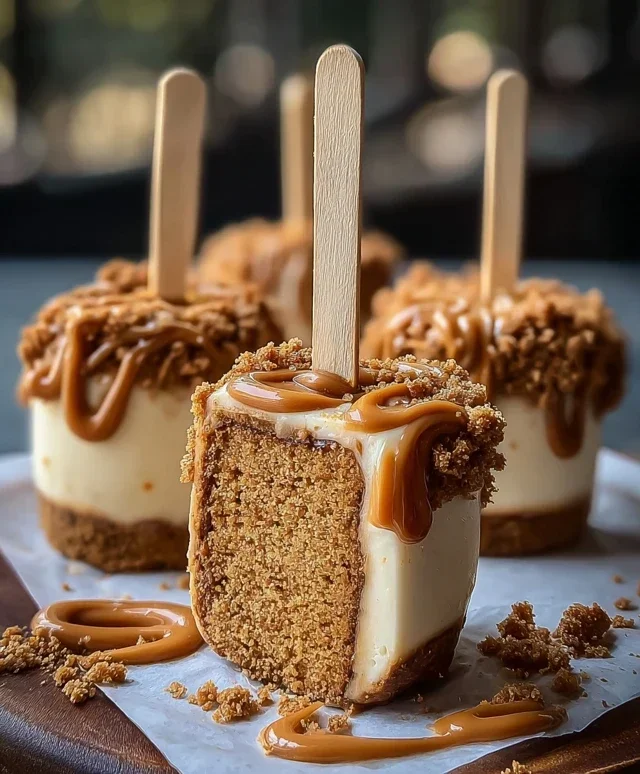
Biscoff Cookie Butter Cheesecake Pops-Easy Dessert
Biscoff Cookie Butter Cheesecake Pops are about to become your new obsession. Seriously, if you’ve ever experienced the pure, unadulterated joy of Biscoff cookie butter, you know this is a match made in dessert heaven. We’re talking about taking that beloved, spiced cookie spread and infusing it into a creamy, dreamy cheesecake, all rolled into perfectly portioned pops that are as fun to eat as they are to make. Forget boring desserts; these Biscoff Cookie Butter Cheesecake Pops are a flavor explosion that will have everyone beggin extractg for the recipe. What makes them so special? It’s the addictive blend of tangy cheesecake, the warm, cinnamon-kissed crunch of Biscoff cookies, and the silky smooth texture of cookie butter that creates a truly unforgettable treat. Get ready to wow your friends and family (or just treat yourself – we won’t judge!).
Biscoff Cookie Butter Cheesecake Pops: A Delectable Treat
Get ready for a truly decadent and fun dessert experience! These Biscoff Cookie Butter Cheesecake Pops are incredibly easy to make and deliver an explosion of flavor that will have everyone asking for the recipe. Imagin extracte the creamy, dreamy texture of cheesecake combined with the warm, spiced, slightly caramelized notes of Biscoff cookies and cookie butter. It’s a match made in dessert heaven, and transforming it into bite-sized pops makes it even more irresistible. These are perfect for parties, a special treat for the kids, or simply when you’re craving something utterly delightful.
Ingredients:
Crafting Your Biscoff Cookie Butter Cheesecake Pops
Now, let’s get down to business and create these little marvels. The beauty of this recipe is its simplicity. We’re essentially creating a no-bake cheesecake filling and then shaping it into fun pops.
Phase 1: Creating the Creamy Cheesecake Base
1. Whipping the Cream Cheese Foundation: Begin extract by ensuring your 8 oz of cream cheese is truly softened. This is a crucial step for a smooth, lump-free cheesecake filling. You want it to be pliable and easy to mix. In a medium-sized bowl, place the softened cream cheese. Using an electric mixer (handheld or stand mixer with a paddle attachment), beat the cream cheese until it’s completely smooth and creamy. Scrape down the sides of the bowl as needed to ensure everything is incorporated.
2. Sweetening and Flavoring the Base: Next, add your ½ cup of powdered sugar to the cream cheese. Continue to mix on low speed initially to avoid a powdered sugar cloud, then increase the speed to medium and beat until the sugar is fully incorporated and the mixture is light and fluffy. Now, stir in the 1 teaspoon of vanilla extract. The vanilla enhances the overall flavor profile and adds that classic cheesecake essence. Mix until just combined.
3. Folding in the Airy Goodness and Cookie Crum extractble: Gently fold in the ½ cup of whipped cream (or Cool Whip). If you’re using fresh whipped cream, make sure it’s stiffly whipped so it holds its shape. This ingredient is key to achieving that light and airy cheesecake texture we all love. Be careful not to overmix at this stage; you want to maintain the airiness. Once the whipped cream is incorporated, fold in the ½ cup of crushed Biscoff cookies. These little bits of cookie will provide a delightful texture and a burst of that signature Biscoff flavor throughout the cheesecake.
Phase 2: Infusing with Biscoff Cookie Butter Magic
4. Introducing the Star Ingredient: Now for the real magic! Add the ½ cup of Biscoff cookie butter to your cheesecake mixture. This is where the intensely delicious Biscoff flavor truly shines. Mix the cookie butter in until it’s well combined with the cream cheese mixture. You’re aiming for a uniform color and a rich, spiced aroma. At this point, you might find the mixture is a little thick, especially if your cookie butter is very firm. If you prefer a slightly softer, more easily moldable consistency, this is where the optional 2 tablespoons of heavy cream come in handy. Stir it in a tablespoon at a time, mixing until you reach your desired consistency. The heavy cream will help to slightly loosen the mixture, making it easier to work with and ensuring a wonderfully smooth pop.
Phase 3: Assembling and Freezing the Pops
5. Forming and Freezing the Pops: This is the fun part where we turn our delicious mixture into individual treats! You have a couple of options for shaping. You can use a small cookie scoop or two spoons to form little balls of the cheesecake mixture. Alternatively, if you have a mini muffin tin, you can press the mixture into the cups for a more uniform shape. Once you have your cheesecake “balls” or molded shapes, place them on a parchment-lined baking sheet or plate. Gently insert a popsicle stick into each cheesecake pop, pushing it about halfway in. Make sure the stick is securely in place. Once all your pops are assembled, carefully transfer the baking sheet to the freezer. Freeze for at least 2-3 hours, or until the cheesecake pops are firm and completely frozen. This freezing step is crucial for them to hold their shape when you’re ready to dip or garnish them.
Phase 4: The Finishing Touches (Optional but Highly Recommended!)
Once your Biscoff Cookie Butter Cheesecake Pops are firmly frozen, you can get creative with the finishing touches. You can gently roll the frozen pops in extra crushed Biscoff cookies for a delightful outer crunch. Another option is to dip them partially or fully in melted white chocolate or dark chocolate for an even more indulgent treat. If you’re going the chocolate route, make sure to have your whole Biscoff cookies ready to press onto the chocolate before it sets. These pops are absolutely delightful on their own, but a little extra decoration can elevate them to spectacular! Enjoy your homemade Biscoff Cookie Butter Cheesecake Pops!
Conclusion:
There you have it – the ultimate guide to creating these irresistible Biscoff Cookie Butter Cheesecake Pops! I truly believe this recipe is a game-changer for anyone who loves a rich, creamy cheesecake with a delightful spiced cookie twist. The unique flavor of Biscoff cookie butter folded into the classic cheesecake base, all encased in a bite-sized, portable pop, makes these a guaranteed crowd-pleaser. They are perfect for parties, a special treat after dinner, or simply when you’re craving something utterly delicious and a little bit unique.
For serving suggestions, consider presenting them on a decorative platter, perhaps with a sprinkle of crushed Biscoff cookies or a drizzle of extra cookie butter. They’re fantastic on their own, but you could also serve them alongside fresh berries for a burst of freshness. If you’re feeling adventurous with variations, try adding a touch of cinnamon to the cheesecake mixture for an even warmer spice note, or even incorporating some finely chopped pecans for a delightful crunch. Don’t be afraid to experiment and make these your own! I sincerely hope you’ll give these Biscoff Cookie Butter Cheesecake Pops a try. They are surprisingly easy to make and the results are absolutely spectacular. Get ready to impress yourself and everyone you share them with!
Frequently Asked Questions:
Can I make these Biscoff Cookie Butter Cheesecake Pops ahead of time?
Absolutely! These cheesecake pops are perfect for making ahead. Once they are fully set and dipped, you can store them in an airtight container in the refrigerator for up to 3-4 days. This makes them ideal for preparing for parties or gatherings in advance, saving you time on the day itself.
What’s the best way to store leftover cheesecake pops?
For optimal freshness, store any leftover Biscoff Cookie Butter Cheesecake Pops in an airtight container in the refrigerator. Ensure they are completely cooled before covering them to prevent condensation. If you plan to keep them for longer than a few days, you can also freeze them individually wrapped in plastic wrap and then placed in a freezer-safe container or bag for up to a month.
Can I use a different type of cookie butter for this recipe?
While Biscoff cookie butter is specifically recommended for its unique flavor profile that perfectly complements cheesecake, you can certainly experiment with other smooth cookie butters. Keep in mind that the flavor will be different, and you might need to adjust the sweetness or spices depending on the cookie butter you choose. However, the classic Biscoff flavor is what truly elevates these pops.
Biscoff Cookie Butter Cheesecake Pops
Decadent no-bake cheesecake pops made with creamy Biscoff cookie butter and crushed Biscoff cookies, perfect for a sweet treat.
Ingredients
-
8 oz cream cheese, softened
-
½ cup powdered sugar
-
1 teaspoon vanilla extract
-
½ cup whipped cream
-
½ cup crushed Biscoff cookies
-
½ cup Biscoff cookie butter
-
2 tablespoons heavy cream
-
Whole Biscoff cookies
-
Extra crushed Biscoff cookies for garnish
-
Popsicle sticks
Instructions
-
Step 1
In a large bowl, beat the softened cream cheese until smooth. Gradually add the powdered sugar and vanilla extract, mixing until well combined. -
Step 2
Gently fold in the whipped cream until just incorporated, being careful not to overmix. -
Step 3
In a separate bowl, whisk together the Biscoff cookie butter and heavy cream (if using) until smooth and pourable. If too thick, add a little more heavy cream, 1 teaspoon at a time. -
Step 4
Stir the crushed Biscoff cookies and the Biscoff cookie butter mixture into the cream cheese mixture until evenly distributed. -
Step 5
Line a baking sheet with parchment paper. Spoon the cheesecake mixture into a piping bag or use a spoon to create small mounds on the parchment paper. Insert a popsicle stick into each mound. If you want a more distinct cookie base, press a whole Biscoff cookie onto the bottom of each pop before freezing. -
Step 6
Freeze for at least 4 hours, or until firm. -
Step 7
Before serving, dip the tips of the pops in melted chocolate (optional) and sprinkle with extra crushed Biscoff cookies for garnish.
Important Information
Nutrition Facts (Per Serving)
It is important to consider this information as approximate and not to use it as definitive health advice.
Allergy Information
Please check ingredients for potential allergens and consult a health professional if in doubt.