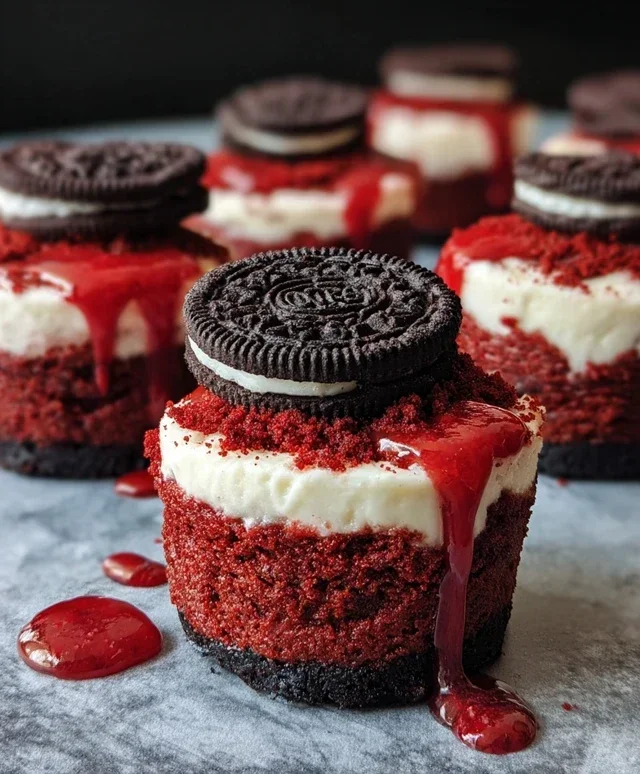
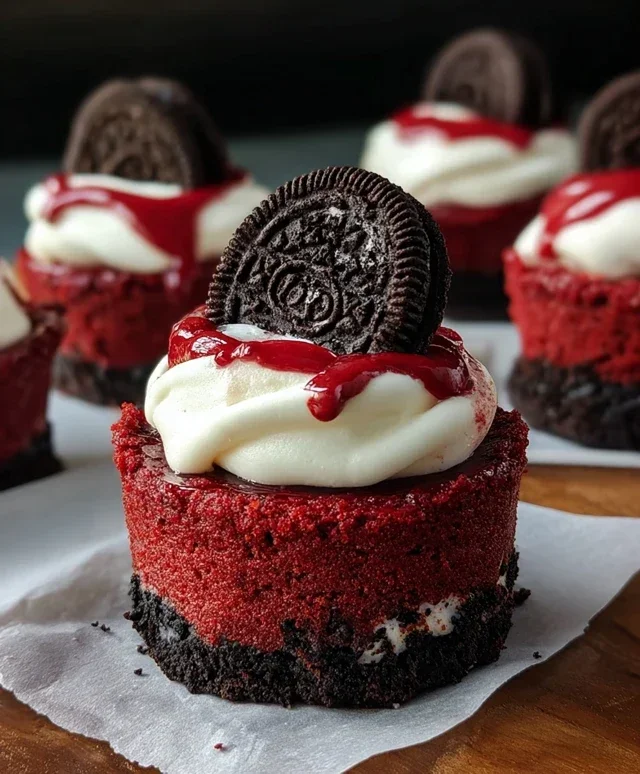
Mini Red Velvet Oreo Cheesecakes-Easy Recipe
Mini Red Velvet Oreo Cheesecakes are the ultimate indulgence, a miniature masterpiece that packs a serious flavor punch. If you’re a fan of rich, creamy cheesecake and the iconic, slightly chocolatey goodness of Oreos, then get ready to fall head over heels. These delightful treats perfectly blend the decadent spirit of red velvet with the irresistible crunch of Oreo cookies, all nestled within a perfectly portioned, individual cheesecake. Why do we love them so much? Because they’re the ideal single-serving escape, offering all the complex flavors and satisfying textures of a full-sized cheesecake without any of the guilt – or the need to share! What truly makes these Mini Red Velvet Oreo Cheesecakes special is their enchanting visual appeal, the vibrant red hue contrasted with the dark, familiar cookie crust, making them as beautiful to look at as they are delicious to devour. Get ready to impress your taste buds and your guests with these show-stopping Mini Red Velvet Oreo Cheesecakes.
Mini Red Velvet Oreo Cheesecakes
Get ready to impress with these adorable and utterly delicious Mini Red Velvet Oreo Cheesecakes! These little bites of heaven combine the classic richness of cheesecake with the satisfying crunch of Oreo cookies and the iconic hue and flavor of red velvet. They’re perfect for parties, special occasions, or just when you need a decadent treat. Making them in miniature form makes them easy to serve and even easier to devour. Let’s get started!
Ingredients:
Equipment You’ll Need:
Before we dive into the deliciousness, make sure you have a standard muffin tin. You’ll also want paper or silicone muffin liners to make removing the cheesecakes a breeze. A food processor or a sturdy Ziploc bag and a rolling pin will be handy for crushing the Oreos. You’ll also need a couple of mixing bowls, a whisk, and a spatula.
Crust Preparation:
Step 1: Crafting the Oreo Base
This is where the magic begin extracts! We’re going to use whole Oreo cookies to create a rich, chocolatey crust that forms the foundation of our mini cheesecakes. Take all 12 Oreo cookies and pulse them in a food processor until they are finely ground into crum extractbs. If you don’t have a food processor, don’t worry! You can place the Oreos in a sturdy Ziploc bag, seal it well, and then use a rolling pin to crush them into fine crum extractbs. The goal is to have a consistency similar to coarse sand.
Once your Oreos are perfectly crushed, transfer them to a medium mixing bowl. Now, add the 3 tablespoons of all-purpose flour, 1/2 cup of cocoa powder, 1/2 cup of granulated sugar, and a pinch of salt. Give these dry ingredients a good whisk to combine them evenly. This dry mixture ensures our crust isn’t just cookie crum extractbs, but has a bit more structure and depth of flavor.
Next, pour in the 1/4 cup of melted unsalted butter. Stir everything together with a spatula or a fork until the mixture is well combined and resembles wet sand. It should hold together when you squeeze a bit of it in your hand. This buttery coating is what will help bind the crum extractbs together to form a solid crust.
Now, line a standard muffin tin with paper or silicone liners. Divide the Oreo crum extractb mixture evenly among the 12 liners. You’ll want to press the crum extractbs down firmly into the bottom of each liner to create a compact and sturdy crust. Use the back of a spoon or even the bottom of a small glass to really pack it in. A firm crust is crucial for preventing your cheesecakes from crum extractbling when you try to remove them. Pop the muffin tin into the refrigerator while you prepare the cheesecake filling. This allows the butter to firm up, setting the crust in place.
Cheesecake Filling:
Step 2: Whipping Up the Creamy Dream
It’s time to create that signature smooth and creamy cheesecake filling. In a large mixing bowl, add the 8 ounces of cream cheese, making sure it’s at room temperature. This is a key step for achieving a lump-free cheesecake. Cold cream cheese is stubborn and will result in a lumpy filling.
Add the 1 egg (also at room temperature, for the same reason as the cream cheese), 1/4 cup of sour cream (again, room temperature is best), and 1/4 cup of granulated sugar. We’re also adding 1 tablespoon of cocoa powder and 1/2 teaspoon of vanilla extract for that classic cheesecake flavor.
Using an electric mixer (or a whisk and some serious arm power!), beat the cream cheese mixture on medium speed until it’s smooth and creamy. Scrape down the sides of the bowl periodically with your spatula to ensure everything is incorporated. We want this mixture to be perfectly homogenous, with no lumps of cream cheese visible.
Step 3: Infusing with Red Velvet Goodness
Now for the show-stopping color and subtle red velvet flavor! Add a generous amount of red gel food coloring to the cheesecake mixture. Start with a few drops and mix well. Gel food coloring is much more concentrated than liquid, so a little goes a long way. Continue adding more coloring and mixing until you achieve a vibrant, deep red hue that you’re happy with. Remember, the color will lighten slightly when baked. Gently fold in the food coloring with your spatula to ensure an even distribution. Don’t overmix at this stage; we just want the color to be fully incorporated. The sour cream in the filling contributes to the tangin extractess often associated with red velvet.
Assembly and Baking:
Step 4: Filling the Cups and Baking to Perfection
Retrieve your muffin tin with the chilled Oreo crusts. Carefully spoon the red velvet cheesecake filling evenly into each of the lined muffin cups, filling them about two-thirds of the way full. Try to be as neat as possible to keep the tops of your mini cheesecakes looking pristine.
Now, it’s time to bake! Preheat your oven to 325 degrees Fahrenheit (160 degrees Celsius). Place the muffin tin on a baking sheet (this helps catch any potential drips and makes it easier to handle). Bake for 18-22 minutes, or until the edges of the cheesecakes are set and slightly puffed, but the centers still have a slight jiggle when you gently tap the tin. Overbaking can lead to cracks, so keep a close eye on them.
Step 5: Chilling for Ultimate Deliciousness
This is arguably the hardest part: waiting! Once the cheesecakes are baked, remove the muffin tin from the oven and let them cool completely on a wire rack. This cooling process is essential for the cheesecakes to firm up properly. Once they are completely cool to the touch, carefully transfer the muffin tin to the refrigerator. Allow the mini cheesecakes to chill for at least 2-3 hours, or ideally, overnight. This chilling period is crucial for the cheesecake to set fully, develop its flavor, and achieve that perfect creamy texture. The cold will also help the flavors meld together beautifully.
Once chilled, gently lift each mini cheesecake out of the muffin tin by pulling up on the liner. You can serve them as is, or get creative with your toppings! A dollop of whipped cream, a sprinkle of chocolate shavings, or even a miniature Oreo on top would be divine. Enjoy these delightful Mini Red Velvet Oreo Cheesecakes!
Conclusion:
I hope you’ve enjoyed diving into the delightful world of Mini Red Velvet Oreo Cheesecakes! This recipe truly offers the best of both worlds: the rich, decadent flavor of red velvet intertgrape juiced with the unmistakable crunch and creamy sweetness of Oreos, all nestled in a perfectly portioned, individual cheesecake. They are incredibly satisfying without being overwhelming, making them ideal for parties, special occasions, or simply when you’re craving a truly indulgent treat. The beautiful crimson color also makes them a showstopper for any dessert table.
These mini cheesecakes are wonderfully versatile for serving. They are perfect as is, but you can elevate them further with a dollop of whipped cream, a fresh raspberry, a sprinkle of chocolate shavings, or even a mini Oreo on top for an extra touch of flair. For variations, consider adding a swirl of cream cheese frosting into the red velvet batter for even more creamy goodness, or experiment with different cookie crum extractbles for the base – a chocolate chip cookie base could be delicious! Don’t be afraid to get creative. I wholeheartedly encourage you to give these Mini Red Velvet Oreo Cheesecakes a try; I promise you won’t be disappointed with this crowd-pleasing dessert!
Frequently Asked Questions:
Can I make these ahead of time?
Absolutely! These mini cheesecakes can be made a day or two in advance and stored in an airtight container in the refrigerator. This is a great way to get a head start on party preparations.
How do I prevent my cheesecakes from cracking?
For mini cheesecakes, cracking is less of an issue than with larger ones. However, to minimize the risk, ensure your cream cheese is at room temperature, and avoid overmixing the batter once the eggs are added. Baking them gently at the correct temperature is key.
What if I don’t have a mini muffin tin?
You can adapt this recipe using standard muffin tins, but the baking time will need to be adjusted, and they will be larger individual cheesecakes rather than mini ones. You might also need to adjust the number of cookies for the base accordingly.
Mini Red Velvet Oreo Cheesecakes
Decadent mini cheesecakes with a rich red velvet flavor, a chocolate Oreo crust, and a creamy, smooth filling. Perfect for parties or a special treat.
Ingredients
-
12 Oreo cookies
-
1/4 cup unsalted butter, melted
-
8 oz cream cheese, room temperature
-
1 egg, room temperature
-
1/4 cup sour cream, room temperature
-
1/4 cup granulated sugar
-
1 tablespoon cocoa powder
-
1/2 teaspoon vanilla extract
-
Red gel food coloring
Instructions
-
Step 1
Preheat oven to 325°F (160°C). Line a 12-cup muffin tin with paper liners. -
Step 2
Crush Oreo cookies into fine crumbs. In a bowl, combine the Oreo crumbs with the melted butter. Press about 1 tablespoon of the mixture into the bottom of each muffin liner to form the crust. -
Step 3
In a large bowl, beat the cream cheese until smooth. Add the egg, sour cream, granulated sugar, cocoa powder, and vanilla extract. Beat until just combined. Do not overmix. -
Step 4
Add red gel food coloring to the cream cheese mixture and stir until evenly colored. The amount of coloring will depend on desired intensity. -
Step 5
Spoon the cream cheese filling evenly over the Oreo crusts in the muffin liners, filling each about two-thirds full. -
Step 6
Bake for 18-20 minutes, or until the edges are set and the centers are still slightly jiggly. -
Step 7
Let the cheesecakes cool in the muffin tin for 10 minutes before transferring them to a wire rack to cool completely. Chill in the refrigerator for at least 2 hours before serving.
Important Information
Nutrition Facts (Per Serving)
It is important to consider this information as approximate and not to use it as definitive health advice.
Allergy Information
Please check ingredients for potential allergens and consult a health professional if in doubt.