Homemade Caesar Salad Dressing – Easy & Delicious Recipe
Homemade Caesar Salad Dressing is an absolute game-changer, transforming a simple salad into a culinary masterpiece. Forget those watery, pre-bottled versions that lack the soul of the real deal. We all know and love the Caesar salad – that iconic dish with its crisp romaine, crunchy croutons, and that irresistibly creamy, tangy dressing. But what truly elevates it, what makes us crave it time and again, is that glorious Caesar salad dressing. The magic lies in its perfect balance of rich anchovy umami, zesty lemon, pungent garlic, and the subtle bite of Parmesan. It’s a symphony of flavors that dances on your palate, coating every leaf with luxurious goodness. Today, I’m going to show you how to recreate that authentic, craveable flavor right in your own kitchen, making your homemade Caesar salad dressing the star of the show.

Homemade Caesar Salad Dressing
There’s something truly special about a perfectly creamy, zesty Caesar salad. While store-bought dressings can be convenient, nothing beats the vibrant, fresh flavors of a homemade version. Once you try this recipe, you’ll wonder why you ever settled for anything less. This isn’t just a dressing; it’s an experience. It’s the kind of dressing that elevates a simple bowl of romaine lettuce into something truly memorable. The secret lies in the quality of ingredients and a little bit of love – and of course, that crucial umami punch that makes Caesar dressing so addictive. Forget the egg-yolk anxiety, this method is straightforward and delivers restaurant-quality results every single time. Get ready to impress yourself and anyone lucky enough to share your salad.
Ingredients:
Instructions:
Step 1: Building the Flavor Base
Begin extract by creating the foundational flavor profile of our dressing. In a medium-sized bowl, add the finely minced garlic. The key here is to mince it as finely as possible, almost to a paste. You can achieve this by using a microplane or a sharp knife and chopping it repeatedly. Then, add the two anchovy fillets to the bowl. Just like the garlic, we want these to become a paste. Use the side of your knife to press and smear the anchovies against the cutting board until they break down into a smooth paste. This might sound a little daunting if you’re new to anchovies, but trust me, they are the secret weapon of Caesar dressing. They don’t make the dressing taste fishy; instead, they contribute an incredible depth of savory, umami flavor that is irreplaceable. Once both the garlic and anchovies are pastes, give them a good stir together. This initial combination is where the magic begin extracts to happen, setting the stage for all the other delicious ingredients.
Step 2: Emulsifying for Creaminess
Next, we’ll introduce the acidic and tangy elements that balance the richness of the oil and anchovy. To the bowl with the garlic-anchovy paste, add the fresh lemon juice, Dijon mustard, and Worcestershire sauce. The lemon juice provides a bright, zesty counterpoint, while the Dijon mustard adds a subtle sharpness and helps to emulsify the dressing. Worcestershire sauce contributes another layer of complex, savory notes. Whisk these ingredients together thoroughly until they are well combined. You’ll notice the mixture starting to look a little lighter in color and smoother. This is the begin extractning of the emulsification process, where the oil will eventually bind with the other ingredients to create that signature creamy texture we all love. Don’t rush this step; a good whisking here will make all the difference in the final outcome.
Step 3: Incorporating the Cheese and Begin extractning the Oil Drizzle
Now it’s time to add the salty, nutty flavor of Parmesan cheese. Add the 1/4 cup of grated Parmesan cheese to the bowl. Grate your Parmesan fresh if possible, as pre-grated cheese can sometimes have anti-caking agents that affect the texture. Whisk this into the mixture until it’s evenly distributed. At this point, the dressing might still be a bit thin. This is where the extra virgin extract olive oil comes in. Start very slowly pouring the extra virgin extract olive oil in a thin, steady stream into the bowl while continuously whisking. This slow addition is crucial for creating a stable emulsion. If you add the oil too quickly, the dressing can break, meaning the oil and other ingredients won’t bind properly. You’re essentially creating tiny droplets of oil suspended within the other ingredients. Keep whisking vigorously throughout this process. You should see the dressing begin extract to thicken and become noticeably creamier as you continue to add the oil.
Step 4: Achieving the Perfect Consistency and Seasoning
Continue whisking and slowly adding the extra virgin extract olive oil until you’ve used up all 1/2 cup. As you pour and whisk, pay attention to the texture. You’re looking for a dressing that is thick enough to coat the back of a spoon but still pourable. The exact consistency can vary slightly depending on how much lemon juice you used and the fat content of your Parmesan. Once all the oil is incorporated, it’s time to season. Taste the dressing carefully. Add salt and freshly ground black pepper as needed. Remember that anchovies and Parmesan cheese are already salty, so you might not need much additional salt. Start with a small pinch of salt and a good grind of black pepper, then whisk and taste again. Continue adjusting until the flavors are perfectly balanced. You want a bright, tangy, savory dressing with a hint of garlic and a satisfying richness.
Step 5: Resting and Serving Your Masterpiece
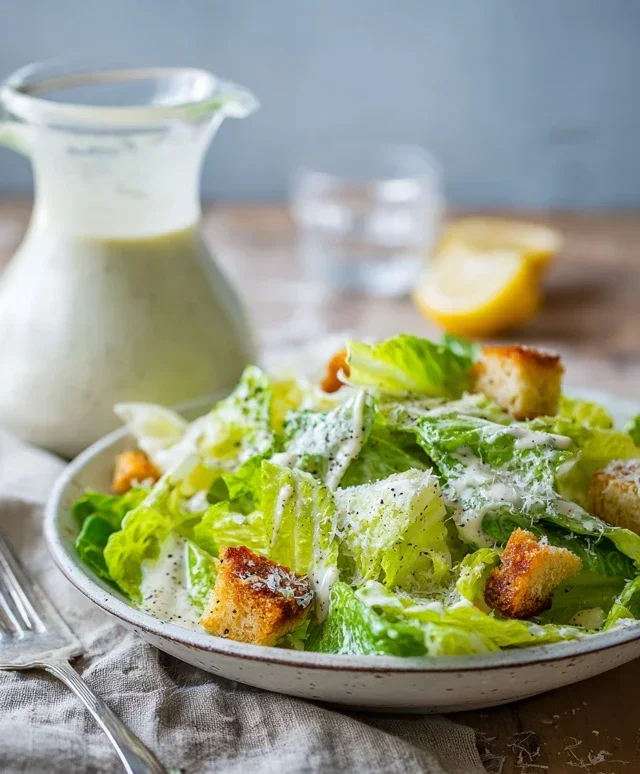
Once you’ve achieved your desired consistency and perfect seasoning, give the dressing one final, good whisk. It’s a great idea to let the dressing rest for at least 15-30 minutes in the refrigerator before serving. This allows the flavors to meld and deepen. During this resting period, the garlic and anchovy flavors will continue to infuse into the oil, creating an even more complex and delicious taste. When you’re ready to serve, give the dressing a quick whisk as the oil might separate slightly if it sits for too long. Pour this glorious homemade Caesar dressing over crisp romaine lettuce, add some croutons, and top with extra grated Parmesan cheese. You can also use this versatile dressing as a dip for vegetables or as a marinade for chicken. Enjoy the fruits of your labor – a truly exceptional Caesar salad dressing made by you!
Conclusion:
Whipping up your own homemade Caesar salad dressing is truly a game-changer for any salad lover. The vibrant, creamy, and tangy flavor you achieve at home far surpasses anything from a bottle. It’s surprisingly simple to make, requiring just a handful of common ingredients, and the satisfaction of creating such a classic dressing from scratch is immense. This recipe is perfect for elevating your everyday salads, making them a truly special occasion. Don’t hesitate to try it – your taste buds will thank you!
Serve this luscious dressing tossed with crisp romaine lettuce, crunchy croutons, and a generous sprinkle of Parmesan cheese for the quintessential Caesar experience. It’s also fantastic as a dip for raw vegetables, a marinade for chicken or fish, or even spread on a chicken sandwich. For variations, consider adding a pinch of anchovy paste for an extra punch of umami, a squeeze of lemon juice for more brightness, or even a touch of Dijon mustard for added complexity.
Frequently Asked Questions about Homemade Caesar Salad Dressing:
Q: How long does homemade Caesar salad dressing last?
A: Stored in an airtight container in the refrigerator, your homemade Caesar salad dressing should last for about 5-7 days. Always give it a quick stir before using, as separation can occur.
Q: Can I make this dressing without raw eggs?
A: Absolutely! If you’re concerned about raw eggs, you can omit them entirely. The dressing will be slightly less rich but still incredibly delicious. Alternatively, you can use pasteurized eggs if you prefer.
Q: My dressing is too thick. How can I thin it out?
A: If your dressing is too thick, you can thin it out by adding a tablespoon of water, lemon juice, or even a little bit of milk or buttermilk at a time until you reach your desired consistency. Stir well after each addition.
Homemade Caesar Salad Dressing
A classic and creamy Caesar salad dressing made from scratch, perfect for elevating your favorite salads.
Ingredients
-
2 large egg yolks
-
2 cloves garlic, minced
-
1 teaspoon Dijon mustard
-
1/4 cup fresh lemon juice
-
1/4 cup grated Parmesan cheese
-
1/4 cup anchovy paste (or 3-4 anchovy fillets, mashed)
-
1/2 cup extra virgin extract olive oil
-
Salt and freshly ground black pepper to taste
Instructions
-
Step 1
In a medium bowl, whisk together the egg yolks, minced garlic, Dijon mustard, and lemon juice until well combined. -
Step 2
Stir in the grated Parmesan cheese and anchovy paste (or mashed anchovies) until incorporated. -
Step 3
Slowly drizzle in the extra virgin extract olive oil while continuously whisking. This will emulsify the dressing, making it thick and creamy. -
Step 4
Continue whisking until all the olive oil has been added and the dressing has a smooth, thick consistency. -
Step 5
Season generously with salt and freshly ground black pepper to taste. Adjust seasoning as needed. -
Step 6
Transfer the dressing to an airtight container and refrigerate for at least 30 minutes to allow the flavors to meld. It will thicken further as it chills.
Important Information
Nutrition Facts (Per Serving)
It is important to consider this information as approximate and not to use it as definitive health advice.
Allergy Information
Please check ingredients for potential allergens and consult a health professional if in doubt.