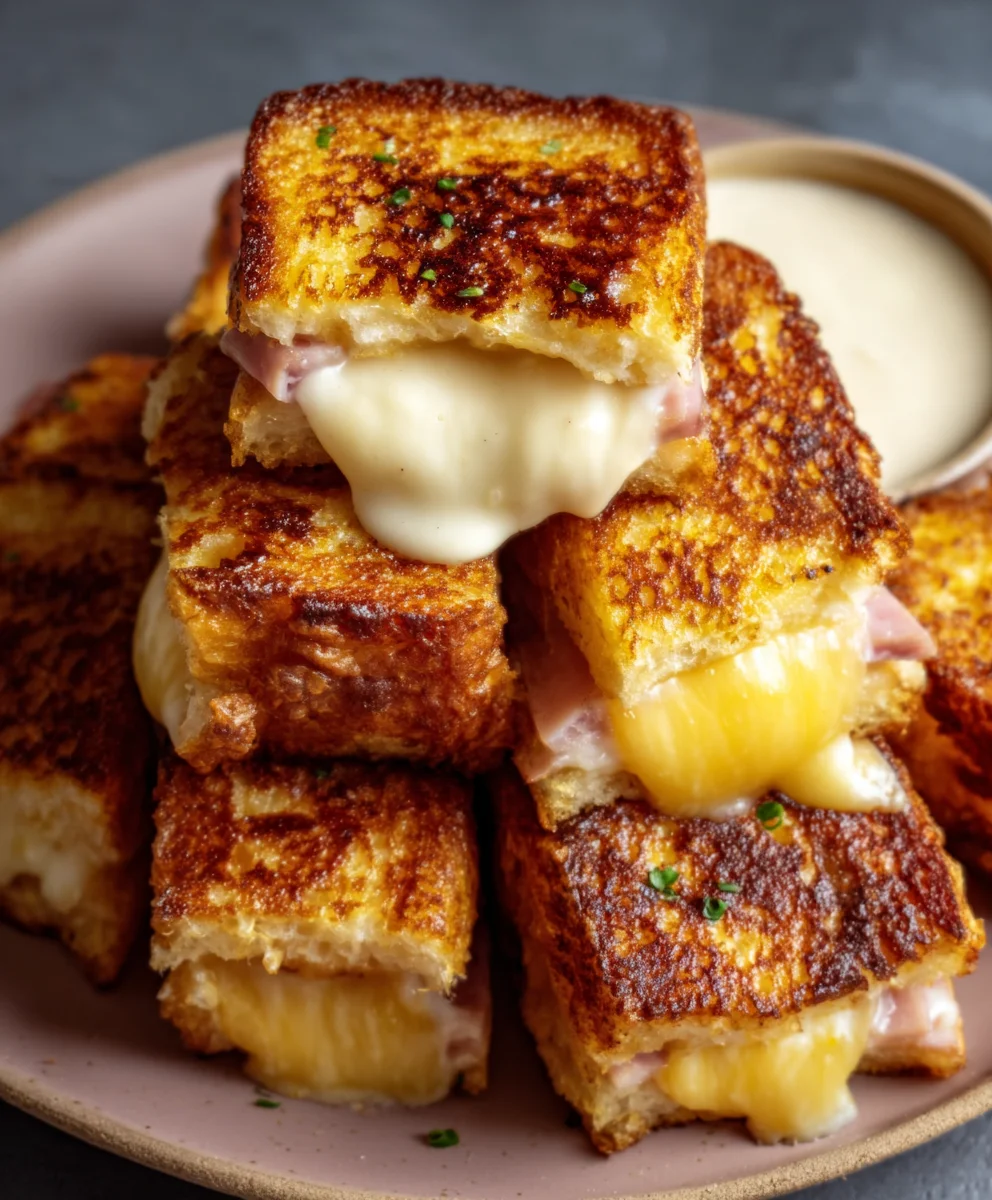
Hawaiian Roll Grilled Cheese-Sweet & Savory Bliss
Hawaiian Roll Grilled Cheese, a seemingly simple sandwich, holds a magical power to transport us back to childhood bliss and comfort. There’s something undeniably joyful about the sweet, soft embrace of a Hawaiian roll giving way to a perfectly melted, gooey cheese filling. It’s not just a snack; it’s an experience that evokes fond memories and satisfies even the deepest cravings. What makes this particular twist on a classic so beloved? It’s the brilliant synergy of textures and flavors. The subtle sweetness of the Hawaiian rolls caramelizes beautifully when grilled, creating a delightful contrast with the savory, rich cheese. This isn’t your average lunchbox staple; this Hawaiian Roll Grilled Cheese elevates the humble grilled cheese into something truly special, a miniature masterpiece that’s both incredibly easy to make and outrageously delicious. Get ready to fall in love with this elevated comfort food all over again.
Ingredients:
- 4 Hawaiian rolls
- 1 cup shredded Monterey Jack cheese
- 2 tablespoons unsalted butter
- Optional: Sliced tomatoes or crispy beef beef bacon
Preparing the Rolls and Cheese
The foundation of any great Hawaiian roll grilled cheese lies in its sweet, soft buns and perfectly melted cheese. To begin extract, we need to prepare our Hawaiian rolls. Take your four Hawaiian rolls and slice them horizontally. This will create a top and bottom half for each sandwich, providing the perfect canvas for our cheesy goodness. Ensure your cuts are as clean as possible to maintain the integrity of the rolls. If the rolls are particularly soft, you might find a serrated knife works best for a clean slice without squishing them.
Next, we’ll focus on the star of the show: the Monterey Jack cheese. You’ll need one cup of shredded Monterey Jack cheese. If you’ve bought a block of cheese, shredding it yourself will yield a creamier melt compared to pre-shredded varieties, which often contain anti-caking agents. However, pre-shredded Monterey Jack works perfectly well for this recipe and offers convenience. Distribute this shredded cheese evenly between the bottom halves of your sliced Hawaiian rolls. Don’t be shy with the cheese – it’s what makes this a grilled cheese, after all! Aim for a generous, even layer.
Assembling the Sandwich
Now it’s time to bring all the elements together for our Hawaiian roll grilled cheese. Carefully place the top halves of the Hawaiian rolls back onto the cheese-covered bottom halves. Gently press down to ensure the sandwich is compact and ready for grilling. At this stage, if you’re opting for the optional additions, this is the perfect time to add them. For a burst of fresh flavor, arrange a few thin slices of tomato on top of the cheese on the bottom half before closing the sandwich. If you’re craving a savory, smoky element, scatter some crispy beef baconbacon over the cheese. These additions can elevate your grilled cheese from simple to sensational, offering delightful textural and flavor contrasts.
Grilling the Hawaiian Roll Grilled Cheese
This is where the magic happens, transforming simple ingredients into a golden, gooey delight. We’ll be using a skillet for this process, which offers excellent control over the heat and ensures even browning. Place a non-stick skillet over medium-low heat. Low and slow is the key to a perfect grilled cheese, especially with the delicate Hawaiian rolls. High heat can burn the outside before the inside has a chance to warm through and melt the cheese.
Once your skillet is warm, add the two tablespoons of unsalted butter. Allow the butter to melt completely, coating the bottom of the pan. Swirl the pan gently to ensure the butter is spread evenly. This buttery base will contribute to the crispy, golden-brown exterior of our Hawaiian roll grilled cheese and infuse it with a rich flavor.
Carefully place your assembled sandwiches into the melted butter in the skillet. You might need to cook them one at a time, depending on the size of your skillet, to avoid overcrowding. Overcrowding can steam the sandwiches instead of grilling them, leading to a less desirable texture. Let the sandwiches cook undisturbed for approximately 3 to 5 minutes. You’re looking for a beautiful golden-brown color on the bottom of the rolls and for the cheese to start melting.
Flipping and Finishing the Sandwich
After 3 to 5 minutes, it’s time to check the underside of your Hawaiian roll grilled cheese. Using a spatula, gently lift one edge to peek. If it’s golden brown and slightly crisp, it’s time to flip. Carefully slide your spatula underneath the entire sandwich and with a confident, swift motion, flip it over. You should hear a gentle sizzle as it hits the pan.
Now, repeat the cooking process on the second side. Cook for another 3 to 5 minutes, or until this side is also golden brown and the cheese is fully melted and gooey. You can gently press down on the sandwich with your spatula during this stage to encourage even melting and to create a slightly more compressed, enjoyable bite. Keep an eye on the heat; if the rolls are browning too quickly, reduce the heat slightly. If the cheese isn’t melting sufficiently, you can cover the skillet loosely with a lid for a minute or two to trap heat and help the cheese melt. The goal is a perfectly toasted bun with a molten cheese interior. Once both sides are golden and the cheese is delightfully melted, your Hawaiian roll grilled cheese is ready to be enjoyed.

Conclusion:
There you have it – the ultimate guide to crafting the most delicious Hawaiian Roll Grilled Cheese! This recipe is a delightful fusion of sweet, savory, and cheesy goodness, perfect for a quick lunch, a satisfying snack, or even a fun dinner. The soft, slightly sweet Hawaiian rolls paired with your favorite melty cheese create a comfort food experience that’s truly irresistible. Don’t be afraid to get creative and experiment with different cheeses and add-ins to make this Hawaiian Roll Grilled Cheese your own. I encourage you to give this recipe a try; I’m confident it will become a fast favorite in your household. Serve it alongside a hearty tomato soup for a classic pairing, or with a fresh side salad for a lighter meal. Enjoy the simple pleasure of this incredibly tasty grilled cheese!
Frequently Asked Questions:
What kind of cheese works best for a Hawaiian Roll Grilled Cheese?
While many cheeses melt beautifully, a classic cheddar, Monterey Jack, or Gruyere are fantastic choices for their flavor and meltability. You can also mix and match for a more complex cheesy profile. A good quality provolone or mozzarella will also yield wonderfully gooey results.
Can I add other ingredients to my Hawaiian Roll Grilled Cheese?
Absolutely! This is where the fun truly begin extracts. Consider adding thin slices of beef ham or turkey for a more substantial sandwich, caramelized onions for a touch of sweetness and depth, or even a thin spread of fig jam for an extra layer of sweet and savory contrast. A sprinkle of fresh herbs like chives or parsley can also add a nice touch of freshness.
Hawaiian Roll Grilled Cheese – Sweet & Savory Bliss
A delightful grilled cheese sandwich featuring the sweet, soft texture of Hawaiian rolls combined with gooey melted Monterey Jack cheese, offering a perfect balance of sweet and savory flavors. Optional additions like fresh tomatoes or crispy beef bacon can elevate this classic to a new level.
Ingredients
-
4 Hawaiian rolls
-
1 cup shredded Monterey Jack cheese
-
2 tablespoons unsalted butter
-
1 ripe tomato, thinly sliced (optional)
-
4 slices crispy beef bacon (optional)
Instructions
-
Step 1
Slice each of the four Hawaiian rolls horizontally to create a top and bottom half for each sandwich. -
Step 2
Distribute 1 cup of shredded Monterey Jack cheese evenly over the bottom halves of the sliced Hawaiian rolls. -
Step 3
If using, add sliced tomatoes or crispy beef bacon on top of the cheese. Place the top halves of the Hawaiian rolls back onto the cheese-covered bottom halves and gently press down. -
Step 4
Melt 2 tablespoons of unsalted butter in a non-stick skillet over medium-low heat. Swirl the pan to coat the bottom evenly. -
Step 5
Carefully place the assembled sandwiches into the melted butter in the skillet. Cook for approximately 3 to 5 minutes per side, until golden brown and the cheese is fully melted and gooey. Gently press down with a spatula during cooking.
Important Information
Nutrition Facts (Per Serving)
It is important to consider this information as approximate and not to use it as definitive health advice.
Allergy Information
Please check ingredients for potential allergens and consult a health professional if in doubt.