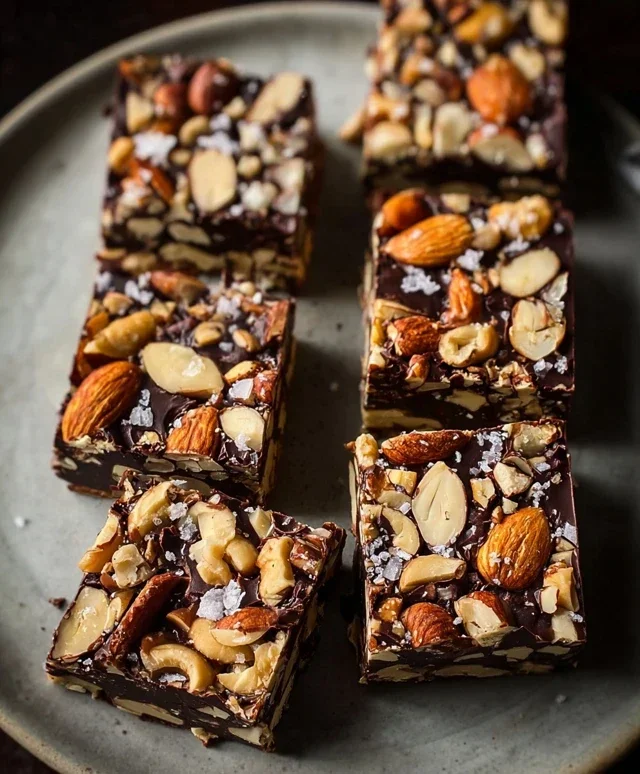
Dark Chocolate Sea Salt Nut Bars-Easy Recipe
Dark Chocolate and Sea Salt Nut Bars are about to become your new obsession, and I can tell you why. There’s something incredibly satisfying about the perfect balance of rich, bittersweet dark chocolate melting into crunchy, toasted nuts, all punctuated by those little bursts of flaky sea salt. These aren’t just any snack; they’re a decadent yet wholesome treat that satisfies cravings without leaving you feeling guilty. We all love a good grab-and-go option, but how often do we find one that truly delights our taste buds? What makes these Dark Chocolate and Sea Salt Nut Bars truly special is their simplicity combined with their sophisticated flavor profile. They’re incredibly easy to make at home, meaning you can control the quality of ingredients and customize them to your heart’s content. Prepare to elevate your snack game with these irresistible Dark Chocolate and Sea Salt Nut Bars.

Dark Chocolate and Sea Salt Nut Bars
Get ready to create a treat that’s both satisfyingly chewy and luxuriously decadent. These Dark Chocolate and Sea Salt Nut Bars are a revelation – a perfect balance of crunchy nuts, airy puffed rice, a hint of sweet chegrape juicess from brown rice syrup, and the irresistible allure of dark chocolate and sea salt. They’re remarkably easy to make, requiring no baking, which makes them an ideal weekend project or a quick fix for those moments when you need something delicious now. I love having these on hand for an afternoon pick-me-up, a post-workout snack, or even as a simple, homemade dessert. The combination of textures and flavors is truly addictive, and you’ll find yourself reaching for them more often than you might expect.
Ingredients:
Instructions
The beauty of these bars lies in their simplicity. We’re essentially creating a no-bake base, binding it together, and then adorning it with that irresistible chocolatey, salty finish.
Step 1: Prepare Your Nut Base
First, let’s get our nuts ready. If you’re using whole nuts like almonds or cashews, it’s a good idea to give them a rough chop. This helps them bind better and makes the bars easier to eat. You don’t need to pulverize them; just break them down into smaller, irregular pieces. For peanuts, if they are already shelled, you can leave them whole or give them a light chop, depending on your preference for texture. Once your nuts are chopped, combine them in a large mixing bowl with the puffed rice. The puffed rice will add a lovely lightness and crunch to the bars, preventing them from becoming too dense. Ensure everything is well mixed.
Step 2: Create the Binding Syrup
Now, it’s time to create the magical ingredient that holds everything together. In a small saucepan, gently heat the brown rice syrup over low heat. You don’t want to boil it, just warm it enough so it becomes more fluid and easier to pour. Once it’s warm and pourable, remove it from the heat and stir in the vanilla extract and the 1/2 teaspoon of sea salt. The vanilla adds a wonderful depth of flavor, and the sea salt is crucial for enhancing all the other tastes. Whisk it all together until well combined. The aroma at this stage is already pretty fantastic!
Step 3: Combine and Press the Base
Pour the warmed brown rice syrup mixture over the nuts and puffed rice in your large mixing bowl. Now comes the fun part: mixing! Use a sturdy spatula or your hands (lightly oiled or wet to prevent sticking) to thoroughly coat all the dry ingredients with the syrup. You want to ensure every nut and piece of puffed rice has a good coating. It might seem a bit sticky, and that’s exactly what we’re going for. Once everything is evenly coated, transfer this mixture to a prepared baking dish. I usually line an 8×8 inch baking dish with parchment paper, leaving some overhang on the sides to make lifting the bars out later a breeze. Press the mixture down firmly and evenly into the dish. You can use the bottom of a glass or a spatula to get a really compact and even layer. The firmer you press, the more cohesive your bars will be.
Step 4: Melt the Chocolate Topping
While your pressed nut base is chilling or setting slightly, let’s prepare that glorious chocolate topping. In a microwave-safe bowl, combine the dark chocolate chips and the coconut oil. Coconut oil helps the chocolate melt smoothly and gives it a lovely sheen. Microwave in 30-second intervals, stirring well after each interval, until the chocolate is completely melted and smooth. Be careful not to overheat it, as chocolate can seize if it gets too hot. Alternatively, you can melt the chocolate and coconut oil in a double boiler for a more controlled melt.
Step 5: Finish and Chill
Once the chocolate is melted and smooth, pour it evenly over the pressed nut mixture in the baking dish. Use a spatula to spread it out to the edges, creating a beautiful, smooth chocolate layer. This is where the magic happens, transforming a simple nut bar into something truly special. If you’re using the optional flaky salt, now is the time to sprinkle it generously over the melted chocolate. The contrast of the sweet chocolate with the little bursts of salty crunch from the flaky sea salt is divine.
Once the chocolate is spread, place the baking dish in the refrigerator. Let it chill for at least 1-2 hours, or until the chocolate is completely set and firm. This chilling time is essential for the bars to firm up and become sliceable.
Step 6: Slice and Serve
When the bars are fully chilled and firm, use the parchment paper overhang to lift the entire slab out of the baking dish. Place it on a cutting board and use a sharp knife to cut it into your desired bar or square shapes. I usually aim for about 12-16 bars, depending on how thick I want them. These bars are best stored in an airtight container in the refrigerator, where they’ll stay fresh and firm for up to a week. Enjoy these incredible Dark Chocolate and Sea Salt Nut Bars!
Conclusion:
I hope you’re as excited as I am to try these Dark Chocolate and Sea Salt Nut Bars! They truly are a revelation – a perfect balance of rich, decadent dark chocolate, the satisfying crunch of various nuts, and that delightful pop of sea salt that elevates every bite. They’re incredibly versatile, making them a fantastic grab-and-go snack for busy mornings, an energizing post-workout treat, or even an elegant, yet simple, dessert. The beauty of this recipe lies in its adaptability; feel free to swap out nuts based on your preferences or what you have on hand. Almonds, walnuts, pecans, even cashews all work wonderfully. You could also add a sprinkle of chili flakes for a touch of heat or some dried cranberries for a fruity tang. Don’t be intimidated by the chocolate; it’s simpler than you think to create these delightful bars. I encourage you to give them a go – I’m confident they’ll become a new favorite in your kitchen!
Frequently Asked Questions:
Can I make these vegan?
Absolutely! To make these Dark Chocolate and Sea Salt Nut Bars vegan, ensure you use vegan dark chocolate. Many dark chocolate varieties are naturally dairy-free, but it’s always a good idea to check the ingredients list. You can also use a plant-based binder like maple syrup or agave nectar if your origin extractal recipe calls for honey or other non-vegan sweeteners.
How should I store these nut bars?
These bars store beautifully. Once cooled completely, you can store them in an airtight container at room temperature for up to a week. For longer storage, or if your kitchen tends to be warm, I recommend keeping them in the refrigerator. This will help maintain their texture and prevent the chocolate from melting, ensuring you have a delicious treat ready whenever the craving strikes.
What kind of nuts are best for these bars?
The beauty of these Dark Chocolate and Sea Salt Nut Bars is their flexibility. A mix of textures and flavors is ideal! I love using a combination of crunchy almonds, rich walnuts, and buttery pecans. However, don’t hesitate to experiment. Cashews add a creamy element, and even peanuts can offer a familiar and satisfying crunch. The key is to use raw, unsalted nuts so you can control the saltiness and toast them to bring out their best flavor before incorporating them into the bars.
Dark Chocolate and Sea Salt Nut Bars
Chewy and satisfying no-bake bars loaded with nuts, puffed rice, and dark chocolate, finished with a sprinkle of sea salt.
Ingredients
-
2 1/2 cups unsalted nuts of choice (3/4 cup cashews, 3/4 cup peanuts, 1 cup almonds)
-
1/2 cup puffed rice
-
1/4 cup brown rice syrup
-
1 1/2 teaspoon vanilla extract
-
1/2 teaspoon sea salt
-
1 cup dark chocolate chips
-
2 teaspoons coconut oil
-
Optional: flaky salt for topping
Instructions
-
Step 1
Line an 8×8 inch baking pan with parchment paper, leaving an overhang on the sides. -
Step 2
In a large bowl, combine the nuts and puffed rice. -
Step 3
In a small saucepan, gently warm the brown rice syrup and vanilla extract over low heat until slightly runny. Do not boil. -
Step 4
Pour the warm syrup mixture over the nut and puffed rice mixture. Add the 1/2 teaspoon of sea salt and stir until everything is well combined and coated. -
Step 5
Press the mixture evenly into the prepared baking pan. -
Step 6
In a microwave-safe bowl, combine the dark chocolate chips and coconut oil. Microwave in 30-second intervals, stirring in between, until melted and smooth. -
Step 7
Pour the melted chocolate over the nut mixture in the pan, spreading it evenly. If using, sprinkle with flaky salt for topping. -
Step 8
Place the pan in the refrigerator for at least 1 hour, or until the chocolate is firm. Once set, lift the bars out of the pan using the parchment paper overhang and cut into 12 bars.
Important Information
Nutrition Facts (Per Serving)
It is important to consider this information as approximate and not to use it as definitive health advice.
Allergy Information
Please check ingredients for potential allergens and consult a health professional if in doubt.