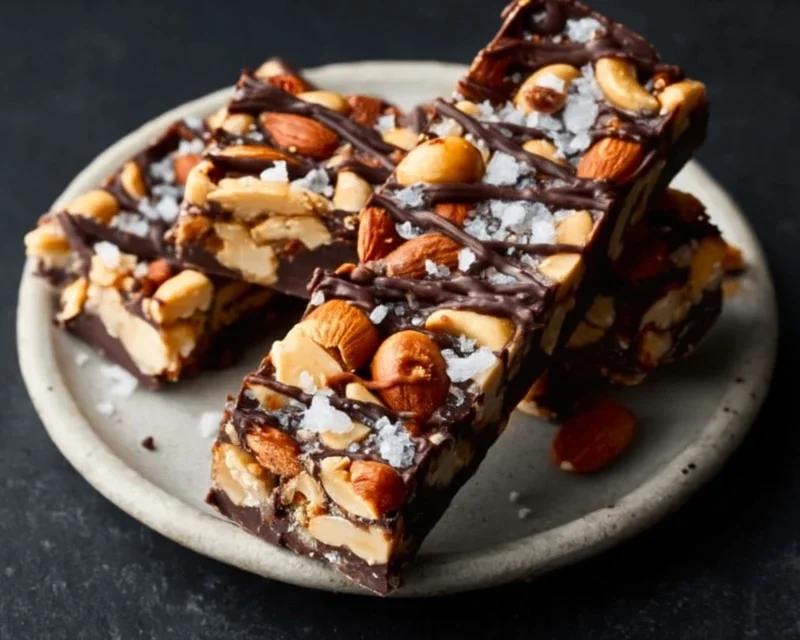
Dark Chocolate Sea Salt Nut Bars-Easy Recipe
Dark Chocolate and Sea Salt Nut Bars are an absolute dream for anyone who craves a sophisticated yet utterly satisfying sweet treat. I’m talking about that perfect harmony of rich, deep cocoa notes playing beautifully against the intriguing, subtle crunch and salinity of flaky sea salt. These aren’t just any snack; they’re a revelation, a homemade delight that elevates your afternoon pick-me-up or your post-dinner indulgence. What makes these Dark Chocolate and Sea Salt Nut Bars so incredibly special? It’s the texture – the satisfying chew from the nuts, the melt-in-your-mouth quality of the dark chocolate, and that unexpected pop of sea salt that cuts through the sweetness, creating a flavor profile that’s both complex and addictive. You’ll find yourself reaching for them again and again, and soon, they’ll become your go-to for impressing guests or simply treating yourself to something truly delicious.
Why You’ll Love These Bars:
Perfectly Balanced Sweet and Salty
Incredibly Easy to Make
Customizable with Your Favorite Nuts

Dark Chocolate and Sea Salt Nut Bars
These Dark Chocolate and Sea Salt Nut Bars are my go-to for a satisfying, homemade treat that hits all the right notes. They’re perfectly chewy, delightfully crunchy, and boast that irresistible combination of rich dark chocolate and a hint of sea salt. Whether you need an afternoon pick-me-up, a post-workout refuel, or a simple dessert that feels a little bit fancy, these bars deliver. The beauty of this recipe lies in its simplicity and adaptability. You can easily swap out the nuts to suit your preferences or what you have on hand. The puffed rice adds a lovely lightness and crunch that balances the denser nuts, and the brown rice syrup provides the perfect chewy binder. Finally, the glossy dark chocolate topping, sprinkled with a touch of flaky sea salt, elevates these from a simple snack to something truly special. Get ready to impress yourself (and anyone lucky enough to share these with you!) with these incredibly easy yet incredibly delicious bars.
Ingredients:
Preparation Steps:
Step 1: Preparing the Nut Mixture
The first step to creating these delicious bars is to get your nuts ready. You can use a single type of nut, but a combination adds wonderful complexity to the flavor and texture. My preferred mix, as listed in the ingredients, is cashews, peanuts, and almonds. I like to give them a rough chop. You don’t want them to be powdery, but rather in varied sizes, from slightly larger pieces to smaller crum extractbles. This ensures you get a satisfying crunch in every bite. You can do this by hand with a sharp knife, or pulse them gently in a food processor. Be careful not to over-process, as you’re aiming for texture, not nut butter. Once chopped, place these nuts into a large mixing bowl. Next, add the puffed rice to the bowl with the nuts. The puffed rice adds a fantastic lightness and crunch that complements the denser nuts beautifully. Give them a gentle stir to combine.
Step 2: Creating the Binding Syrup
Now it’s time to create the glue that will hold our delicious bars together. In a small saucepan, combine the brown rice syrup, vanilla extract, and the 1/2 teaspoon of sea salt. Place the saucepan over medium-low heat. Stir the mixture gently as it heats up. You’re not looking to boil this, just to warm it through and ensure the salt is fully dissolved. Warming the brown rice syrup slightly makes it more pliable and easier to incorporate into the nut and rice mixture, ensuring an even coating. This step is crucial for achieving the perfect chewy texture. Once the syrup is warm and the salt has dissolved, remove the saucepan from the heat.
Step 3: Combining the Base Ingredients
Pour the warm brown rice syrup mixture over the chopped nuts and puffed rice in the large mixing bowl. Using a sturdy spatula or a wooden spoon, begin extract to mix everything together thoroughly. You want to ensure that every single piece of nut and puffed rice is coated in the sticky, sweet syrup. This might take a minute or two of patient stirring. It’s important to work relatively quickly at this stage, as the syrup will start to cool and thicken. Press the mixture down firmly as you stir to help it bind together. The goal is to create a cohesive mixture that will hold its shape when pressed into a pan.
Step 4: Pressing and Chilling the Base
Prepare an 8×8 inch baking pan by lining it with parchment paper. Make sure the parchment paper overhangs the sides of the pan; this will make it much easier to lift the bars out later. Spoon the nut and rice mixture into the prepared pan. Now comes the pressing! This is a key step for ensuring your bars don’t crum extractble apart. Use the bottom of a measuring cup, a flat-bottomed glass, or even your hands (lightly greased if they stick) to press the mixture down as firmly and evenly as possible into the pan. The denser you pack it, the more cohesive your bars will be. Once firmly pressed, place the pan in the refrigerator for at least 30 minutes. This chilling time allows the brown rice syrup to set and firm up, making the base easier to handle and cut.
Step 5: Melting the Chocolate and Finishing
While the nut base is chilling, prepare the chocolate topping. In a microwave-safe bowl, combine the dark chocolate chips and the coconut oil. Microwave in 30-second intervals, stirring well after each interval, until the chocolate is completely melted and smooth. The coconut oil helps the chocolate melt evenly and creates a lovely glossy finish. Once the chocolate is smooth, retrieve the chilled nut base from the refrigerator. Pour the melted dark chocolate evenly over the top of the pressed nut mixture, spreading it with your spatula to cover the entire surface. If you’re using flaky salt, sprinkle it over the still-melted chocolate while it’s wet. The salt crystals will adhere beautifully and add that perfect touch of savory contrast.
Step 6: Setting and Cutting the Bars
Once the chocolate is spread, return the pan to the refrigerator for at least another 1 to 2 hours, or until the chocolate is completely set and firm. This is crucial for clean cuts. Once the chocolate has hardened, use the parchment paper overhang to carefully lift the entire block out of the pan. Place it on a cutting board and, using a sharp knife, cut the block into your desired bar size. For cleaner cuts, you can gently warm the knife blade under hot water and dry it before each cut. Store these delicious Dark Chocolate and Sea Salt Nut Bars in an airtight container in the refrigerator. They will stay fresh for about a week, though I doubt they’ll last that long! Enjoy every delicious, chewy, crunchy, chocolatey bite.
Conclusion:
I truly hope you’ve enjoyed diving into this recipe for Dark Chocolate and Sea Salt Nut Bars! These bars are an absolute winner because they strike the perfect balance between rich, indulgent dark chocolate, the satisfying crunch of your favorite nuts, and that delightful hint of sea salt that elevates every bite. They’re incredibly versatile, making them perfect for a quick breakfast on the go, a satisfying afternoon snack, or even a healthier dessert option. The simple preparation means you can whip up a batch without a fuss, and the results are always impressive. I encourage you to give these Dark Chocolate and Sea Salt Nut Bars a try – I’m confident you’ll fall in love with their delicious flavor and satisfying texture just as much as I have!
Serving Suggestions: Enjoy these bars on their own for an immediate energy boost, or crum extractble them over yogurt or a smoothie bowl for added texture and flavor. They also pair wonderfully with a cup of coffee or tea.
Variations: Feel free to experiment with different nut combinations! Almonds, walnuts, pistachios, or even pecans would be fantastic additions. You could also add a sprinkle of chili flakes for a spicy kick or some dried cranberries for a touch of tartness.
Frequently Asked Questions:
Can I make these bars vegan?
Absolutely! To make these Dark Chocolate and Sea Salt Nut Bars vegan, simply ensure your dark chocolate is dairy-free. Many high-quality dark chocolates are naturally vegan, but it’s always good to check the ingredients. You can also substitute the honey or maple syrup with agave nectar for a fully plant-based option.
How long will these bars stay fresh?
When stored in an airtight container at room temperature, these bars will typically stay fresh for up to a week. For longer storage, you can keep them in the refrigerator, where they’ll last for about two weeks. You can also freeze them for up to three months!
Dark Chocolate and Sea Salt Nut Bars
Chewy and satisfying no-bake bars packed with nuts, puffed rice, and drizzled with dark chocolate and sea salt.
Ingredients
-
2 1/2 cups unsalted nuts (3/4 cup cashews, 3/4 cup peanuts, 1 cup almonds)
-
1/2 cup puffed rice
-
1/4 cup brown rice syrup
-
1 1/2 teaspoon vanilla extract
-
1/2 teaspoon sea salt
-
1 cup dark chocolate chips
-
2 teaspoons coconut oil
-
Flaky salt for topping (optional)
Instructions
-
Step 1
Line an 8×8 inch baking pan with parchment paper, leaving an overhang on the sides. -
Step 2
In a large bowl, combine the mixed nuts and puffed rice. Stir to evenly distribute. -
Step 3
In a small saucepan over low heat, gently warm the brown rice syrup until it is pourable. Stir in the vanilla extract and sea salt. -
Step 4
Pour the warm syrup mixture over the nuts and puffed rice. Stir well until all ingredients are coated. -
Step 5
Press the mixture firmly and evenly into the prepared baking pan. -
Step 6
In a small microwave-safe bowl, combine the dark chocolate chips and coconut oil. Microwave in 30-second intervals, stirring in between, until melted and smooth. -
Step 7
Drizzle the melted chocolate over the nut mixture in the pan. Sprinkle with flaky salt, if using. -
Step 8
Refrigerate for at least 30 minutes, or until the chocolate is set. Cut into bars.
Important Information
Nutrition Facts (Per Serving)
It is important to consider this information as approximate and not to use it as definitive health advice.
Allergy Information
Please check ingredients for potential allergens and consult a health professional if in doubt.