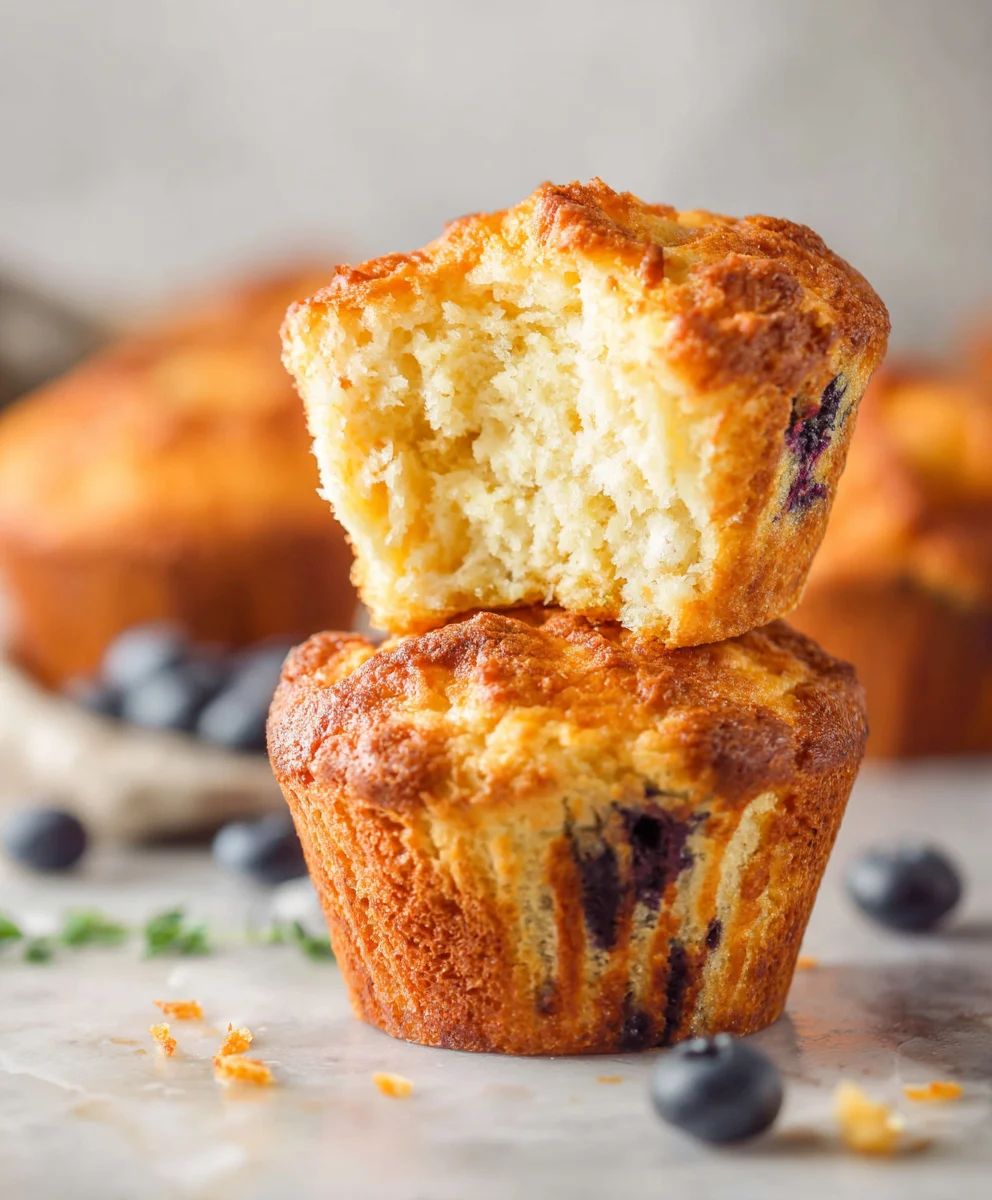
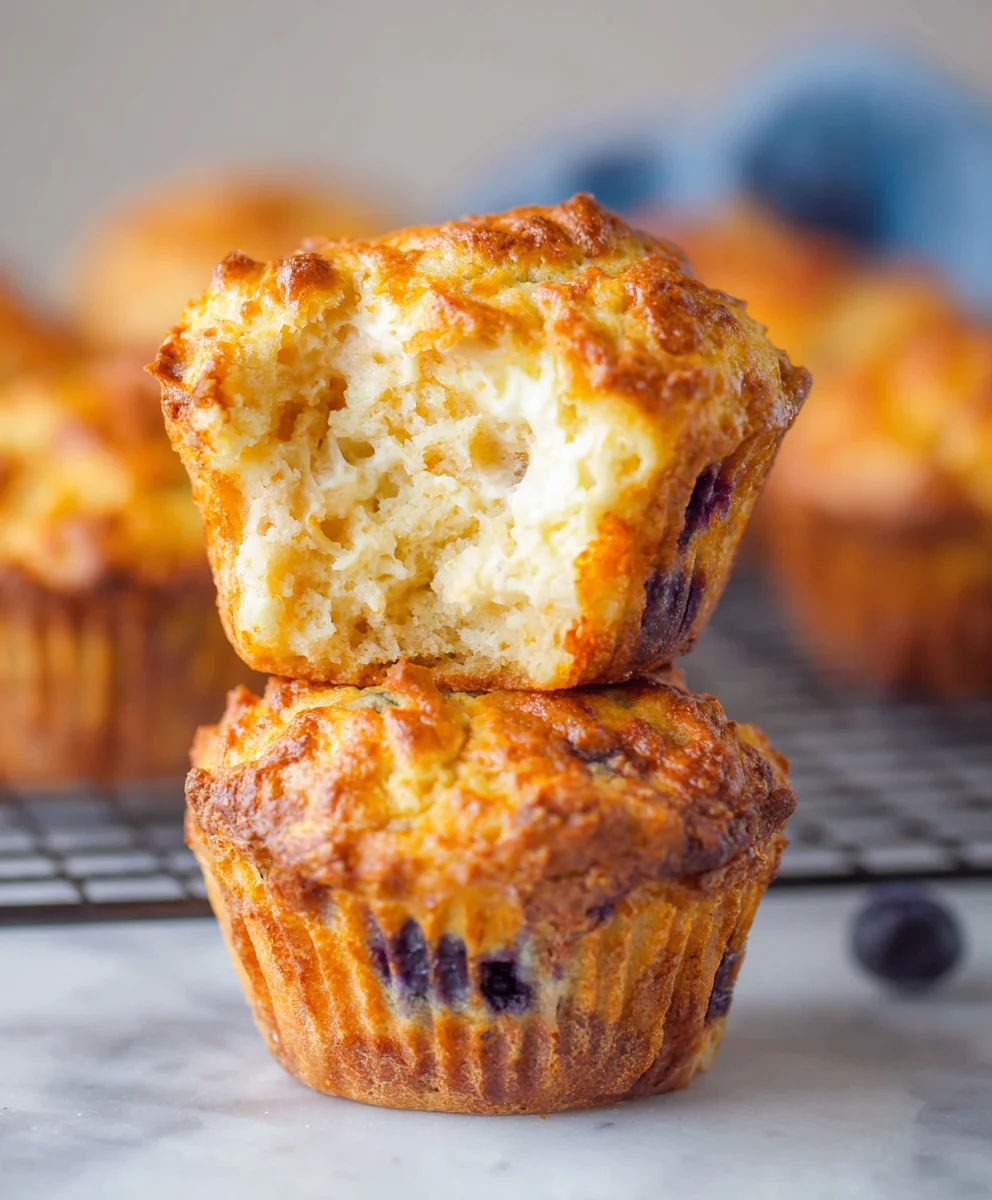
Best Ever Cottage Cheese Muffins- Deliciously Easy
15+ Best Ever Cottage Cheese Muffin Recipes! If you’re looking to elevate your baking game with a surprising yet delightful ingredient, you’ve landed in the perfect spot. Cottage cheese, often overlooked for sweet treats, is a secret weapon for incredibly moist, tender, and subtly tangy muffins that are simply irresistible. These aren’t your average muffins; they’re a revelation, packed with wholesome goodness and a delightful texture that will have you reaching for a second (or third!) helping. People absolutely adore cottage cheese muffins because they strike that perfect balance between being a satisfying breakfast, a wholesome snack, and a surprisingly light dessert. What truly makes these recipes special is the way cottage cheese transforms humble ingredients into something extraordinary, creating a flavor and mouthfeel that’s both comforting and uniquely delicious. Get ready to discover your new favorite muffin obsession!
Ingredients:
- 1 cup low-fat cottage cheese
- 2 large eggs
- 1/4 cup melted coconut oil
- 1/3 cup coconut sugar or sweetener of choice
- 1 tsp vanilla extract
- 1 1/2 cups whole wheat flour
- 1 tsp baking powder
- 1/2 tsp baking soda
- 1/4 tsp salt
- 1/2 cup dark chocolate chips
Making Your Cottage Cheese Chocolate Chip Muffins
Phase 1: Preparing the Wet Ingredients and Preheating
The first step to creating these incredibly moist and delicious cottage cheese chocolate chip muffins is to get your oven ready and combine the foundational wet ingredients. Preheat your oven to 375 degrees Fahrenheit (190 degrees Celsius). This consistent temperature is crucial for even baking, ensuring your muffins rise beautifully without burning. Next, in a large mixing bowl, add your 2 large eggs. Whisk them gently with a fork or a whisk until the yolks and whites are just combined. Don’t over-whisk; we’re not making meringue here. To this, add your 1 cup of low-fat cottage cheese. The cottage cheese is the star ingredient, providing unparalleled moisture and a subtle, creamy tang that complements the sweetness of the chocolate. If you’re sensitive to small curds, you can give the cottage cheese a quick blend with an immersion blender or in a food processor before adding it to the eggs, but I personally enjoy the slight texture it adds. Now, pour in your 1/4 cup of melted coconut oil. Coconut oil adds a lovely richness and helps create a tender crum extractb. If you don’t have coconut oil, a neutral-flavored oil like vegetable or canola oil will work in a pinch, but the coconut oil imparts a subtle, pleasant aroma. Follow this with your 1/3 cup of coconut sugar. Coconut sugar offers a slightly caramel-like flavor and a lower glycemic index compared to refined sugar, making these muffins a slightly more wholesome treat. If you prefer, feel free to use your favorite granulated sweetener, adjusting the amount to your personal taste. Finally, stir in 1 teaspoon of vanilla extract. Vanilla is a classic flavor enhancer that rounds out the sweetness and brings out the chocolate notes beautifully. Whisk all of these wet ingredients together until they are thoroughly combined and the mixture is smooth and uniform. This combination forms the flavorful base of your muffins.
Phase 2: Incorporating the Dry Ingredients
With your wet ingredients happily mingled, it’s time to introduce the dry components. In a separate medium-sized bowl, combine your 1 1/2 cups of whole wheat flour. Whole wheat flour lends a heartier texture and more nutritional value than all-purpose flour, though if you prefer a lrum extractter crumb, you can substitute half of it with all-purpose flour. To the flour, add 1 teaspoon of baking powder and 1/2 teaspoon of baking soda. These leavening agents are essential for creating that signature muffin rise. Baking powder provides a double-acting lift, starting in the bowl and continuing in the oven, while baking soda reacts with the acidic components in the batter (like the cottage cheese) to give an extra boost. Don’t forget to add 1/4 teaspoon of salt. Salt, often overlooked in sweet recipes, is a crucial flavor balancer that intensifies the other ingredients and prevents the muffins from tasting bland. Now, whisk these dry ingredients together thoroughly. It’s important to distribute the leavening agents and salt evenly throughout the flour to ensure consistent rising and flavor in every bite. Once the dry ingredients are well-mixed, create a well in the center of the wet ingredients. Gradually add the dry ingredients to the wet ingredients, mixing with a spatula or wooden spoon until just combined. Be careful not to overmix at this stage. Overmixing can develop the gluten in the flour too much, resulting in tough, dense muffins. A few streaks of flour remaining are perfectly fine; they will disappear during baking.
Phase 3: The Chocolatey Addition and Filling the Liners
Now comes the most exciting part for many: adding the chocolate chips! Gently fold in your 1/2 cup of dark chocolate chips. I recommend using dark chocolate chips as their slightly bitter notes provide a lovely contrast to the sweet muffin base. If you’re a milk chocolate fan, feel free to substitute them. For an extra decadent touch, you can reserve a tablespoon of chocolate chips to sprinkle on top of each muffin before baking. This creates a visually appealing and extra-chocolatey finish. Once the chocolate chips are evenly distributed throughout the batter, it’s time to fill your muffin liners. Line a standard 12-cup muffin tin with paper liners or grease the cups thoroughly if you prefer to bake directly in the tin. Spoon the batter evenly into the prepared muffin cups, filling each one about two-thirds to three-quarters full. This allows enough room for the muffins to rise without overflowing. Using an ice cream scoop can help ensure uniform portioning, leading to evenly baked muffins. Don’t press the batter down; keep it light and airy.
Phase 4: Baking to Golden Perfection
Place your filled muffin tin into the preheated oven. Bake for approximately 20 to 25 minutes, or until a wooden skewer or toothpick inserted into the center of a muffin comes out clean with onrum extracta few moist crumbs attached. Avoid opening the oven door too early in the baking process, as this can cause the muffins to deflate. If you notice the tops browning too quickly, you can loosely tent the muffin tin with aluminum foil for the remainder of the baking time. Once baked, remove the muffin tin from the oven and let the muffins cool in the tin for about 5 to 10 minutes. This brief cooling period in the tin helps them set properly before you attempt to remove them.
Phase 5: Cooling and Enjoying
After the initial cooling in the tin, carefully transfer the muffins to a wire rack to cool completely. Allowing them to cool on a wire rack ensures air circulation all around, preventing the bottoms from becoming soggy. Once they’ve reached room temperature, they are ready to be devoured! These cottage cheese chocolate chip muffins are delicious on their own, or you can serve them with a dollop of Greek yogurt or a smear of butter. They store well in an airtight container at room temperature for up to 3 days, or in the refrigerator for about a week. For longer storage, you can freeze them, and they reheat beautifully in a toaster oven or microwave. Enjoy the delightful texture and rich flavor of your homemade cottage cheese muffins!
Conclusion:
I hope you’ve enjoyed exploring the 15+ Best Ever Cottage Cheese Muffin Recipes! These delightful muffins offer a fantastic way to boost your protein intake while enjoying a delicious treat. Their versatility makes them perfect for breakfast on-the-go, a satisfying snack, or even a light dessert. Don’t be afraid to experiment with different add-ins and flavor profiles to make them your own. Remember, baking is an adventure, and these cottage cheese muffins are a wonderful starting point for culinary creativity. So go ahead, preheat your ovens, and get ready to whip up a batch that your whole family will rave about! Happy baking!
Frequently Asked Questions:
Can I make these cottage cheese muffins gluten-free?
Absolutely! For most recipes, you can easily substitute a gluten-free all-purpose flour blend for the regular flour. Ensure your blend contains xanthan gum or add a teaspoon if it doesn’t. You might need to adjust the liquid slightly, so start with the recommended amount and add a tablespoon more if the batter seems too dry.
What’s the best way to store cottage cheese muffins?
Once cooled completely, cottage cheese muffins can be stored in an airtight container at room temperature for up to 2 days. For longer storage, refrigerate them for up to a week, or freeze them individually wrapped for up to 3 months. Reheat gently in a toaster oven or microwave before serving.
Best Ever Cottage Cheese Muffins- Deliciously Easy
Incredibly moist and delicious cottage cheese chocolate chip muffins, made easily with simple ingredients.
Ingredients
-
1 cup low-fat cottage cheese
-
2 large eggs
-
1/4 cup melted coconut oil
-
1/3 cup coconut sugar
-
1 tsp vanilla extract
-
1 1/2 cups whole wheat flour
-
1 tsp baking powder
-
1/2 tsp baking soda
-
1/4 tsp salt
-
1/2 cup dark chocolate chips
Instructions
-
Step 1
Preheat your oven to 375 degrees Fahrenheit (190 degrees Celsius). In a large mixing bowl, whisk together 2 large eggs and 1 cup of low-fat cottage cheese. Add 1/4 cup of melted coconut oil, 1/3 cup of coconut sugar, and 1 teaspoon of vanilla extract. Whisk until thoroughly combined and smooth. -
Step 2
In a separate medium bowl, combine 1 1/2 cups of whole wheat flour, 1 teaspoon of baking powder, 1/2 teaspoon of baking soda, and 1/4 teaspoon of salt. Whisk to distribute evenly. -
Step 3
Gradually add the dry ingredients to the wet ingredients, mixing with a spatula or wooden spoon until just combined. Be careful not to overmix. Gently fold in 1/2 cup of dark chocolate chips. -
Step 4
Line a standard 12-cup muffin tin with paper liners or grease the cups. Spoon the batter evenly into the prepared muffin cups, filling each about two-thirds to three-quarters full. -
Step 5
Bake for 20 to 25 minutes, or until a wooden skewer inserted into the center comes out clean. Let the muffins cool in the tin for 5-10 minutes before transferring to a wire rack to cool completely.
Important Information
Nutrition Facts (Per Serving)
It is important to consider this information as approximate and not to use it as definitive health advice.
Allergy Information
Please check ingredients for potential allergens and consult a health professional if in doubt.