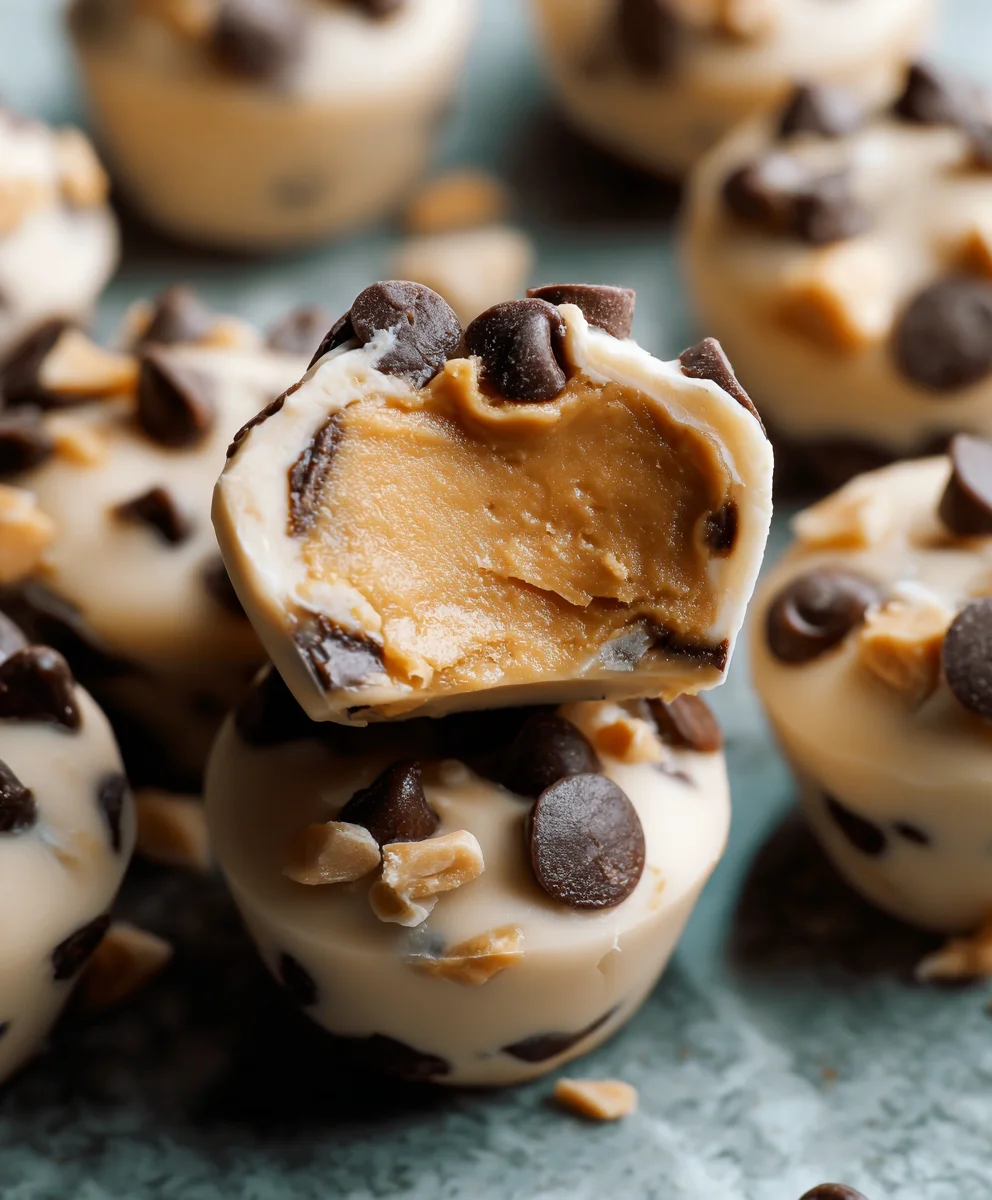
Frozen Greek Yogurt Peanut Butter Bites – Healthy Treat
Frozen Greek Yogurt Peanut Butter Bites: Your Freezer’s New Best Friend. Are you constantly on the hunt for that perfect, guilt-free treat that satisfies your sweet tooth and provides a little boost of energy? Look no further than these incredible Frozen Greek Yogurt Peanut Butter Bites! We all know the struggle of wanting something delicious but also wanting to feel good about what we’re eating. That’s exactly where these little powerhouses shine. People absolutely adore them because they strike the ideal balance between creamy, decadent, and surprisingly healthy. Imagin extracte the delightful tang of Greek yogurt swirled with the irresistible nuttiness of peanut butter, all chilled to a perfectly firm yet yielding bite. What makes these truly special is their incredible versatility. They’re not just a dessert; they’re the ideal post-workout recovery snack, a delightful breakfast addition, or even a midday pick-me-up that feels like a true indulgence without the sugar crash. You can whip them up in minutes and have a stash ready to go, making them your freezer’s ultimate secret weapon against cravings.

Ingredients:
- 1 cup creamy peanut butter
- ½ cup plain Greek yogurt
- ¼ cup honey or maple syrup (adjust to your sweetness preference)
- 1 teaspoon vanilla extract
- ½ teaspoon cinnamon
- ¼ cup mini chocolate chips (or finely chopped regular chocolate chips)
- 2 tablespoons chia seeds
- Optional: Pinch of sea salt for enhanced flavor
Crafting Your Frozen Greek Yogurt Peanut Butter Bites
These bites are incredibly simple to make, requiring no baking whatsoever. They’re the perfect make-ahead treat, ready to be grabbed straight from the freezer whenever a craving strikes. Let’s get started!
Step 1: Combining the Creamy Base
Start by gathering a medium-sized mixing bowl. Into this bowl, spoon your creamy peanut butter. If your peanut butter is particularly stiff from being stored in the refrigerator, you might want to let it sit at room temperature for about 15-20 minutes to soften slightly. This will make it much easier to incorporate with the other ingredients. Add the plain Greek yogurt to the peanut butter. The Greek yogurt not only adds a lovely tang and creaminess but also contributes protein and a lower fat content compared to just using more peanut butter.
Step 2: Sweetening and Spicing Things Up
Now it’s time to add the sweetness and that comforting warmth. Drizzle in your honey or maple syrup. I recommend starting with ¼ cup and then tasting the mixture before proceeding. You can always add a little more if you prefer a sweeter bite. Next, add the vanilla extract. Half a teaspoon might not sound like much, but it truly amplifies the overall flavor profile, adding a familiar and pleasant aroma. For that subtle spice that elevates everything, add a pinch of cinnamon. Trust me, this little addition makes a significant difference. If you’re feeling adventurous and enjoy a slight savory counterpoint to the sweetness, a tiny pinch of sea salt can also be a wonderful addition here.
Step 3: Thoroughly Mixing the Ingredients
This is where the magic starts to happen. Using a sturdy spoon or a spatula, begin extract to thoroughly mix all the ingredients together. You want to achieve a homogenous consistency, ensuring that the peanut butter, Greek yogurt, sweetener, vanilla, and cinnamon are completely combined. This might take a minute or two of vigorous stirring. Don’t be discouraged if it looks a bit streaky at first; keep mixing until it’s smooth and creamy. Make sure to scrape down the sides and bottom of the bowl to incorporate all the ingredients. The goal is a well-blended, uniform mixture that will hold its shape when chilled.
Step 4: Incorporating the Boosters
Once your base mixture is smooth and well-combined, it’s time to add the texture and nutritional powerhouses: the chocolate chips and chia seeds. Gently fold in the mini chocolate chips or your chopped chocolate. If you’re using larger chocolate chips, chopping them smaller will ensure they distribute more evenly throughout the bites and are easier to bite into when frozen. Next, sprinkle in the chia seeds. These tiny seeds are packed with fiber and omega-3 fatty acids, making these treats not just delicious but also a little bit nutritious. Stir gently to distribute them evenly throughout the peanut butter mixture. You don’t want them all clumped together.
Step 5: Freezing into Perfect Portions
Now comes the part where we transform this delicious mixture into grab-and-go bites. You have a couple of options for shaping. You can either drop spoonfuls of the mixture onto a parchment paper-lined baking sheet, creating rustic, bite-sized mounds. Or, for more uniform shapes, you can lightly grease your hands with a little oil or cooking spray and roll the mixture into small balls, about 1-inch in diameter. Place the shaped bites onto the parchment-lined baking sheet, ensuring they have a little space between them so they don’t freeze together. Transfer the baking sheet to your freezer and freeze for at least 2-3 hours, or until the bites are completely firm and solid. Once frozen, you can transfer them to an airtight container or a freezer-safe bag for long-term storage. They should keep well for up to a month, though I doubt they’ll last that long! Enjoy them straight from the freezer for a delightful, healthy-ish treat.
Conclusion:
We’ve reached the delicious end of our journey into creating the amazing Frozen Greek Yogurt Peanut Butter Bites: Your Freezer’s New Best Friend! These delightful little treats are incredibly easy to whip up and offer a wonderfully healthy way to satisfy your sweet cravings. Whether you’re looking for a post-workout refuel, a midday energy boost, or a guilt-free dessert, these bites are sure to hit the spot. I truly hope you enjoy making and, more importantly, devouring them as much as I do. Experiment with the variations below to discover your personal favorite flavor profile!
For serving suggestions, these bites are perfect straight from the freezer. They’re fantastic on their own, but you could also crum extractble them over a bowl of fresh berries or a smoothie for added texture and flavor. They make a lovely, light dessert after a hearty meal or a delightful accompaniment to your morning coffee.
As for variations, don’t be afraid to get creative! You can add a sprinkle of cinnamon for warmth, some mini chocolate chips for an extra indulgence, or even a dash of vanilla extract to the yogurt mixture. For a nutty crunch, consider stirring in some chopped almonds or walnuts. The possibilities are truly endless!
Frequently Asked Questions:
Can I make these ahead of time?
Absolutely! The beauty of Frozen Greek Yogurt Peanut Butter Bites: Your Freezer’s New Best Friend is that they are designed to be made ahead. Once frozen, they can be stored in an airtight container for up to 2-3 weeks, making them an excellent option for meal prepping and having healthy snacks readily available.
What if I don’t have Greek yogurt?
While Greek yogurt provides the best creamy texture and protein content for these bites, you can substitute it with regular plain yogurt. However, the texture might be slightly runnier, and the bites may not be as firm. You might need to adjust the freezing time or add a bit more peanut butter to help them set.
Frozen Greek Yogurt Peanut Butter Bites – Healthy Treat
Simple, no-bake frozen treats made with peanut butter, Greek yogurt, and nutritious additions like chocolate chips and chia seeds.
Ingredients
-
1 cup creamy peanut butter
-
½ cup plain Greek yogurt
-
¼ cup honey or maple syrup
-
½ teaspoon vanilla extract
-
½ teaspoon cinnamon
-
¼ cup mini chocolate chips
-
2 tablespoons chia seeds
Instructions
-
Step 1
Combine peanut butter and Greek yogurt in a medium-sized bowl. If peanut butter is stiff, let it soften at room temperature for 15-20 minutes. -
Step 2
Add honey or maple syrup, vanilla extract, and cinnamon to the bowl. A pinch of sea salt is optional for enhanced flavor. -
Step 3
Thoroughly mix all ingredients using a sturdy spoon or spatula until a homogenous and smooth consistency is achieved. Scrape down the sides and bottom of the bowl. -
Step 4
Gently fold in the mini chocolate chips and chia seeds, distributing them evenly throughout the mixture. -
Step 5
Drop spoonfuls onto a parchment paper-lined baking sheet or roll into 1-inch balls. Place on the baking sheet with space between them and freeze for at least 2-3 hours until firm. -
Step 6
Once frozen solid, transfer to an airtight container or freezer-safe bag for storage. Enjoy straight from the freezer.
Important Information
Nutrition Facts (Per Serving)
It is important to consider this information as approximate and not to use it as definitive health advice.
Allergy Information
Please check ingredients for potential allergens and consult a health professional if in doubt.