Easy Mini Cannoli Cups Recipe- Delicious Dessert
Mini Cannoli Cups are about to become your new favorite sweet treat, and for good reason! We all know and adore the classic cannoli, with its crispy shell and impossibly creamy ricotta filling. But what if I told you we could capture that magical essence in a bite-sized, fuss-free package? That’s precisely what these delightful Mini Cannoli Cups deliver. They offer all the iconic flavors and textures you crave, just in a more approachable and utterly adorable format. Imagin extracte the satisfaction of a perfectly crisp shell giving way to a luscious, subtly sweet ricotta mixture, perhaps with a hint of citrus or chocolate. These Mini Cannoli Cups are perfect for parties, dessert tables, or simply for treating yourself when a serious craving strikes. Get ready to impress yourself and everyone lucky enough to snag one of these delicious Mini Cannoli Cups!

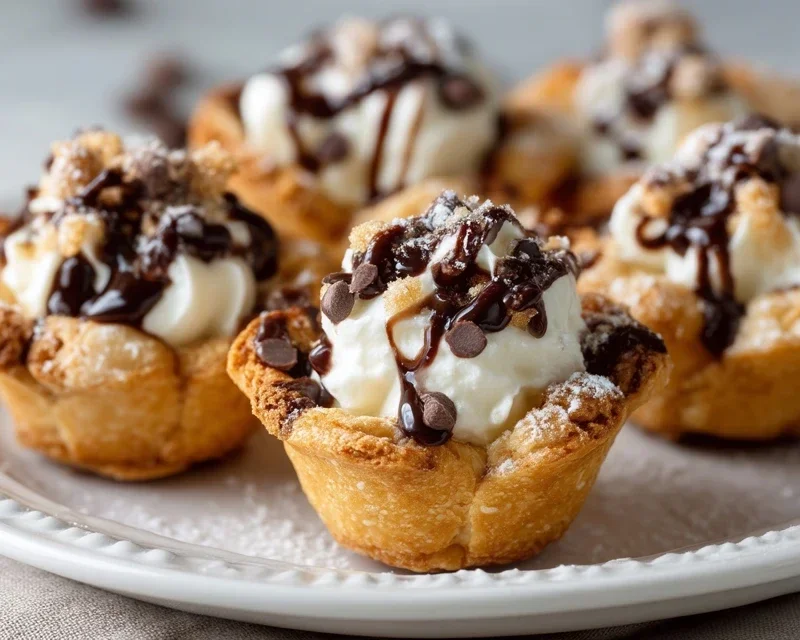
Mini Cannoli Cups
Get ready to impress your friends and family with these delightful Mini Cannoli Cups! Forget the hassle of frying cannoli shells; this recipe uses convenient refrigerated pie crusts to create perfectly shaped, golden-brown cups that are ready to be filled with a luscious, creamy ricotta filling. These mini delights are a fantastic way to enjoy all the classic flavors of cannoli without the extensive effort. They’re perfect for parties, holidays, or just a sweet treat any day of the week. Let’s dive into creating these miniature masterpieces!
Ingredients:
Preparing the Creamy Ricotta Filling
The heart of any good cannoli is its rich, sweet filling. We’ll start by preparing this first so it has a chance to chill and meld its flavors beautifully.
1. Drain the Ricotta: This is a crucial step for a perfect filling. Open your container of whole-milk ricotta cheese and drain off as much liquid as possible. You can do this by placing a fine-mesh sieve over a bowl and spooning the ricotta into it. Let it sit for at least 30 minutes, or even longer if you have the time. Pressing gently with the back of a spoon can also help release excess moisture. The drier the ricotta, the thicker and creamier your filling will be, preventing a watery result.
2. Combine Filling Ingredients: In a medium bowl, combine the drained ricotta cheese with the powdered sugar, granulated sugar, finely grated orange or lemon zest, and vanilla extract. Use a spatula or a wooden spoon to gently mix everything together until just combined and smooth. Be careful not to overmix, as this can sometimes break down the ricotta’s texture. The zest adds a wonderful bright, aromatic note that is classic in cannoli. Taste the filling and adjust the sweetness or zest if you prefer.
3. Chill the Filling: Cover the bowl with plastic wrap and refrigerate the ricotta filling for at least 30 minutes. This allows the flavors to deepen and the filling to firm up, making it easier to pipe or spoon into the baked cannoli cups.
Creating the Crispy Pie Crust Cups
Now, let’s move on to the edible vessels for our creamy filling. Using refrigerated pie crusts makes this process incredibly simple and results in perfectly formed cups.
4. Prepare the Pie Crusts: Preheat your oven to 375°F (190°C). Lightly grease a mini muffin tin or mini cupcake pan. Unroll the softened refrigerated pie crusts as directed on the box. You’ll want to work with them quickly so they don’t become sticky. Using a round cookie cutter that is slightly larger than the opening of your mini muffin tin (about 2.5 to 3 inches in diameter is usually perfect), cut out as many circles as you can from each pie crust. You should get about 12 circles per crust, so 24 in total.
5. Form and Bake the Cups: Gently press each pie crust circle into the greased cups of your mini muffin tin, pressing it up the sides to form a cup shape. You can use your fingers to gently crimp the edges if you like, or leave them smooth. Once all the cups are formed, place them in the preheated oven and bake for 10-12 minutes, or until they are lightly golden brown and slightly puffed. Keep a close eye on them, as they can brown quickly.
6. Create the Sugary Coating: While the pie crust cups are baking, prepare your turbinado sugar and cinnamon mixture. In a small, shallow dish, combine the turbinado sugar and ground cinnamon. This mixture will be used to coat the baked cups for an extra layer of flavor and texture.
7. Cool and Coat: Once the pie crust cups are baked to a beautiful golden hue, carefully remove them from the oven. Let them cool in the muffin tin for a few minutes to firm up slightly. Then, gently remove them from the tin and immediately dip the edges of each warm cup into the turbinado sugar and cinnamon mixture. The warmth of the cups will help the sugar adhere. Alternatively, you can sprinkle the mixture over the top of the cups. If you plan to fill them immediately, you can skip this step and add the sugar coating after filling, but it’s often easier and more even when done while the cups are warm. Allow the cups to cool completely on a wire rack.
Assembling Your Mini Cannoli Cups
The final step is bringin extractg it all together for that irresistible cannoli experience.
8. Fill the Cups: Once the pie crust cups are completely cooled, you can fill them. You can use a small spoon or a piping bag fitted with a round tip. Spoon or pipe the chilled ricotta filling into each cooled cannoli cup. Don’t overfill them; aim for a generous but manageable amount.
9. Add the Finishing Touches: For a classic cannoli look and taste, sprinkle the tops of the filled cups with the miniature semisweet chocolate chips or finely chopped pistachios. You can gently press them into the filling. Finally, dust the Mini Cannoli Cups generously with additional powdered sugar just before serving. This adds a beautiful finishing touch and a hint of extra sweetness.
Enjoy your homemade Mini Cannoli Cups! They are best served the same day they are filled to maintain the crispness of the pie crust.
Conclusion:
And there you have it – your guide to creating delightful Mini Cannoli Cups! This recipe is truly fantastic because it offers all the iconic flavors and textures of traditional cannoli in an incredibly manageable and adorable format. The crispy, baked shells are perfectly complemented by the creamy, sweet ricotta filling, making each bite a burst of pure joy. They’re not just easy to make, but they’re also incredibly versatile. I love serving these as a stunning dessert at parties, a charming addition to a brunch spread, or simply as a sweet treat to brighten my afternoon. The fun doesn’t stop with the basic recipe, either! Feel free to get creative with your toppings – think chopped pistachios, mini chocolate chips, colorful sprinkles, or even a dusting of cocoa powder. I wholeheartedly encourage you to give these Mini Cannoli Cups a try. You’ll be amazed at how impressive they look and taste, and the satisfaction of making them yourself is unparalleled. Happy baking!
Frequently Asked Questions:
Can I make the cannoli shells ahead of time?
Yes, you absolutely can! Baked cannoli shells can be stored in an airtight container at room temperature for up to 2-3 days. It’s best to fill them closer to serving time to maintain their crispiness.
What if I don’t have mini muffin tins?
No problem! If you don’t have mini muffin tins, you can adapt this recipe by baking the dough circles on a baking sheet and then shaping them around a cannoli form or even a dowel rod while still warm. Alternatively, you could make larger cannoli cups using a standard muffin tin, adjusting the baking time accordingly.
Can I use a different type of cheese for the filling?
While ricotta is traditional and provides the signature creamy texture and mild flavor, some people experiment with mascarpone for an even richer filling. However, ricotta is highly recommended for the most authentic Mini Cannoli Cup experience.
Mini Cannoli Cups
Delightful mini cannoli cups with a creamy ricotta filling, perfect for a sweet treat.
Ingredients
-
1 container whole-milk ricotta cheese (15 oz., drained)
-
1/2 cup powdered sugar
-
2 tablespoons granulated sugar
-
1 teaspoon finely grated orange zest
-
1/2 teaspoon vanilla extract
-
1 box refrigerated pie crusts, softened as directed on box (2 count )
-
3 tablespoons turbinado sugar (raw sugar)
-
1 teaspoon ground cinnamon
-
1/4 cup miniature semisweet chocolate chips
-
additional powdered sugar
Instructions
-
Step 1
Preheat oven to 375°F (190°C). Lightly grease muffin tins. -
Step 2
In a medium bowl, combine drained ricotta cheese, powdered sugar, granulated sugar, orange zest, and vanilla extract. Mix until well combined and smooth. Stir in chocolate chips. -
Step 3
Unroll refrigerated pie crusts. Cut out circles using a 3-inch round cutter. Press circles into prepared muffin tin cups, forming cups. -
Step 4
In a small bowl, mix turbinado sugar and cinnamon. Sprinkle a little of this mixture into the bottom of each pie crust cup. -
Step 5
Spoon or pipe the ricotta filling into each pie crust cup. -
Step 6
Bake for 10-12 minutes, or until the pie crust is golden brown and the filling is slightly set. -
Step 7
Let cool in muffin tins for a few minutes before carefully transferring to a wire rack to cool completely. -
Step 8
Dust with additional powdered sugar before serving.
Important Information
Nutrition Facts (Per Serving)
It is important to consider this information as approximate and not to use it as definitive health advice.
Allergy Information
Please check ingredients for potential allergens and consult a health professional if in doubt.