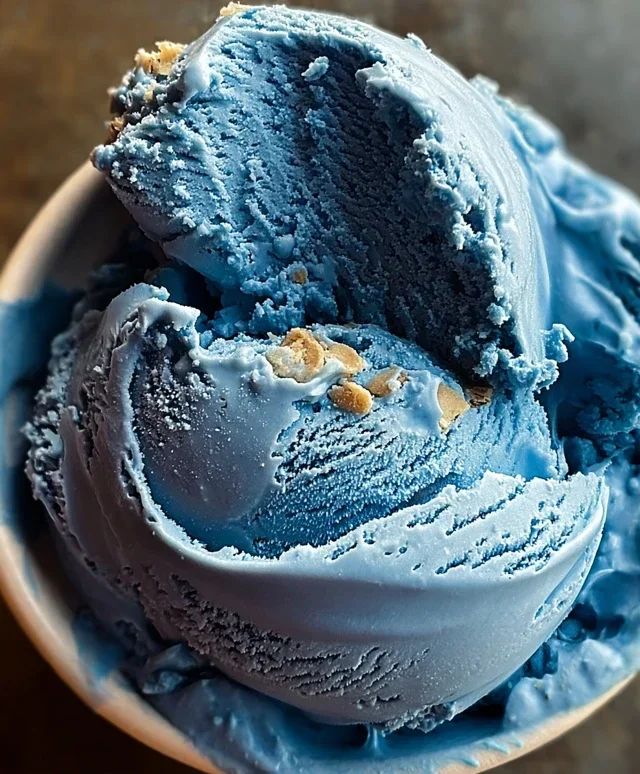
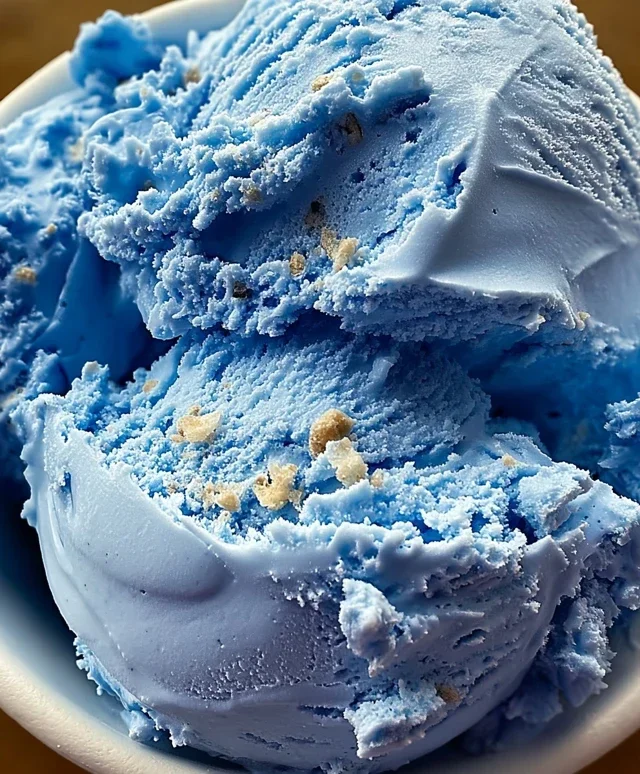
Blue Moon Ice Cream- Easy & Delicious Homemade Recipe
Blue Moon Ice Cream. It’s a flavor that sparks curiosity, ignites nostalgia, and is undeniably iconic. Have you ever wondered what that vibrant, almost otherworldly blue hue signifies? It’s more than just a pretty color; it’s a gateway to a unique taste experience that has captivated dessert lovers for generations. This isn’t your average vanilla or chocolate. Blue Moon Ice Cream boasts a mysterious and delightful flavor profile – often described as a blend of almond, citrus, and hints of vanilla or even bubblegum – a complex symphony that’s both familiar and thrillingly new with every spoonful. It’s the perfect antidote to a sweltering summer day, a whimsical treat for a birthday celebration, or simply a way to add a touch of magic to any ordinary moment. Get ready to dive into the delightfully enigmatic world of Blue Moon Ice Cream, because we’re about to uncover how to recreate this legendary scoop right in your own kitchen!
Blue Moon Ice Cream
There’s something uniquely nostalgic and whimsically delightful about Blue Moon ice cream. Its vibrant, ethereal blue hue instantly transports many of us back to childhood summers and carefree days. Unlike many ice cream flavors with a distinct fruit or chocolate base, Blue Moon’s flavor profile is a bit more enigmatic, often described as a blend of almond, vanilla, and a hint of something citrusy or floral. This recipe aims to capture that classic Blue Moon magic right in your own kitchen, bringin extractg a scoop of pure joy and vibrant color to your dessert table.
This recipe is surprisingly straightforward, even for those new to homemade ice cream. The key is patience and the right ingredients. We’ll be creating a custard-style base, which will give our Blue Moon ice cream an incredibly rich and creamy texture that store-bought varieties often struggle to replicate. So, gather your ingredients, dust off your ice cream maker, and let’s dive into creating this delightful treat.
Ingredients:
Crafting the Blue Moon Base
The foundation of any great ice cream is a well-made base. For our Blue Moon, we’ll be gently heating the milk and cream with sugar to create a smooth, sweet, and rich liquid that will churn into luscious ice cream. It’s important to use whole milk and heavy cream here, as the fat content is crucial for achieving that signature creamy texture without any icy crystals.
1. In a medium saucepan, combine the 2 cups of heavy cream and 1 cup of whole milk. Place the saucepan over medium heat. We want to warm this mixture gently, not boil it. You’ll see steam rising and small bubbles forming around the edges of the pan. Stir occasionally to ensure the sugar dissolves completely and to prevent any scorching on the bottom of the pan.
2. Once the cream and milk mixture is warm to the touch and you can see faint wisps of steam, gradually whisk in the 3/4 cup of granulated sugar. Continue whisking until the sugar is entirely dissolved. This is important for a smooth texture; undissolved sugar can lead to a gritty ice cream. Test by rubbing a little of the liquid between your fingers – it should feel smooth, not grainy.
3. Remove the saucepan from the heat. Now it’s time to infuse our base with that quintessential Blue Moon flavor. Stir in the 1 teaspoon of vanilla extract and the 1 teaspoon of almond extract. The almond extract is key to that unique, slightly nutty, and complex flavor that makes Blue Moon so distinctive. Let the mixture steep for about 10-15 minutes off the heat. This allows the flavors to meld beautifully before chilling.
4. This is where the magic truly begin extracts! Once the base has had a chance to steep, it’s time to add the color. Start by adding just a few drops of blue food coloring. Stir it in thoroughly and observe the color. Blue Moon ice cream is typically a vibrant, almost electric blue. You can add more food coloring, a drop at a time, until you achieve your desired shade. Remember that the color will lighten slightly once the ice cream is churned and frozen, so don’t be afraid to go a little bolder with the color now.
5. Now, for the crucial step of chilling the base. This is absolutely essential for proper churning. Pour the colored base into a clean bowl or container. Cover it tightly with plastic wrap, pressing the wrap directly onto the surface of the liquid to prevent a skin from forming. Refrigerate the base for at least 4 hours, or preferably overnight. The colder the base, the faster and more efficiently your ice cream maker will churn, resulting in a creamier texture.
Churning Your Blue Moon Delight
With our beautifully chilled and vibrantly colored base ready, it’s time to bring it to life in your ice cream maker. Follow the manufacturer’s instructions for your specific machine. Generally, this involves pouring the chilled base into the pre-frozen bowl of your ice cream maker and letting it churn until it reaches a soft-serve consistency. This process typically takes about 20-30 minutes.
If you’re adding chopped maraschino cherries for an extra pop of flavor and texture, now is the time to incorporate them. Add the chopped cherries during the last 5 minutes of churning. This ensures they are evenly distributed throughout the ice cream without getting pulverized by the churning blades. The sweetness and slight chegrape juicess of the cherries are a delightful addition to the creamy Blue Moon base.
Freezing for Perfect Texture
Once your ice cream has reached a soft-serve consistency, it’s time to harden it up for scooping. Transfer the churned ice cream to a freezer-safe container. If you’re using the optional maraschino cherries, give the mixture one final gentle stir to distribute them evenly. Press a piece of parchment paper or plastic wrap directly onto the surface of the ice cream to help prevent ice crystals from forming. Seal the container tightly and place it in the freezer. Allow the ice cream to freeze for at least 4-6 hours, or until firm enough to scoop. The longer it freezes, the harder it will become.
Enjoy your homemade Blue Moon ice cream! It’s perfect on its own, or as a colorful and flavorful addition to cakes and other desserts.
Conclusion:
So there you have it – your guide to creating a delightful batch of Blue Moon Ice Cream right in your own kitchen! This recipe truly shines because of its vibrant, unique flavor profile, reminiscent of a creamy, slightly fruity, and wonderfully mysterious dessert that’s a nostalgic favorite for many. It’s incredibly satisfying to whip up something so visually stunning and delicious from scratch. I truly encourage you to give this Blue Moon Ice Cream recipe a try; it’s surprisingly straightforward and the results are incredibly rewarding, offering a fun twist on traditional ice cream flavors. It’s perfect for a summer treat, a special occasion, or just when you need a splash of delightful blue in your day!
Serving suggestions are plentiful! Enjoy this Blue Moon Ice Cream on its own, in a waffle cone, or even as a base for a more elaborate dessert. Consider topping it with whipped cream, rainbow sprinkles, or even a drizzle of marshmallow fluff for an extra layer of fun. For variations, feel free to experiment with adding a touch of almond extract for a nuttier note or even swirl in some maraschino cherry juice for a subtle fruity undertone. Don’t be afraid to play around and make it your own!
Frequently Asked Questions about Blue Moon Ice Cream:
Is Blue Moon Ice Cream really blue?
Yes! The iconic blue hue is achieved through the use of food coloring, which is a key element in its distinctive appearance. The flavor itself is naturally creamy and often has subtle fruity and vanilla notes.
Can I make Blue Moon Ice Cream without an ice cream maker?
Absolutely! While an ice cream maker yields the creamiest texture, you can achieve a delicious result by using the no-churn method. This typically involves whipping cream, sweetened condensed milk, and your flavorings, then freezing and stirring periodically to break up ice crystals.
Blue Moon Ice Cream
A vibrant and creamy homemade ice cream with a unique almond and vanilla flavor, tinged with a classic blue hue. Perfect for a fun and refreshing treat.
Ingredients
-
2 cups heavy cream
-
1 cup whole milk
-
3/4 cup granulated sugar
-
1 teaspoon vanilla extract
-
1 teaspoon almond extract
-
Blue food coloring, as needed
-
1/4 cup maraschino cherries, chopped (optional)
Instructions
-
Step 1
In a large bowl, whisk together the heavy cream, whole milk, granulated sugar, vanilla extract, and almond extract until the sugar is dissolved. -
Step 2
Add blue food coloring a few drops at a time, stirring until you achieve your desired blue shade. Remember the color will lighten slightly when frozen. -
Step 3
If using, stir in the chopped maraschino cherries. -
Step 4
Pour the mixture into your ice cream maker and churn according to the manufacturer’s instructions. -
Step 5
Once churned to a soft-serve consistency, transfer the ice cream to an airtight container. -
Step 6
Freeze for at least 4 hours, or until firm, before serving.
Important Information
Nutrition Facts (Per Serving)
It is important to consider this information as approximate and not to use it as definitive health advice.
Allergy Information
Please check ingredients for potential allergens and consult a health professional if in doubt.