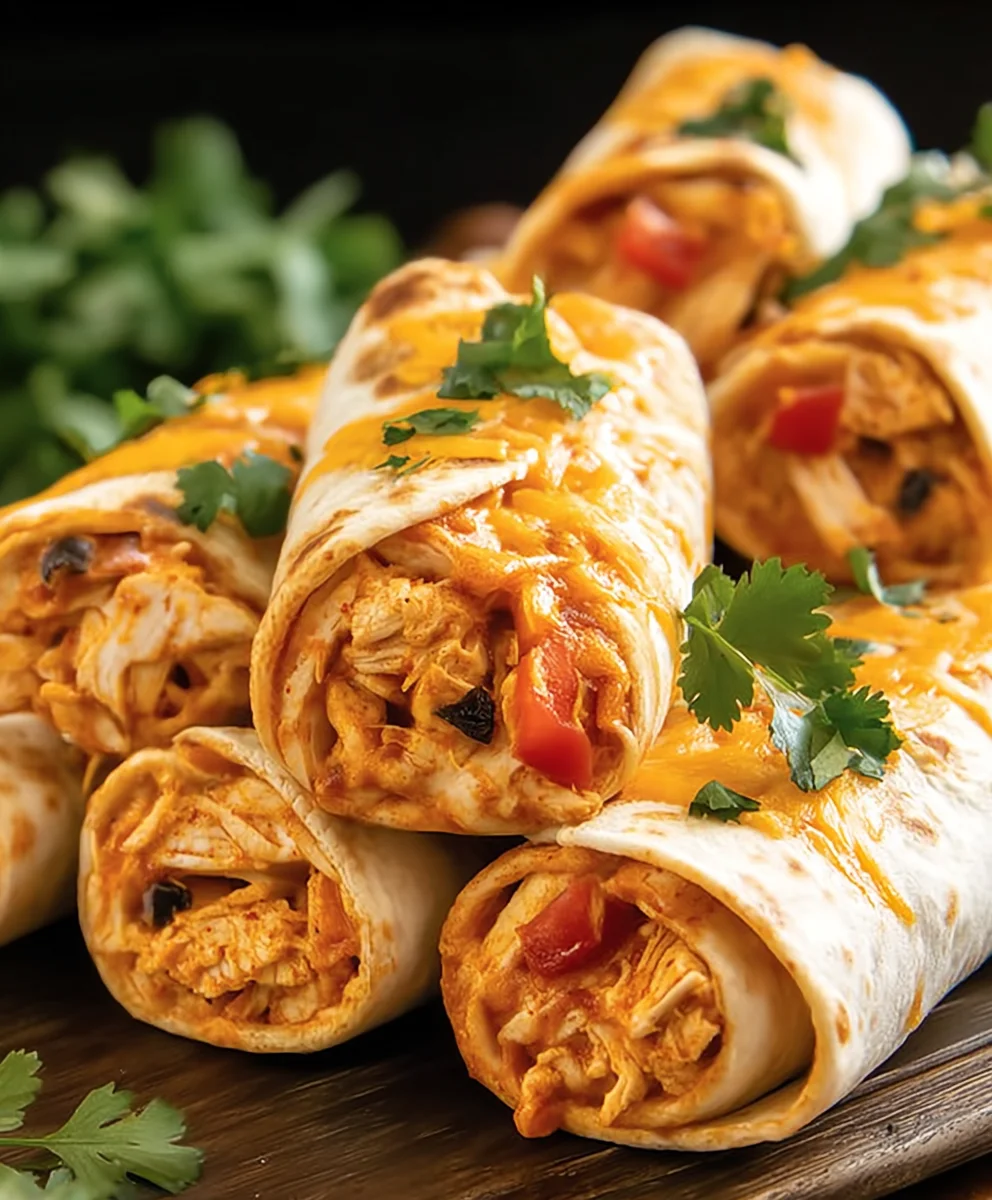
Easy Chicken Enchilada Roll Ups-Flavorful Weeknight Meal
Chicken Enchilada Roll Ups are more than just a meal; they’re a comforting embrace, a vibrant fiesta on a plate, and a weeknight savior all rolled into one. Who doesn’t adore the irresistible combination of tender chicken, melty cheese, and that signature zesty enchilada sauce? These delightful roll-ups take the beloved flavors of classic enchiladas and present them in a fun, easy-to-manage format that’s perfect for busy evenings or casual gatherings. What truly sets our Chicken Enchilada Roll Ups apart is the perfect balance of spices and the creamy texture that envelops each bite. They’re incredibly satisfying without being heavy, making them a guaranteed crowd-pleaser for both kids and adults alike. Get ready to impress your family and friends with this incredibly delicious and approachable recipe!
Why You’ll Love This Recipe
Forget the fuss of traditional enchiladas. These Chicken Enchilada Roll Ups simplify the process, making them a fantastic option even for novice cooks. The convenience factor is undeniable – each roll is a perfectly portioned flavor bomb. Plus, the customizable nature means you can adjust the spice level and fillings to suit your exact preferences. Imagin extracte the aroma filling your kitchen as these bake to golden perfection, promising a truly rewarding culinary experience. We’ve perfected the ratio of ingredients to ensure every single bite is packed with authentic, comforting enchilada goodness.
The Special Touch
What makes these Chicken Enchilada Roll Ups truly special is our secret blend of spices that elevates the humble chicken and tortilla to something extraordinary. We’ve also found that a touch of lime zest in the filling adds a bright, fresh counterpoint to the richness of the sauce and cheese. This recipe isn’t just about following steps; it’s about creating a memorable dish that brings people together. The creamy sauce, the savory filling, and the perfectly tender chicken all harmonize beautifully, creating a flavor profile that will have everyone asking for seconds.
Ingredients:
- 5 burrito-sized flour tortillas
- 1 ounce packet of taco seasoning mix
- 3 cups shredded cooked chicken
- 8 ounce package of cream cheese, softened
- 1½ cups shredded Mexican cheese or cheddar cheese
- 10 ounce can diced tomatoes with green chilies (like Rotel), drained
- 1 teaspoon minced garlic
- 4 green onions, sliced
- ½ cup chopped cilantro for garnish (optional)
Preparing the Filling
Step 1: Combine the Chicken and Seasoning
Begin extract by preparing your flavorful chicken filling. In a medium-sized bowl, combine the 3 cups of shredded cooked chicken with the entire 1 ounce packet of taco seasoning mix. Make sure the seasoning is evenly distributed throughout the chicken. This is your base for the delicious enchilada flavor. For best results, use chicken that has been cooked and shredded beforehand, perhaps rotisserie chicken for ease, or chicken breasts boiled and then pulled apart. The taco seasoning will imbue the chicken with that classic Tex-Mex taste, providing the savory foundation for our roll-ups.
Step 2: Incorporate Creamy Elements and Flavor Boosters
Next, it’s time to add the creamy richness and extra flavor. To the seasoned chicken, add the 8 ounce package of softened cream cheese. Ensure your cream cheese is truly softened; this will make it much easier to mix and prevent lumps in your filling. Following the cream cheese, stir in the 1½ cups of shredded Mexican cheese or cheddar cheese. The combination of cream cheese and shredded cheese will create a wonderfully smooth and gooey texture that binds everything together. Then, add the drained 10 ounce can of diced tomatoes with green chilies. Draining these is important to avoid making the filling too wet. Finally, stir in the 1 teaspoon of minced garlic and the sliced green onions (reserving a few for garnish if you wish). Mix everything thoroughly until all ingredients are well combined and you have a cohesive, flavorful filling. This mixture will be rich, slightly tangy from the tomatoes, and have a hint of oniony freshness.
Assembling the Chicken Enchilada Roll Ups
Step 3: Warm and Prepare the Tortillas
Now we move on to assembling the roll-ups. To make the tortillas pliable and easier to roll without tearing, it’s best to warm them slightly. You can do this in a few ways. The easiest method is to microwave them, usually 2-3 at a time, for about 20-30 seconds until they are warm and flexible. Alternatively, you can lightly warm them in a dry skillet over medium heat for about 15-20 seconds per side. Be careful not to overheat them, as they can become brittle. Once warmed, lay one tortilla flat on a clean work surface.
Step 4: Filling and Rolling the Tortillas
With a tortilla ready, it’s time to fill it. Spoon a generous portion of the prepared chicken and cheese mixture onto the center of the tortilla, spreading it evenly across about two-thirds of the surface, leaving a small border on one edge. Be careful not to overfill, as this can make rolling difficult.gin extractw, begin rolling the tortilla tightly from the edge closest to you, tucking in the sides slightly as you go to create a compact cylinder. Aim for a neat roll, like a burrito. Once rolled, you can place the seam-side down to help keep it from unraveling. Repeat this process with the remaining tortillas and filling. You should have five beautifully rolled enchilada roll-ups.
Finishing and Serving
Step 5: Baking and Garnishing
To finish our Chicken Enchilada Roll Ups, we’ll bake them to melt the cheese and warm everything through. Preheat your oven to 375 degrees Fahrenheit (190 degrees Celsius). Arrange the rolled enchiladas seam-side down in a greased baking dish, ensuring they are snug but not overly crowded. You can pour a simple enchilada sauce over the top if you desire (though this recipe focuses on the filling itself), or even a drizzle of sour cream. Place the baking dish in the preheated oven and bake for 15-20 minutes, or until the tortillas are lightly golden and the filling is hot and bubbly. Once out of the oven, allow them to rest for a minute or two. Garnish generously with the reserved sliced green onions and the ½ cup of chopped cilantro, if using. These Chicken Enchilada Roll Ups are best served immediately while they are warm and the cheese is wonderfully melted.

Conclusion:
There you have it! Our delightful Chicken Enchilada Roll Ups are ready to grace your table. We’ve walked through each step to create this flavorful and satisfying dish, perfect for weeknight dinners or casual gatherings. The creamy filling, spiced chicken, and cheesy topping combine to create a symphony of taste that’s sure to please everyone.
To serve, these roll ups are fantastic on their own, but we love pairing them with a dollop of sour cream, a sprinkle of fresh cilantro, and perhaps some sliced avocado or a side of Mexican rice and refried beans for a complete meal. Don’t be afraid to get creative with variations! You can easily swap out the chicken for shredded beef or beef, or even make them vegetarian with black beans and corn. A little extra chili powder or a dash of hot sauce can elevate the spice level if you’re feeling adventurous.
We truly hope you enjoy making and savoring these Chicken Enchilada Roll Ups as much as we do. They’re a fantastic way to bring a taste of Mexico to your home with minimal fuss. So go ahead, give them a try, and prepare for some happy sighs around the dinner table!
Frequently Asked Questions:
Can I make Chicken Enchilada Roll Ups ahead of time?
Yes, absolutely! You can assemble the roll ups and store them in the refrigerator, covered, for up to 24 hours before baking. You might need to add a few extra minutes to the baking time if they are cold from the fridge.
What kind of tortillas work best for Chicken Enchilada Roll Ups?
We recommend using corn tortillas. They tend to hold their shape better when rolled and baked. If you find they are breaking, you can briefly warm them in the microwave or on a dry skillet to make them more pliable.
How can I make these spicier?
To add more heat, consider incorporating a diced jalapeño into the chicken filling, adding a pinch of cayenne pepper to the enchilada sauce, or serving with your favorite hot sauce on the side.
Easy Chicken Enchilada Roll Ups
Flavorful and easy chicken enchilada roll-ups, perfect for a quick weeknight meal. These are filled with seasoned chicken, creamy cheeses, and a hint of spice.
Ingredients
-
5 burrito-sized flour tortillas
-
1 ounce packet of taco seasoning mix
-
3 cups shredded cooked chicken
-
8 ounce package of cream cheese, softened
-
1½ cups shredded Mexican cheese or cheddar cheese
-
10 ounce can diced tomatoes with green chilies (like Rotel), drained
-
1 teaspoon minced garlic
-
4 green onions, sliced
-
½ cup chopped cilantro for garnish (optional)
Instructions
-
Step 1
In a medium bowl, combine shredded chicken with taco seasoning mix until evenly distributed. Use pre-cooked chicken for ease, like rotisserie chicken. -
Step 2
Add softened cream cheese, shredded Mexican or cheddar cheese, drained diced tomatoes with green chilies, minced garlic, and sliced green onions to the chicken mixture. Mix thoroughly until well combined. -
Step 3
Warm tortillas briefly in the microwave (20-30 seconds) or a dry skillet (15-20 seconds per side) until pliable. Lay a warmed tortilla flat. -
Step 4
Spoon a generous portion of the filling onto the center of the tortilla, spreading it evenly over about two-thirds of the surface. Roll the tortilla tightly from the edge closest to you, tucking in the sides as you go to form a compact cylinder. Place seam-side down. -
Step 5
Repeat with remaining tortillas and filling. Preheat oven to 375°F (190°C). Arrange the roll-ups seam-side down in a greased baking dish. -
Step 6
Bake for 15-20 minutes, or until tortillas are lightly golden and the filling is hot and bubbly. Garnish with reserved sliced green onions and chopped cilantro, if using. Serve immediately.
Important Information
Nutrition Facts (Per Serving)
It is important to consider this information as approximate and not to use it as definitive health advice.
Allergy Information
Please check ingredients for potential allergens and consult a health professional if in doubt.